


Models
>
16310
16310 - Overview
Models starting with 16310
Click on the best match to narrow your results.
- 16310 (9000001-9999999 - 1979) ToroLawn Mower (Lawn Mower)
- 16310 (2000001-2999999 - 1982) ToroLawn Mower (Lawn Mower)
- 16310 (1000001-1999999 - 1981) ToroLawn Mower (Lawn Mower)
- 16310 (0000001-0999999 - 1980) ToroLawn Mower (Lawn Mower)
- 16310 ( 0000001 - 0999999 ) ToroLawn Mower (Lawnmower)
- 16310 ( 2000001 - 2999999 ) ToroLawn Mower (Lawnmower)
- 16310 ( 9000001 - 9999999 ) ToroLawn Mower (Lawnmower)
- 16310 ( 1000001 - 1999999 ) ToroLawn Mower (Lawnmower)
- 16310-1 General ElectricRange
Exact Part matches for your search term
[Viewing 1 of 1]
WATER SEAL WASHER (2 REQ'D)
This part number matches the current model number 16310
PartSelect #: PS868888
Manufacturer #: 16310
No Longer Available
Keep searches simple, eg. "belt" or "pump".

Plug-Spark
PartSelect #: PS9140427
Manufacturer #: 796112S
This part is the replacement spark plug for your engine. It measures approximately 2.5 inches by 1 inch. The spark plug creates the spark that ignites fuel in your engine during the combustion process...
$4.99
In Stock

Grommet
PartSelect #: PS9294797
Manufacturer #: 692189
This OEM grommet, also called a 90-degree breather tube, is sold individually. Black in color and made of rubber, this is a 90-degree elbow for the crankcase breather tube of your mower engine. If you...
$5.34
In Stock

Screw
PartSelect #: PS9942372
Manufacturer #: 321-10
This is a replacement screw, also known as a shear pin that is used in several pieces of outdoor power equipment. It is made of metal and is approximately 2 inches in length. It is a hex head screw an...
$3.99
In Stock

Nut-Lock, Ni
PartSelect #: PS8953555
Manufacturer #: 3296-42
This Ni Nut-Lock, or Nylock Nut, is a Silver 1/4 x 20 metal nut. Sold individually, it can be adjusted using a wrench or socket and torque wrench to the manufacturer specfications, and is used to secu...
$3.99
In Stock


Seal-Oil
PartSelect #: PS8948679
Manufacturer #: 299819S
This OEM Oil Seal is an individually sold rubber part which is attached around the axis shaft on the crankcase housing to provide a proper seal. A broken seal will lead to a leak, and the part should ...
$5.99
In Stock

Seal-O Ring
PartSelect #: PS8936675
Manufacturer #: 270344S
The O-Ring is a black rubber part, used to provide a seal between two pieces. It can be used in various locations on a variety of equipment. Installation is rate as "Easy" and will require a screw dri...
$3.99
In Stock


Washer
PartSelect #: PS8963619
Manufacturer #: 40-1940
This OEM-sourced washer in your walk-behind lawnmower provides space and protects the rear wheel from rubbing against the pivot arm assembly, ensuring smooth wheel rotation. A damaged washer may appea...
$3.99
In Stock
Common Symptoms of models starting with 16310
[Viewing 2 of 2]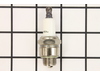
Keep searches simple. Use keywords, e.g. "leaking", "pump", "broken" or "fit".
The gasket needed to be replaced in top oven, it was brittle and broken.
We took out the philips screws on the right and left side of inside of the oven and two hex head screws on the clip on the top of the oven in the front. Then using a slot screw driver pryed the oven liner out enough to remove old gasket and replace the new gasket. We did see in some online directions that we were suppose to remove enti
... Read more
re oven from cabinet and loosen bolts in the back. But, we were able to get enough space to get the old gasket out and new one installed. We did use a 1/4" thick piece of wood on face of oven to prevent any denting of oven when prying out the liner of the oven.
Read less
Parts Used:
-
JoAnn from Auburn, WA
-
Difficulty Level:Easy
-
Total Repair Time:15 - 30 mins
-
Tools:Screw drivers
19 of 27 people
found this instruction helpful.
Was this instruction helpful to you?
Thank you for voting!
Oven Gasket Worn and Brittle
Took oven door off. Removed screws that were holding oven insert. Pulled out oven insert. Removed old gasket. Installed new gasket. Push oven insert back. Installed screws. Replaced oven door.
Parts Used:
-
Karen from Yakima, WA
-
Difficulty Level:Really Easy
-
Total Repair Time:15 - 30 mins
-
Tools:Screw drivers
7 of 7 people
found this instruction helpful.
Was this instruction helpful to you?
Thank you for voting!
Gasket around rim of oven broke while cleaning
Son-in-law unscrewed oven compartment; broken gasket was easy enough to remove and new gasket easy to replace; only problem was oven door would not shut tight. Tried shoving gasket harder into groove, tried turning on oven and heating new gasket to see if it would soften. Finally got it to close by pushing hard on left side of oven and
... Read more
inside light would at least go off and stay off.
Read less
Parts Used:
-
Dorothy from Santa Rosa, CA
-
Difficulty Level:A Bit Difficult
-
Total Repair Time:15 - 30 mins
-
Tools:Screw drivers
6 of 9 people
found this instruction helpful.
Was this instruction helpful to you?
Thank you for voting!