


Models
>
1065907890
1065907890 Kenmore Refrigerator - Overview
Sections of the 1065907890
[Viewing 1 of 1]
Keep searches simple, eg. "belt" or "pump".

Bi-Metal Defrost Thermostat
PartSelect #: PS11750673
Manufacturer #: WPW10225581
If you have ice building up in your freezer, or if your freezer is getting too warm during the defrost cycle you may need to replace the bi-metal defrost thermostat. The function of the defrost bi-met...
$46.59
In Stock

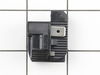
RELAY-STRT
PartSelect #: PS11770133
Manufacturer #: W10920279
This is a push-on start relay for your refrigerator. It attaches to the compressor and starts it by briefly boosting it. It will then shut off as soon as the motor is up to the required speed. You may...
$67.12
In Stock

Speed Nut
PartSelect #: PS11742700
Manufacturer #: WP486692
The speed nut (also referred to as a condenser motor fan nut), fits onto the condenser fan motor. The motor for this fan turns on simultaneously with the evaporator and the compressor motors, so a mal...
$7.59
On Order

Screw - 8-18 x 1/2
PartSelect #: PS11742751
Manufacturer #: WP489464
Sold individually.
$10.83
In Stock

Defrost Heater Assembly
PartSelect #: PS11740458
Manufacturer #: WP2323197
The defrost heater keeps the cooling coils from frosting over.
$67.96
In Stock

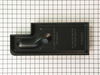
Terminal Cover
PartSelect #: PS11738947
Manufacturer #: WP2162358
This is a terminal cover for the compressor in a refrigerator. This covers the relay and overload switch on the compressor. Once you have gained access to the terminal cover, you will see that the cov...
$56.54
In Stock

Evaporator/Drain Pan
PartSelect #: PS11745971
Manufacturer #: WP842041
This tray is used to collect the access water from the cooling system to prevent water from leaking on to your floor.
$113.17
In Stock

Condenser Fan Blade
PartSelect #: PS11738272
Manufacturer #: WP1108179
This fan blade circulates air over the condenser. It mounts onto the shaft of the condenser fan motor.
No Longer Available


 – Part Number: WP2172890")

Questions And Answers for 1065907890
We're sorry, but our Q&A experts are temporarily unavailable.
Please check back later if you still haven't found the answer you need.
Common Symptoms of the 1065907890
[Viewing 12 of 12]Fridge too warm
Fixed by
these parts
these parts

Show All
Freezer not defrosting
Fixed by
these parts
these parts
Show All
Freezer section too warm
Fixed by
these parts
these parts
Show All
Will Not Start
Fixed by
these parts
these parts
Show All
Fridge and Freezer are too warm
Fixed by
these parts
these parts
Show All
Fridge too cold
Fixed by
these parts
these parts
Show All
Frost buildup
Fixed by
these parts
these parts
Show All
Freezer too cold
Fixed by
these parts
these parts
Show All
Too warm
Fixed by
these parts
these parts
Show All
Fridge runs too long
Fixed by
these parts
these parts
Show All
Clicking sound
Fixed by
these parts
these parts
Show All
Leaking
Fixed by
these parts
these parts
Show All


Keep searches simple. Use keywords, e.g. "leaking", "pump", "broken" or "fit".
Fridge was getting too warm, ice buildup on coils.
WARNING: REPLACING THIS PART REQUIRES CUTTING AND SPLICING ELECTRICAL WIRES. RISK OF ELECTRICAL SHOCK OR FIRE. DO NOT ATTEMPT THIS REPAIR IF YOU ARE NOT EXPERIENCED WITH ELECTRICAL WIRING.
Part Info:
The bi-metal strip is clipped onto the evaporator coils and is designed to regulate the defrost coil temperature. If it is n ... Read more ot functioning properly you may notice ice buildup preventing air flow (and preventing proper refrigeration), or more rarely the freezer side may get too warm during the defrost cycle.
Materials:
* Replacement bi-metal strip
* Wire cutters
* Wire strippers
* Wire nuts
* Electrical tape
* 10MM socket
Steps:
1: UNPLUG THE FRIDGE! If there is ice buildup, wait until the ice has melted. A box fan blowing at the ice will help melt it more quickly.
2: Remove the panel covering the evaporator coils. It's located inside the fridge, on the freezer side.
3: Un-clip the bi-metal strip from the evaporator coils.
4: Unplug the wires from the evaporator fan, defrost coil and bi-metal strip, then disconnect the main connector that is plugged into the rear wall.
5: Clip both wires to the old ( bad ) bi-metal strip. Cut close to the casing of the bi-metal strip so there are long wires to splice onto.
6: Strip 1/4 to 1/2 inches of insulation off of the ends of the wires ( depending on the size of the wire-nuts you use). Twist the bare wires slightly to prevent fraying.
7: Do the same for the ends of the wires on the (new) bi-metal strip.
8: Take the ends of the wires belonging to the (new) bi-metal strip and the wires coming from the main plug. Take the like-colored wires, and twist the bare metal ends together.
9: Twist on wire nuts, for both sets of wires. Make sure they are snug, with no bare wire showing.
10: Tape over the wire nuts with electrical tape. Tape over the wires nuts in a spiral fashion, completely covering the nut and both wires that are now spliced together. This will prevent accidental shorting.
11: Plug the main plug back into the rear wall of the fridge. Also re-connect the connectors to the evaporator fan and defrost coil. Make sure the clips on the connectors are snug to ensure a good connection.
12: Clip the new bi-metal strip onto the coils, in the same spot as before. ( Usually just after the small incoming copper tubing that connects to the coils, known as the expansion valve. That is usually the coldest spot on the coils during operation).
13: Replace the panel that covers the coils.
14: Plug the fridge back in... Now you fridge should defrost correctly. If it does not, your defrost coil could be burned out, or the control board could be faulty.
Read less
Parts Used:

-
Cathy from Winter Park, FL
-
Difficulty Level:A Bit Difficult
-
Total Repair Time:15 - 30 mins
-
Tools:Nutdriver
154 of 178 people
found this instruction helpful.
Was this instruction helpful to you?
Thank you for voting!
refrigerator stopped cooling, otherwise fine
Well first of all, I was afraid that the compressor was shot and I'd need a whole new refrigerator (ack $1000!!!). After googling/reading, I figured out that the starter relay mounted on the compressor was burned out. (loud click as thermal cutout shuts down compressor.) So, I ordered a replacement part, overnight shipping. Unfortunately,
... Read more
this was on a Friday night, so I had to figure out how to keep the fridge cold all weekend (til Tuesday). I'd already moved frozen stuff to a chest freezer, but the inside of the fridge compartment was now nearly warm at this point, so I got 10 lb of dry ice. That got things cooled down initially. Well, turns out that with a short piece of wire, you can momentarily jump across the terminals of the relay and kick start the compressor. It then runs until either the defrost cycle stops it or the thermostat kicks it off. Anyway, all weekend, every six hours or so, I turned off the fridge for a minute to cool down the overheated, stalled compressor, then turned it on and jumped the terminals to start it up. Kind of a pain, but saved lots of food. Overall, the $30+$30 (shipping) for the part saved me from having to get a new refrigerator, so I'm quite pleased. I've used Part Select many times now. Very fast service and shipping, great website/database. I shop around and every time end up buying from them again.
Read less
Parts Used:

-
Roger from Bethesda, MD
-
Difficulty Level:Easy
-
Total Repair Time:Less than 15 mins
-
Tools:Nutdriver, Screw drivers
48 of 58 people
found this instruction helpful.
Was this instruction helpful to you?
Thank you for voting!
Refrigerator Wasn't Cooling,Evaporater Coil Freezing Up
I have a side by side so in order to access the bi-metal switch I first had to empty out the freezer. The switch is clipped on to the top of the evaporator coil. I had to remove 8 screws to remove the back panel of the freezer compartment. The bi-metal switch was right there in plain view. There are two colored wires that come out of
... Read more
the switch. I tried pulling them out of the socket they were plugged into but gave up for fear of breaking something. I ended up cutting the wires and splicing them together. I used the plastic twist caps. I made sure when I closed everything back up that the open end of the caps were pointing down so no water can accumulate in them. It has been 3 days now and so far so good
Read less
Parts Used:
-
Robert from Doral, FL
-
Difficulty Level:Easy
-
Total Repair Time:30 - 60 mins
-
Tools:Pliers, Screw drivers
38 of 50 people
found this instruction helpful.
Was this instruction helpful to you?
Thank you for voting!