


Models
>
XRSS204BW
XRSS204BW Amana Refrigerator - Overview
Models starting with XRSS204BW
Click on the best match to narrow your results.
Keep searches simple, eg. "belt" or "pump".

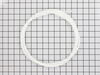
Door Closure Cam Kit
PartSelect #: PS2168612
Manufacturer #: R0181181
This door closing cam kit is intended for use on the bottom of your refrigerator and freezer door hinges. The cam helps close the doors and to lifts them slightly when opened. If your door will not op...
$11.10
In Stock

Screw, 8/18 x 3/8
PartSelect #: PS11746840
Manufacturer #: WP90767
This screw is sold individually.
$5.42
In Stock

Crisper Frame Support
PartSelect #: PS11738556
Manufacturer #: WP12603701
This genuine OEM crisper frame support provides stability to the crisper drawer in your refrigerator, preventing sagging or collapse under the weight of produce. It is typically located at the bottom ...
$8.86
In Stock

Crisper Pan - Large
PartSelect #: PS11743459
Manufacturer #: WP67001503
Sold individually.
Front Width: 16.8;
Front to Back: 14.9";
Width at Rear: 16.42.
$98.82
In Stock

Screw
PartSelect #: PS12349731
Manufacturer #: W11233072
This is a multi-use and multi-appliance screw. It can be used on a microwave, refrigerator, range/oven, air conditioner, dehumidifier, washer, or dryer. The measurements of this screw are 8 x 1/2 inch...
$20.79
In Stock

Water Tube Kit
PartSelect #: PS11730901
Manufacturer #: W10823511
This is the replacement water tube kit for your refrigerator. This tubing is made of plastic, is 1/4 inch in diameter, and comes with 2 inserts. This tube may be longer than the original tube, and may...
$36.12
In Stock

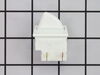
SWITCH
PartSelect #: PS12584655
Manufacturer #: W11291138
This is a light switch for your refrigerator. It activates when the door of your appliance is opened, and it will turn the light inside on and off. You will need to replace this part is if your light ...
$28.75
In Stock

Evaporator Fan Blade
PartSelect #: PS11738973
Manufacturer #: WP2169142
If your refrigerator or freezer is too warm, or making noises, you may need to replace the fan blade. The fan blade attaches to the evaporator motor, which is in the freezer section, to help circulate...
$37.20
In Stock

Shelf Support - Right Side
PartSelect #: PS11738259
Manufacturer #: WP10941102
This right side shelf support is just over an inch long. It is all white in color and it is made entirely of plastic.
No Longer Available


Ice Maker Shut-Off Arm
PartSelect #: PS11743571
Manufacturer #: WP67004028
The icemaker shut off arm, used in a refrigerator, gives the icemaker a signal to stop making ice once the bin has a reached a certain limit. This helps monitor ice production. If your icemaker is not...
$55.76
In Stock

Toe Grille Clip
PartSelect #: PS1575410
Manufacturer #: 12627302
Sold individually.
No Longer Available
Common Symptoms of models starting with XRSS204BW
[Viewing 10 of 10]Light not working
Fixed by
these parts
these parts

Show All
Leaking
Fixed by
these parts
these parts

Show All
Door won’t open or close
Fixed by
these parts
these parts

Show All
Noisy
Fixed by
these parts
these parts

Show All
Fridge too warm
Fixed by
these parts
these parts

Show All
Ice maker not making ice
Fixed by
these parts
these parts


Show All
Clicking sound
Fixed by
these parts
these parts
Show All
Door Sweating
Fixed by
these parts
these parts
Show All
Ice maker dispenses too much ice
Fixed by
these parts
these parts
Show All
Not dispensing water
Fixed by
these parts
these parts
Show All


Keep searches simple. Use keywords, e.g. "leaking", "pump", "broken" or "fit".
Door would not close
After emptying the refrig. door, I unscrewed the plate on the top of the refrigerator that covered the door bolts. Then off with the three bolts. I removed the door by lifting it up a few inches. The two parts of the door cam were easily removed and replaced with the new part. BEFORE REPLACING the door spread vasoline on both cam parts.
... Read more
(Not after as I did. The second time you do any of these repairs go SO much better :o)
After putting the door back on, adjust the tension of the screws holding the door in place if needed to align the door on the cams so that it shuts completely. Failure to do this will require taking the top off the door again. (see comment above on "... second time...")
If all is properly aligned, the door should swing completely shut.
Even with the mistakes that required removing the door to lubricate the cams, and removing it AGAIN to readjust the screws on the top to properly align the door on the cams, this was a twenty minute job. My wife and I were still speaking to one another at the end of it- a sure sign of an easy repair.
Read less
Parts Used:

-
Russ from Asheville, NC
-
Difficulty Level:Easy
-
Total Repair Time:15 - 30 mins
-
Tools:Nutdriver, Screw drivers
79 of 84 people
found this instruction helpful.
Was this instruction helpful to you?
Thank you for voting!
Leak at fill tube
Removed two screws that held cover plate. remove cover plate. Remove water hose, and clamp, by compressing clamp with pliers. Remove fill tube by pulling HARD, from back.
Replace fill tube, check to be sure that it entered ice maker properly. Replace hose and clamp.
Replace cover and screws.
Replace fill tube, check to be sure that it entered ice maker properly. Replace hose and clamp.
Replace cover and screws.
Parts Used:


-
Richard from Yarmouth, ME
-
Difficulty Level:Really Easy
-
Total Repair Time:15 - 30 mins
-
Tools:Nutdriver, Pliers
59 of 74 people
found this instruction helpful.
Was this instruction helpful to you?
Thank you for voting!
Door switch module wore out
Pull out old module...
Remove 2 wires...
Tape to inside wall [don't want them to fall down into side panel]..
Order new switch..
Fed Ex pkg came on 2nd day..
Install wires on switch...
Press into opening...
Check door light on..[OK]
.. Done
Remove 2 wires...
Tape to inside wall [don't want them to fall down into side panel]..
Order new switch..
Fed Ex pkg came on 2nd day..
Install wires on switch...
Press into opening...
Check door light on..[OK]
.. Done
Parts Used:

-
Fred from Oceanport, NJ
-
Difficulty Level:Easy
-
Total Repair Time:Less than 15 mins
-
Tools:Pliers
40 of 55 people
found this instruction helpful.
Was this instruction helpful to you?
Thank you for voting!