This an authentic OEM 40-Watt replacement light bulb, used in a number of household appliances. It is specially designed to withstand extreme temperatures, which is why these replacement bulbs are mos...
This long oven sensor is also commonly known as a temperature sensor. It is designed for use with ovens and ranges. It is similar to a thermostat; it measures and regulates the internal temperature of...
This is a replacement oven rack and it is designed for use with ranges and ovens. This is a genuine OEM replacement part. The rack provides a level and stable surface for cookware inside of your appli...
This is a multi-use and multi-appliance screw. It can be used on a microwave, refrigerator, range/oven, air conditioner, dehumidifier, washer, or dryer. The measurements of this screw are 8 x 1/2 inch...
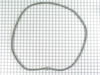
The oven door gasket on your range functions as a seal between the warm interior of your oven, and the outside. It prevents heat from fleeing your oven when the door is closed. Before making any repai...
This part is for oven ranges, it connects individual wires and protects the device from electrical surges, voltages, and current. With this part, the house power is connected to the range wire harness...
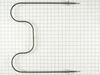
This electric oven bake element with female spade connections is 16 inches long and 19 inches wide. It has a terminal depth of three inches, making a total element length of nineteen inches.
The light cover lens in your oven is designed to protect the light bulb. If your light cover lens is damaged, you will need to replace it. This part is made of clear glass and is roughly 3 inches in d...
Ask our experts a question about this model and we'll get back to you as soon as possible!
1 question answered by our experts.
Sort by:
< Prev
1
Next >
Search filter:
Clear Filter
Your search term must have 3 or more characters.
Keep searches simple. Use keywords, e.g. "leaking", "pump", "broken" or "fit".
Sorry, we couldn't find any existing answers that matched.Try using some different or simpler keywords, or submit your new question by using the "Ask a Question" button above!
Mary
August 2, 2021
The heating element does not seem to be working correctly. It only goes up to about 80 degrees. Which part do i need?
For model number W132W
Hi Mary,
Thank you for contacting us. If either the broil or bake element is not working correctly, the issue may be with the oven sensor. The oven temperature sensor is the part that monitors the oven temperature and signals the electronic control board to turn the elements on and off. Before removing this part from the oven and testing it with a multimeter for continuity, unplug the oven from the electrical outlet. To test the sensor, you will need to reference your owner’s manual to determine what the correct reading should be for your model, as this varies from model to model. To test it for continuity, use a multimeter on the Rx1 setting and touch the terminals with the probes. This test needs to be done with the sensor at room temperature to produce accurate results. If your test results do not meet the manufacturer’s guidelines, you need a replacement temperature sensor. If the sensor is fine, you will need to check the oven elements, the electronic control board and the wiring between the parts to see which one is causing the issue. We hope this helps! If you have any questions, please let us know.
Removed the oven door by opening slightly, then pic door up to remove. Remove 2 screws holding oven sensor in place, gently pull on sensor to remove, had to remove about 8 inches to get at plastic connector. Unplug connector, had to use an adapter cable supplied with the PartSelect kit to install new sensor, push cable back into opening,
... Read morereinstall 2 screws. The oven works fine! Note that due to thermal lag the temperature overshoots to 370 degrees and undershoots to 340 degrees, this appears to be normal oven operation. Putting door back in place was easy.
First I removed the two screws that hold the element in place. I then pulled the sensor out about 3 inches and disconnected the two wires. Next, I connected new sensor and screwed the new sensor back in place. One area for caution. Make sure that the electrical connection is pushed in past the insulation on the back side of the oven. Fa
... Read moreilure to do so will cause the plastic plug connector to melt from oven heat.
Inside the oven, I removed one Phillips screw on each side where the element mounts to the back oven wall. Then disconnected the wire on each side using pliers. Unscrewed glass lens, unscrewed light bulb. Replaced all pieces in reverse order. Took less than 10 minutes.


 Diagram and Parts List for Jenn-Air Wall Oven")


 – Part Number: WP74003020")


 – Part Number: WP74003020")