


Models
>
SGR341CC0
SGR341CC0 Westinghouse Dryer - Overview
Sections of the SGR341CC0
[Viewing 7 of 7]


Manuals & Care Guides for SGR341CC0
Click to downloadInstall
Installation Instructions
(0.58MB)
Manual
Owner's Manuals
(0.48MB)
Care
Use and Care Manual
(0.06MB)
Wiring
Wiring Diagram
(0.41MB)
Keep searches simple, eg. "belt" or "pump".

Rear Drum Bearing Kit
PartSelect #: PS459829
Manufacturer #: 5303281153
This rear drum bearing kit is designed for use with dryers. It supports the rear of the drum in your appliance as it tumbles your clothes during the drying cycle. If your drum will not tumble, or if i...
$62.48
In Stock

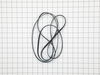
Drum Belt
PartSelect #: PS1148434
Manufacturer #: 134503600
This drum belt, often referred to as a drive belt, is used in the assembly of dryers. It goes around the drum, the idler pulley, and the motor pulley. As the armature on the motor spins, this belt is ...
$17.66
In Stock

Drum Support Bearing
PartSelect #: PS418807
Manufacturer #: 131825900
If your dryer does not tumble, will not start, is noisy, or is leaving marks on your clothing, you may need to replace the drum support bearing. The drum is supported at the rear by a bearing, which a...
$6.33
In Stock

Drum Glide - White
PartSelect #: PS5574052
Manufacturer #: 137513300
This white drum glide is used in a clothes dryer to ensure the front of the dryer drum is supported as it does rotations. *Please note: these are sold individually, however there are two of these in y...
$28.03
In Stock

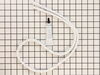
Door Catch
PartSelect #: PS418433
Manufacturer #: 131658800
The door catch on your dryer is an important part as it keeps your dryer door closed, in order to ensure no air or clothes can escape. This part works by holding the door strike, which allows the door...
$62.67
In Stock

Turn - Type Start Switch
PartSelect #: PS975832
Manufacturer #: 134398300
This part is used to start the dryer once you have selected a setting on the timer.
$58.95
In Stock

Lower Front Felt Seal with Adhesive
PartSelect #: PS832645
Manufacturer #: 5303937183
The lower front felt seal with adhesive, also known as a drum felt seal, is used in dyers and allows the drum to easily glide on the front panel. For this repair project, you will need the following t...
$19.85
In Stock

M Series Ignition Coil Kit
PartSelect #: PS470049
Manufacturer #: 5303931775
This kit contains two coils, one is a two-wire secondary coil and the other is a three-wire booster coil. Both coils in the ignition coil kit should be used together in the clothes dryer. Some of the ...
$21.45
In Stock

Timer Knob - White with Gray Grip
PartSelect #: PS2330897
Manufacturer #: 134886700
Sold individually. This knob accepts a D-shaped shaft.
$46.60
In Stock

Dryer Drum Bearing Bracket
PartSelect #: PS12579101
Manufacturer #: 131724301
This drum bearing bracket is for dryers. Drum bearing bracket holds and supports the drum bearing
$10.64
In Stock

Front Upper Felt Seal with Adhesive
PartSelect #: PS832644
Manufacturer #: 5303937182
The upper felt seal for your dryer is attached to the top edge of the drum support area, and is held there by a high temperature adhesive. It creates a seal where the dryer door opens and closes, so t...
$19.64
In Stock

Lint Filter
PartSelect #: PS417841
Manufacturer #: 131450300
Located at the front of the dryer, this lint filter traps lint and debris from the exhaust air flowing out of the dryer drum. This part measures approximately 12 inches long x 7 inches high, has a pla...
$28.51
In Stock
Questions And Answers for SGR341CC0
We're sorry, but our Q&A experts are temporarily unavailable.
Please check back later if you still haven't found the answer you need.
Common Symptoms of the SGR341CC0
[Viewing 6 of 6]Noisy
Fixed by
these parts
these parts


Show All
Door won’t close
Fixed by
these parts
these parts


Show All
Marks left on clothes
Fixed by
these parts
these parts


Show All
Drum Not Spinning
Fixed by
these parts
these parts
Show All
Not Heating
Fixed by
these parts
these parts

Show All
Too hot
Fixed by
these parts
these parts
Show All


Keep searches simple. Use keywords, e.g. "leaking", "pump", "broken" or "fit".
Loud Squeaking
1. Unplug dryer from outlet
2. Using Lg. flat screwdriver, pry under the front edge of the top and release two spring tabs
3. Lift up top and tilt back out of your way
4. Unscrew two phillips scews on inside of front panel
5. Lift up and out the front panel. Two spring clips at bottom.
6. Rlease tension on drum be ... Read more lt at the motor. Access panel at rear of dryer.
7.Unscrew 3 screws from inside, center rear of drum.
8. Remove drum through the front of the dryer. You may have to spread the sides apart a little bit for it to fit
9. Lift up on the rear drum bearing to remove it from the bearing retainer. ( U shaped plastic socket)
10. unsrew 2 screws and remove the bearing retainer, ground ball. Ball retainer is on outside of dryer.
11. Vacuum everything--duct, blower, lint trap, ect.
12. Intall new bearing retainer and grounding ball, an assistant is helpful at this time, one to hold ball retainer on rear of dryer, one to screw it in from the inside
13. reassemble remainder of parts in reverse order.
Read less
Parts Used:
-
Frank from Boyertown, PA
-
Difficulty Level:Easy
-
Total Repair Time:15 - 30 mins
-
Tools:Nutdriver, Screw drivers
333 of 349 people
found this instruction helpful.
Was this instruction helpful to you?
Thank you for voting!
Motor would hum but not turn on when start knob was turned.
The motor bearings had stiffened up – classic planned obsolescence.
I could tell the motor was bad, because when I tried to spin the drum by hand, it wouldn't turn in any direction. (Normally it can turn fairly easily.)
(Helpful hint: As you remove screws / parts, place them in a plastic baggie, and write on the ... Read more baggie from whence they came. This is especially helpful if you have to order parts and then wait a few days for them to arrive.)
You can replace the starter motor without removing the drum, but it is easier if you do remove the drum. Plus, I decided to also replace the drum belt, since it was 9 years old and is a wear part.
UNPLUG THE DRYER BEFORE YOU BEGIN.
1. Pop off the top cover; it has two spring clips at the front, then it hinges up. Disconnect the green grounding wire at the back, then slip the cover off the hinges and set it aside.
2. Remove the front panel:
a. Looking down into the dryer, disconnect the electrical harnesses that go between the front controls and the body. You may have to cut a nylon cable tie to access one or more. (Note that they have shapes that won't allow you to mix them up later). Also, there are two wires that attach to connectors in the top middle of the dryer, which are difficult to get at; you may need a needle nose pliers to pull them. Remember their color-coding for reinstallation.
b. Remove the two phillips screws located about 8 inches from the top, on either side, inside the body, that hold the front panel in place.
c. The front panel is now held in place by spring clips. Pry it gently to pop it loose. It will hinge out, then you can pull it up. Notice how the front piece has felt pads that serve to hold the front of the drum; you'll line it up the same way when it goes back together. Set the front panel aside.
3. Remove the rear motor vent plate.
a. It is at the back, lower right of the dryer (which is lower left once you're behind it). 2 phillips screws hold it in place.
b. Now look inside to see the motor and belt. Memorize how the belt feeds around the motor pulley and the larger, white plastic tensioner pulley. Notice how the rear motor bearing sits in a half-round metal plate, held down by a spring clip. (Make a drawing if you like.)
c. Move the spring- loaded tensioner arm to take tension off the belt, then slip the belt off the motor pulley.
d. Notice that the tensioner pulley, arm and spring are all held in place by the spring. Note that the tensioner pulley can slip off its shaft. Note these things for when you put it all back together later.
e. Now undo the tensioner arm spring and remove the arm, pulley and spring. Set them aside.
4. Remove the drum:
a. There is a yellowish plastic block at the top front of the open dryer body that holds the drum. Take it out with a phillips screwdriver.
b. Slip the now un-tensioned belt off the drum, to the back, so it hangs over the heater element body. You can leave it there for now, so you don't forget to install it before you put everything back together. If you're going to replace the belt, now is a good time to do so. (Check the length of the new belt against the old one, to make sure they're the same.)
c. Now you can remove the drum. It uses a center ball in a socket joint at the back to hold it in place. Use a screwdriver to lever upward on the back of the drum. This will pop the ball up, and then you can pull the drum out from the front.
5. Clean it up.
Now is a very good time to vacuum out any lint in the fan area, inside the dryer body, etc. Also consider removing the lint trap assembly from the dryer front ( 2 phillips screws) and vacuuming it out as well.
6. Remove the motor.
a. First, remove the fan that's attached to the front of the motor. Use a socket (7/8", I think) to unscrew the fan from the front of the motor shaft. IMPORTANT: The fan has a plastic hex nut sh
Read less
Parts Used:

-
Elvis from Miami, FL
-
Difficulty Level:Easy
-
Total Repair Time:More than 2 hours
-
Tools:Nutdriver, Screw drivers, Socket set
213 of 248 people
found this instruction helpful.
Was this instruction helpful to you?
Thank you for voting!
Dryer would heat initially then cool down
The top of the dryer was easily removed by prying the front up with a screwdriver then tipping it back and off of the mounting brackets. Then the front of the dryer was removed by unscrewing a single screw on each side that held the front to the side panels then pulling the front away from the dryer. Once the front was off, the coils we
... Read more
re easily accessible on the bottom left side. A metal bracket held the coils on and was somewhat tough to get the two screws removed on it as they were stuck, but once they were removed the coils easily came out and I was able to replace them in minutes. The whole job took 15-20 minutes and I now have a dryer that heats through the entire drying cycle.
Read less
Parts Used:
-
Brett from Monticello, MN
-
Difficulty Level:Easy
-
Total Repair Time:15 - 30 mins
-
Tools:Screw drivers
95 of 108 people
found this instruction helpful.
Was this instruction helpful to you?
Thank you for voting!