The Defrost Timer (Defrost control) acts like a clock by switching on the defrost heater circuit after a predetermined amount of compressor run time. This allows the defrost circuit to clear the evapo...
The crisper drawer is clear plastic and is located inside the refrigerator. It is used to store fruits and vegetables at a certain temperature to ensure food will last longer. If your drawer is cracke...
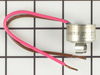
This is a bimetal defrost thermostat for your refrigerator. It stops the fridge from overheating during the defrost cycle by protecting the evaporator. This clip-on thermostat will sense the temperatu...
The door shelf retainer bar end cap connects to the retainer bar on your refrigerator’s door shelf, and attaches it to the refrigerator door. If your shelf retainer bar has become disconnected, a dama...
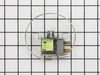
This is a 60 Hertz, 120-volt evaporator fan motor for your refrigerator. This part is located in the back of the freezer, and circulates air over the refrigerator coils. These coils will convert the h...
This genuine OEM ice maker kit is designed to fit refrigerators that did not originally come with an ice maker. This kit contains everything needed to install the new ice maker on your refrigerator in...
This touch-up paint can be used on a wide variety of household appliances. It is most often used on washers, dryer, refrigerators, dishwashers, ranges, freezers, trash compactors, or microwaves. It is...
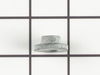
This hinge bracket, also known as a door stop, is attached to the bottom of the door and is used to limit how far the door swings out to protect the refrigerator itself, and any surrounding cabinets f...
$10.73
In Stock
Questions And Answers for RT18DKXKT08
Be the first to ask our experts a question about this model!
✖
Ask a Question
Ask our experts a question on this model and we'll respond as soon as we can.
I troubleshot the problem by reading the electrical schematic and concluding the heating elements (defrost cables) were either defective or the bi-metal temp sensor was open. When closed the temp sensor completes the circuit for the current to flow through the heaters to defrost the cooling coils every 8 hours and then when the bimetal o
... Read morepens at 55 degrees the circuit is open and the coils are cooled because the refridgeration motor is in run mode. A timer between the motor and heater elements also was defective. The timer controls the cooling period and the defrost period. I ohmed out each part according to the spec sheet of normal resistance of parts and thus the bimetal and timer were defective. I gather a surge of some duration and amplitude affected these parts because a storm 24 hours prior to refridgerator problem had passsed through the area and the AC electrical power had oscillated several times during that event. I used hand tools to do the repair. If you are not mechanically inclined a step by step proceedure would be moot. It is a matter of disassembly and assembly paying close attention to fragile parts.
First I removed the two screws that secure the guard in bottom back of the freezer and removed it . Next I removed the two screws that secure the guard on the back wall of the freezer and removed it. There are three wires connected to the motor, I unplugged those and removed the two screws that secure the motor and removed it. I swapped t
... Read morehe grommets, blade and support bracket from the old motor. I put it back together in reverse steps and its working great. My mother-in-law can,t stop thanking me ! I saved her at least $400 to buy a new fridge. Thank You, Brian Miner
My refrigerator is approximately seven years old (date of manufacture: 2001). I had come home twice in the last month to find that it had not been running for several hours (ice melted, milk spoiled, etc.) but it would start running again if I twisted the thermostat knob. So, I ordered a new thermostat. First I removed the 1/4" hex scr
... Read moreew that held the plastic thermostat housing in place (it screws up into the top of the refrigerator compartment). Then I removed the plastic thermostat knob and slid the old thermostat out of the housing. I then disconnected the wires one-by-one from the old thermostat and connected them to the new one so I could be certain they were all connected correctly. Finally, I pulled the plastic sheathing off the old sensor wire, slid it onto the new one and popped the wire back into place. Slide the thermostat back into the housing, screw the housing back into the top of the refrigerator compartment, replace the plastic thermostat knob, and the job is done.