


Models
>
LW8303L2
LW8303L2 Amana Washer - Overview
Models starting with LW8303L2
Click on the best match to narrow your results.
Keep searches simple, eg. "belt" or "pump".

Thrust Washer
PartSelect #: PS11740482
Manufacturer #: WP233520
This genuine OEM washer has a 3/4 inch outside diameter. This thrust washer can be used on most makes and models of dryers. A complete list of compatible dryers is available below. The washer is found...
$7.95
In Stock

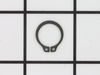
Retaining Ring
PartSelect #: PS11740487
Manufacturer #: WP23748
The metal retaining ring, which is under an inch long, holds the rear wheels on the axels of the dryer. The main reason why it would need to replaced is if the retaining ring has sprung out of place o...
$13.58
In Stock

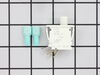
Door Switch Kit
PartSelect #: PS1964648
Manufacturer #: W10169313
This part replaces two terminal switches in a dryer and prevents the dryer from running when the door is open. This includes two connectors. If your dryer will not shut off, start, or does not tumble,...
$29.94
In Stock

Screw, 8/18 x 3/8
PartSelect #: PS11746840
Manufacturer #: WP90767
This screw is sold individually.
$5.42
In Stock

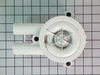
Drain Pump
PartSelect #: PS1594294
Manufacturer #: 27001233
This pump is attached to the motor and helps expel water from the washing machine. It is activated after the spin speed is maintained for a specific period of time.
No Longer Available

Hose Clamp
PartSelect #: PS11743008
Manufacturer #: WP596669
This hose clamp is used in a wide variety of household appliances. Most often it is found in washers, dishwashers, refrigerators, freezers, dehumidifiers, garbage disposals, or air conditioners. This ...
$7.76
In Stock

Screw
PartSelect #: PS12349731
Manufacturer #: W11233072
This is a multi-use and multi-appliance screw. It can be used on a microwave, refrigerator, range/oven, air conditioner, dehumidifier, washer, or dryer. The measurements of this screw are 8 x 1/2 inch...
$20.79
In Stock
 – Part Number: WP28808")
V-Style Drive Belt (32.5 inches long)
PartSelect #: PS11740616
Manufacturer #: WP28808
This v-style drive belt is thirty-two and a half inches long and half of an inch wide.
$43.27
On Order

Adjustable Leveling Leg
PartSelect #: PS2021026
Manufacturer #: 22003428
If your washer shakes or vibrates loudly when it reaches its max speed, make sure the 4 levelling legs are even. Adjust the legs so that the machine is level, and tighten the locking nuts on the legs ...
$18.47
In Stock

Hose Clamp
PartSelect #: PS11740613
Manufacturer #: WP285655
The hose clamp is used to hold the water hose in place which will prevent the hose from leaking water. Sometimes the clamp may lose its ability to latch on, causing a leaking washer. For the installat...
$11.10
In Stock

Lid Hinge Mounting Screw
PartSelect #: PS11748588
Manufacturer #: WPW10119828
Sold individually. NOTE: The color on the screw may not be the same as the image, but will still function the same.
$11.80
In Stock

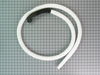
Drain Hose with Rubber Elbow
PartSelect #: PS11742254
Manufacturer #: WP40053901
This hose attaches to the pump to help remove the water out of the washer. 7 feet in length.
$55.00
In Stock
Common Symptoms of models starting with LW8303L2
[Viewing 7 of 7]Leaking
Fixed by
these parts
these parts

Show All
Noisy
Fixed by
these parts
these parts

Show All
Will not drain
Fixed by
these parts
these parts

Show All
Will not agitate
Fixed by
these parts
these parts
Show All
Burning smell
Fixed by
these parts
these parts
Show All
No hot or cold water
Fixed by
these parts
these parts

Show All
Spins slowly
Fixed by
these parts
these parts
Show All


Keep searches simple. Use keywords, e.g. "leaking", "pump", "broken" or "fit".
Switch sticking in on position
FIRST unplug dryer from electrical source, CAUTION, the top of this dryer does not open with clips, do not pry on top to open! On the front of the dryer look under the lower panel, and find two screws, one on the left side, and one on the right, remove these screws, and pull slightly down on panel to remove. Behind this panel find two s
... Read more
crews holding the door panel, one on the left, and one on the right, remove the left, and support the door panel while removing the right side. Gently pull the bottom of door panel outward, and the clips on top of door panel will unhinge from top, carefully rotate left side of door panel to floor, and note the wire connections on switch, and orientation of switch, then unplug wires, and move door panel to a comfortable working positon. Door must be open to remove switch, then depress the two plastic retaining keepers on each side of switch, and push switch through toward door. Replace with new switch, reconnect the wires, and reassymble in reverse order. Remember, door assymbly must be inserted in dryer top at an angle, and then bottom rotated downward, and bottom panel nylon guildes inserted into door panel bottom.
Read less
Parts Used:

-
Don from Jacksonville, FL
-
Difficulty Level:Really Easy
-
Total Repair Time:15 - 30 mins
-
Tools:Nutdriver
99 of 133 people
found this instruction helpful.
Was this instruction helpful to you?
Thank you for voting!
Frayed V-belt
VERY EASY!!!
SAFETY FIRST-Always unplug the appliance.
Use 8mm socket to remove front panel screws. Loosened up two hose clamps connected to the pump and removed both lines (Hoses contain water, use a towel) which is located underneath the motor. Disconnect motor electrical connector on the left side of the motor. With socket, r ... Read more emove 4 mounting bracket screws that secure the motor and pump assembly. Pull back the tension/idler pulley to loosen belt off the main pulley to the washer drum. Tilt and pull out motor/pump assembly. Underneath the pump, use star-bit to remove the pump from motor assembly to remove the belt. Install new belt on motor pulley (Good time to check for debris or anything restricing free movement of pump) and re-install pump. Install the motor/pump assembly and loosely secure the motor/pump assembly. Place the belt onto the motor pulley and pull back the tensioner/idler pulley to allow slack of belt to be placed on washer drum pulley. Put the belt on the lip of the drum pulley and rotate while pulling back the tensioner/idler pulley until the belt is seated on the groove of the drum pulley. Tighten the motor/pump assembley. Re-attach the 2 hoses and tighten down the clamps. Re-connect the electrical connector to the motor...Don't forget to plug in the washer and secure the front panel...Piece 'O cake, you're done! About 15 minutes to do the job. Much like changing a belt on most vehicles.
Read less
Parts Used:
 – Part Number: WP28808")
-
John from Milton, PA
-
Difficulty Level:Really Easy
-
Total Repair Time:15 - 30 mins
-
Tools:Nutdriver, Screw drivers
59 of 66 people
found this instruction helpful.
Was this instruction helpful to you?
Thank you for voting!
Water leaking on floor from "mysterious place underneath washer"
Water was leaking on the floor during the wash cycle and especially during draining of the washer. I removed the front panel at ground level and watched while draining after a rinse.
I t was obvious that water was spraying from a hole in the rubber end of the hose (the hose is a fused assembly of a plastic section and a rubber ... Read more section).
So, I finished draining, removed the hose (required pliers to squeeze off a hose clamp).
Upon inspecting the hose, it was also apparent that the hole was caused by rubbing against a support bracket for the motor. This should not happen, but it did because the plastic standoff supposed to keep the hose away from the bracket was installed 180 degrees backwards.
So, I simply replaced the hose and turned the bracket around to the correct orientation.
Everything worked as planned and my repair cost was much less than if I had called someone out.
Read less
Parts Used:

-
Bryan from Chicago, IL
-
Difficulty Level:Easy
-
Total Repair Time:Less than 15 mins
-
Tools:Pliers, Socket set
50 of 55 people
found this instruction helpful.
Was this instruction helpful to you?
Thank you for voting!