This filter is made of metal and is intended for use with ranges and cooktops. Grease filters are an important but often neglected part of ranges. If the filter is full, your extractor fan will become...
This bake element is for the bottom of your oven. The bake element supplies heat for baking. If you find there is little to no heat when baking, a burned out bake element, or food is taking too long t...
This long oven sensor is also commonly known as a temperature sensor. It is designed for use with ovens and ranges. It is similar to a thermostat; it measures and regulates the internal temperature of...
This is a leveling leg for your oven, range, or stove. The leveling legs on your oven allow your appliance to sit perfectly flat. The new one may be longer in length than your original, but will work...
This surface burner switch, also known as an infinite switch, controls and regulates the heat output of the burners on a stovetop. The user simply adjusts the knob on the user interface panel, which i...
This is a replacement oven rack and it is designed for use with ranges and ovens. This is a genuine OEM replacement part. The rack provides a level and stable surface for cookware inside of your appli...
This is a multi-use and multi-appliance screw. It can be used on a microwave, refrigerator, range/oven, air conditioner, dehumidifier, washer, or dryer. The measurements of this screw are 8 x 1/2 inch...
This is a radiant surface element with limiter, and it works in conjunction with your range. The function of this part is to give heat to the surface directly above it, on cooking area stove top.This ...
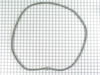
The oven door gasket on your range functions as a seal between the warm interior of your oven, and the outside. It prevents heat from fleeing your oven when the door is closed. Before making any repai...
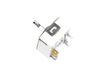
This part is for oven ranges, it connects individual wires and protects the device from electrical surges, voltages, and current. With this part, the house power is connected to the range wire harness...
Ask our experts a question about this model and we'll get back to you as soon as possible!
1 question answered by our experts.
Sort by:
< Prev
1
Next >
Search filter:
Clear Filter
Your search term must have 3 or more characters.
Keep searches simple. Use keywords, e.g. "leaking", "pump", "broken" or "fit".
Sorry, we couldn't find any existing answers that matched.Try using some different or simpler keywords, or submit your new question by using the "Ask a Question" button above!
Terry
January 10, 2020
Downdraft fan quit working. How do i fix or replace?
For model number JES9800AAQ
Good Day Terry. Thank you for your question in regards to your unit (Model Number JES9800AAQ). Based on our research, you may need to replace the Blower Motor in your unit (PartSelect Number PS11750204). Here are the steps to replace: 1). Remove power from unit. 2). Remove bottom access panel. 3) Disconnect ducting allow for downdraft blower motor removal. 4) Label and disconnect electrical connections. 5) Remove screws securing motor assembly. 6) Reverse procedure to reinstall downdraft blower motor. We hope this helps. Best Regards.
1 person found this helpful.
Was this helpful?
Thank you for voting!
< Prev
1
Next >
✖
Ask a Question
Ask our experts a question on this model and we'll respond as soon as we can.
First, I unplugged the oven. Then, I removed the two screws that hold the element in place. After that, I gently pulled the element toward the front of the oven until the wires were exposed. I disconnected the wires from the old element, removed the old element and then attached the wires to the new baking element. I gently pushed the
... Read more new element back into the screw holes and screwed the new element in place. When I plugged the oven back into the wall I heard a pop and thought I'd blown up the oven! Turns out the breaker popped...after fixing the breaker, I turned the oven on and the element worked just fine. I highly recommend PartSelect.com for their fast shipping and great products. I will be ordering from them again for future appliance parts.
Removed the oven door by opening slightly, then pic door up to remove. Remove 2 screws holding oven sensor in place, gently pull on sensor to remove, had to remove about 8 inches to get at plastic connector. Unplug connector, had to use an adapter cable supplied with the PartSelect kit to install new sensor, push cable back into opening,
... Read morereinstall 2 screws. The oven works fine! Note that due to thermal lag the temperature overshoots to 370 degrees and undershoots to 340 degrees, this appears to be normal oven operation. Putting door back in place was easy.


 Diagram and Parts List for Jenn-Air Range")