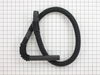
The tub dampening straps support the wash tub and reduce vibration by keeping the tub at the center of the cabinet. If your washer shakes and moves, or is making a loud banging noise during the wash c...
$9.61
In Stock
Order within the next 25 mins and your part ships today!
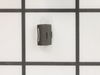
This clip ensures that the knob is securely fastened to the control shaft, allowing you to properly select the correct time and setting for your dryer. If your dryer will not start or shut off, the ti...
$9.01
In Stock
Order within the next 25 mins and your part ships today!
The drain hose is black in color and made of flexible material. This is a part for your top-load washer. The hose measures 57 inches long. This part moves the water out of the washer and into the drai...
$27.09
In Stock
Order within the next 25 mins and your part ships today!
This pump helps expel water from the washing machine and is activated after the spin speed is maintained for a specific period of time. If you notice that your washing machine will not drain, there is...
$72.45
In Stock
Order within the next 25 mins and your part ships today!
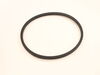
The main tub seal is located between the transmission and the outer tub. Its the primary water seal in the outer tub for the transmission-shaft. If your washer is leaking during the fill cycle, or at ...
$16.73
In Stock
Order within the next 25 mins and your part ships today!
This V-shaped drive belt is 29 1/2 inches long x 1/2-inch-wide, and fits both front-load and top-load washing machines. When belts are worn or frayed, they are known to make noise. If you have a top-l...
$14.10
In Stock
Order within the next 25 mins and your part ships today!
This is a tub bearing and it is meant to work in conjunction with your washing machine. The purpose of this part is to aid in keeping the inner tub of your washing machine spinning smoothly during a w...
$9.97
In Stock
Order within the next 25 mins and your part ships today!
This split ring is supplied by the original equipment manufacturer, and it is designed to secure the tub bearing in washing machines. It is a circular metal ring, with an outer diameter of 2 inches. T...
$14.41
In Stock
Order within the next 25 mins and your part ships today!
This tub bearing goes in your washing machine. You will find it on the bottom of the outer tub, where the transmission goes through the tub. If you hear metal on metal when the washer is spinning, you...
$27.53
In Stock
Order within the next 25 mins and your part ships today!
1. Drained the wash tub by taking the drain hose from the back of the washing machine and dropping it below the tub - water flowed out of hose a lot easier than trying to suck water out of tub using a pump (tried this on the first time I tried to fix washer). (Washing machine on 2nd floor of house and didn't want water running on floor)<
... Read morebr />2. Removed the 2 bolts holding the Pump/Motor assembly to the machine. 3. Removed both hose clamps on the Pump/Motor assembly and removed Pump. 4. Attached the new drain inlet hose to the pump and then to the tub with the original hose clamps. 5. Attached the drain hose to the pump and then plugged in the 2 wires for the pump. 6. Plugged in the washing machine and everything worked.
NOTES: 1. Hardest part was working with hose clamps (spring type clamps) in the tight space under the machine. 2. Easier to fix since I pulled machine apart a few days before - removing the clog in the pump/motor assembly only to get everything back together to find out that the motor was dead. Still well worth the time and effort due to not having to go out and buy a new Machine...
Used the spatula to release the front panel (push flat spatula under top about 2 inches from either side to release the two sprng clips holding the front panel on) to expose the tub and motor assembly. Inspected the belt and it seemed worn and a lot of rubber particles were in base of machine. Ordered the belt from partselect - received i
... Read moret two days later. Loosened 4 motor mount nuts. Removed old belt and replaced. Tightened belt and tightened nuts on motor. Only tricky part is you will need extensions for socket drive because belt is in the way for two of the motor mount nuts. I used a 1/4" small socket wrench, with an extension. No expertise needed on this one.
Aside from getting the wet clothes and most of the water out,the toughest part of the job for me was to figure out how to get inside the machine. I nearly wrecked the thing trying to lift the top panel. After some frustration I removed the star-type screws on back of the control panel and found, tucked away neatly, the documentation/parts
... Read more list complete with instructions on how to remove the FRONT panel. Once I got inside it was easy to locate the pump. I ran the drain cycle for a moment to see if the pump turned at all. The original had an exposed fan so it was easy to see that indeed the motor was not turning. I inspected all the hose and electrical connections to make sure I had the tools I'd need and the savvy to replace the part(s) if I could locate them. I'm not much of a web-head, so I was a little surprised when I typed G.E. appliances and the search took me to partselect.com where I was pretty much coached through the procedure before I even ordered the part. The box arrived ahead of schedule (yay) and when I looked at the pump it didn't look much like the one I was replacing. But then I realized it was the same thing just ten years more advanced. I used a small pair of vise grips to pinch and lock the pipe clamps open. I know there is a plier made for this, but... Anyways, after loosening the clamps and sliding them away from the pump I pulled the hoses off and let the last of the rinse water still in them run down my shirt sleeve to my elbow. (optional, not recommended) Thus refreshed I then rummaged through my socket set and found what I needed to remove the 2 sheet metal mounting screws and disconnected the 2 power leads. I removed the faulty pump and proudly showed it to my wife. Unimpressed, she asked how much longer. I quickly reversed the procedure to install the new unit and confidently piled in a load of laundry. The cycle completed just fine and has done so since. I will and have recommmended partselect.com to friends and will use it again for sure.