


Models
>
GFS185/MN00
GFS185/MN00 Caloric Refrigerator - Overview
Sections of the GFS185/MN00
[Viewing 9 of 9]


Keep searches simple, eg. "belt" or "pump".

Light Bulb - 40W
PartSelect #: PS884734
Manufacturer #: 8009
This an authentic OEM 40-Watt replacement light bulb, used in a number of household appliances. It is specially designed to withstand extreme temperatures, which is why these replacement bulbs are mos...
$11.73
In Stock

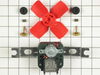
Defrost Timer
PartSelect #: PS11723171
Manufacturer #: W10822278
The Defrost Timer (Defrost control) acts like a clock by switching on the defrost heater circuit after a predetermined amount of compressor run time. This allows the defrost circuit to clear the evapo...
$34.61
In Stock

Evaporator Fan Motor Kit
PartSelect #: PS376645
Manufacturer #: 482731
The evaporator is found in the back of the freezer. This kit comes with two mounting grommets, two sleeves (not to be used on porcelain models), two #8 mounting screws, and a push-on fan blade. If you...
$74.11
In Stock


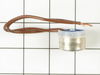
Bi-Metal Defrost Thermostat
PartSelect #: PS11742471
Manufacturer #: WP4387499
This thermostat opens at 50 degrees Farenheit and closes at 25 degrees Farenheit.
$59.18
In Stock

Cold Control Thermostat
PartSelect #: PS316579
Manufacturer #: 1123394
This cold control thermostat has a temperature range from 29.5 degrees Fahrenheit to 16.5 degrees Fahrenheit and a capillary length of 35 inches.
$127.91
In Stock

Filter Drier Tube
PartSelect #: PS11728084
Manufacturer #: W10843121
This filter dryer is for refrigerators and filters refrigerant that travels through the sealed system of the refrigerator.
$38.13
In Stock


Questions And Answers for GFS185/MN00
We're sorry, but our Q&A experts are temporarily unavailable.
Please check back later if you still haven't found the answer you need.
Common Symptoms of the GFS185/MN00
[Viewing 13 of 13]Fridge too warm
Fixed by
these parts
these parts

Show All
Freezer not defrosting
Fixed by
these parts
these parts
Show All
Noisy
Fixed by
these parts
these parts
Show All
Freezer section too warm
Fixed by
these parts
these parts
Show All
Leaking
Fixed by
these parts
these parts
Show All
Will Not Start
Fixed by
these parts
these parts
Show All
Fridge and Freezer are too warm
Fixed by
these parts
these parts
Show All
Fridge runs too long
Fixed by
these parts
these parts
Show All
Frost buildup
Fixed by
these parts
these parts
Show All
Freezer too cold
Fixed by
these parts
these parts
Show All
Fridge too cold
Fixed by
these parts
these parts
Show All
Too warm
Fixed by
these parts
these parts
Show All
Won’t start
Fixed by
these parts
these parts
Show All


Keep searches simple. Use keywords, e.g. "leaking", "pump", "broken" or "fit".
Unit very noisy and freezer too warm
First I removed the racks in the freezer. The rack supports on the sides lift off without tools. The evaporator cover is at the back of the freezer. 4 phillips head screws. The cover lifts up then forward to expose the evaporator, evaporator fan and duct. The duct is held by 3 hex head screws. The evaporator fan is attached to the duct wi
... Read more
th a wiring pigtail to a plug. Unplug the fan and remove the duct. The fan is held by 2 hexhead screws. The new fan is put in place and assembly is simply the reverse of disassembly. The unit is quiet and cools properly now. The new part fit perfectly.
Read less
Parts Used:

-
Michael from Churchville, NY
-
Difficulty Level:Easy
-
Total Repair Time:15 - 30 mins
-
Tools:Nutdriver, Screw drivers
86 of 91 people
found this instruction helpful.
Was this instruction helpful to you?
Thank you for voting!
Defrost timer was faulty. Required a mild tap to restart
Trouble shot the electrical circuit per the electrical schematic and zeroed in when I noted the Defrost Timer circuit was open. When I tapped on the bottom of the timer it began functioning normally (for a few days). Ordered a new Defrost Timer Kit and along with the installation instruction, I watched the on-line video. It was very help
... Read more
ful!!
After installation was complete, I plugged the Refrigerator into the electrical outlet and.......nothing happened! Hmmm!
Removed the Defrost Time Kit and inspected it for any damage and found none. Then I placed a flathead screwdriver to the manual advance knob and slightly rotate the gear mechanism. I heard a distance "click”. I believe the Timer was in the ‘defrost’ mode when received.
I reinstalled the timer, verified the wiring connections and this time plugged the Refrigerator into the electrical outlet and ….. it worked!!!
I unplugged the refrigerator, finished the installation per the instructions, plugged the unit in and monitored it for a few hours (just in case). That was a week ago and the Refrigerator is working like new.
The instructions were written in a manner which required re-reading a few times as they could be a bit vague. The video was what really helped and I appreciate PartSelect adding it to the instructions.
Read less
Parts Used:

-
LES from MADERA, CA
-
Difficulty Level:Really Easy
-
Total Repair Time:30 - 60 mins
-
Tools:Nutdriver, Screw drivers
66 of 72 people
found this instruction helpful.
Was this instruction helpful to you?
Thank you for voting!
Freezer Iced up, dripping water into refrigerator below
De-iced the refrigerator. Removed two screws from the thermostat panel on the upper refrigerator section. Tilted it down, removed two speed nuts holding the timer, unplugged the timer plug. Determined from the instruction sheet (easy to follow) what time delay function is used, based on wire colors, placed the jumper on the correct ter
... Read more
minal on the new timer. Plugged it in, replaced the speed nuts and screws. The timer fit perfect, works just like it is supposed to, quick easy job.
Read less
Parts Used:
-
Robert from Bradenton, FL
-
Difficulty Level:Really Easy
-
Total Repair Time:Less than 15 mins
-
Tools:Pliers, Screw drivers
61 of 72 people
found this instruction helpful.
Was this instruction helpful to you?
Thank you for voting!