


Models
>
DLE2516W
DLE2516W LG Dryer - Overview
Models starting with DLE2516W
Click on the best match to narrow your results.
Keep searches simple, eg. "belt" or "pump".

Dryer Lint Filter
PartSelect #: PS3527578
Manufacturer #: 5231EL1003B
The lint filter in your dryer is used to collect lint as it passes through the dryer vent. If you notice that your dryer is not providing enough heat, or if it takes too long to dry, you may need to r...
$50.07
In Stock

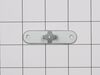
ROLLER ASSEMBLY
PartSelect #: PS12749664
Manufacturer #: 4581EL2002H
This part is sold individually. The drum support roller is found in your dryer. It is used to hold the drum in place in the cabinet while letting the drum rotate on the support rollers. It is recommen...
No Longer Available

Thermal Fuse
PartSelect #: PS3530485
Manufacturer #: 6931EL3003D
This thermal fuse acts as a high-limit thermostat, and shuts off the heating element when the dryer overheats by cutting off power to the dryer. If the thermal fuse has blown, the dryer will not start...
$24.24
In Stock

High Limit Thermostat and Thermistor Kit
PartSelect #: PS16878105
Manufacturer #: AGM30045804
This dryer thermistor temperature sensor helps monitor and regulate the temperature inside a dryer. This part includes the wire harness. If your dryer overheats, does not produce enough heat, or takes...
$89.47
In Stock

Moisture Sensor
PartSelect #: PS3529161
Manufacturer #: 6500EL3001A
The sensor controls the temperature in your dryer and will turn off once your clothes have reached the desired dryness level. If you notice that your dryer is not giving off enough heat to dry the clo...
$22.28
In Stock

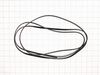
Dryer Drum Belt
PartSelect #: PS11705916
Manufacturer #: 4400EL2001F
The belt wraps the length of the dryer drum, secured by a tension pulley and then loops around the motor pulley. If you find that the drum is not turning properly or at all while your dryer is in succ...
$31.27
In Stock

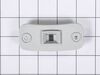
Blower Thermostat
PartSelect #: PS8747887
Manufacturer #: 6931EL3002M
The thermostat is a part for your dryer, and it is roughly 1 inch long by roughly 1.5 inches wide. The purpose of the thermostat is to measure the temperature of the air inside your dryer drum. As the...
$45.92
In Stock

Lint Filter Guide Cover
PartSelect #: PS3519694
Manufacturer #: 3550EL1006B
Located just inside the dryer door. The guide cover (or grill cover) is where the hot air circulates through the appliance. This part may crack or become damaged over time, causing clothes to get caug...
$30.68
In Stock

Heater Assembly
PartSelect #: PS3527790
Manufacturer #: 5301EL1001H
They are all strung with a coiled wire made of a nickel and a chrome alloy. This wire receives, but resists, a controlled electric current and as a result, the wire heats up. The heat produced is used...
$247.88
In Stock

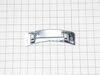
Thermostat Assembly
PartSelect #: PS3530481
Manufacturer #: 6931EL3001E
The high limit thermostat on your dyer prevents your dryer from overheating. When the dryer heats up too much, the high limit thermostat will sense it and automatically shut off the heating element. I...
$34.25
In Stock


Felt Seal
PartSelect #: PS3522851
Manufacturer #: 4036EL3001A
This genuine OEM felt gasket provides a cushioned seal between the inner tub of your electric dryer and the rear panel. It prevents your clothes from getting snagged and helps in heat retention. You w...
$33.91
In Stock
Common Symptoms of models starting with DLE2516W
[Viewing 5 of 5]Noisy
Fixed by
these parts
these parts


Show All
Door won’t close
Fixed by
these parts
these parts
Show All
Not Heating
Fixed by
these parts
these parts

Show All
Drum Not Spinning
Fixed by
these parts
these parts
Show All
Marks left on clothes
Fixed by
these parts
these parts
Show All
")


Keep searches simple. Use keywords, e.g. "leaking", "pump", "broken" or "fit".
Dryer would run with no heat
I actually went to mr fix it on u tube. Great instruction on how to take dryer apart. First I unplugged the dryer. I found I could reach the heating system by removing the lint tube in the back of the dryer. I put my I phone with the light on inside the back of the dryer and tested the connections to see if all were working. The thermal f
... Read more
use was not working. I removed the two wires , red on top and white on the bottom. Then used a small Phillips screwdriver to remove the two mounting screws and removed the fuse. I then used a vacuum to clear any lint from the back of the dryer and inside the dryer. This took me about an hour and a half. I did it this way because I did not want to disassemble the entire dryer to get to the components. I received the fuse in 3 days and tested it. It was fine. I then put it in the dryer screwed it in place, connected the wires. Replaced the lint tube. This took about 10 minutes. Dryer is running great.
Read less
Parts Used:
-
Richard from ORMOND BEACH, FL
-
Difficulty Level:Easy
-
Total Repair Time:30 - 60 mins
-
Tools:Screw drivers
63 of 70 people
found this instruction helpful.
Was this instruction helpful to you?
Thank you for voting!
Screeching during operation
Found disassembly video and watched several times. Suspected that one of the drum wheels had seized up. Found extreme volume of lint and hair inside unit as well as a dryer sheet melted on top of heating unit. Front left drum wheel was worn down from lint and hair jamming its movement. Video made it easy, not a really complicated piec
... Read more
e of machinery. Replaced all 4 wheels due to normal wear on other three. Wanted to be sure drum evenly balanced on all 4. Parts came quickly and were easy to install. My sister and I did this together. Would not recommend doing it alone. Took time to vac and wipe down entire unit. Now it runs so quiet we have to look to see if it is operating. Got a brand new machine out of it, saved a couple of hundred dollars in repair bills, and found 11 cents inside the machine. For your own piece of mind, if you have had your dryer for several years, you need to open it up and clean it out. Its not hard... added note, we are both in our 60's... so if we can do it so can you.... Such a feeling of accomplishment, can't buy that in a store....
Read less
Parts Used:
-
CAROL from NAMPA, ID
-
Difficulty Level:Really Easy
-
Total Repair Time:More than 2 hours
-
Tools:Pliers, Screw drivers
31 of 41 people
found this instruction helpful.
Was this instruction helpful to you?
Thank you for voting!
The dryer worked fine except the dryer did not heat up
I unplugged the dryer and disconnected the vent.
I pulled the dryer away from the wall so I had room to work on it.
Pulled the top cover off (slides back).
Took the door off
Took the front adjustable feet on the bottom off
Unscrewed all of the face screws on the front of the dryer
Took the two screws off of t ... Read more he back of the control panel holding the control panel to the metal frame.
Gently pulled on the control panel to reveal 4 screws under the control panel to be able to take the front cover off.
Pulled the front cover off (the dryer door front cover).
Pulled the dryer vent cover off (two screws).
I could now see the heating element with sensor/fuse (right side).
Did a continuity test (beep) on all visable sensors/fuses on the heating element. No beep on the thermal fuse (used website diagram to locate parts to test and replacement part numbers).
Got the part after about a week, tested the parted (it beeped), replaced with new part and put dryer back together, plugged in and the dryer heated. Problem solved.
Read less
Parts Used:
-
Catherine from COVINGTON, WA
-
Difficulty Level:Really Easy
-
Total Repair Time:30 - 60 mins
-
Tools:Screw drivers
16 of 18 people
found this instruction helpful.
Was this instruction helpful to you?
Thank you for voting!