This drawer slide rail is for the right side of your refrigerator. The drawer slide rail attaches horizontally to the refrigerator wall and supports the drawer so it can easily slide in and out. If th...
This is a manufacturer-approved drawer slide rail for your refrigerator. This slide rail is for the left side of the fridge. All you need to complete this repair is a Phillips screwdriver. Remove the ...
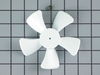
This evaporator fan motor grommet, or condenser fan grommet is built for refrigerators. It provides a cushion between the fan motor and the motor mounting bracket. It is made or round, black plastic a...
The interior light of your refrigerator is controlled by a switch that is activated when the door is opened and closed. If your refrigerator light will not turn on, there could be an issue with the sw...
This 40-Watt light bulb is sold individually and is a genuine OEM replacement option for your home appliances. It is specially designed to withstand extreme temperatures, so this bulb is compatible wi...
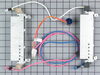
This part assembly has 2 functions: The defrost heater keeps the cooling coils from frosting over and the thermostat senses that the heat near the cooling coils has reached the desired temperature. Us...
This is a package of twelve Phillips-head screws. They can be used as replacement screws in refrigerators, ice makers, or freezers. Be sure to check that your appliance model is compatible with these ...
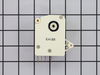
This clip on refrigerator defrost thermostat clips on to your refrigerator's evaporator. It will cut out at 60 degrees Fahrenheit and kick back in when the temperature drops to 32 degrees Fahrenheit.
$51.25
In Stock
Questions And Answers for CSX22GABCWW
Be the first to ask our experts a question about this model!
✖
Ask a Question
Ask our experts a question on this model and we'll respond as soon as we can.
Fridge was not really cold. Fan was working at back of freezer. Romoved the drawers and back panel of freezer compartment. Melted ice with a blow dryer and collected water with a towel so that it would not overflow the drip pan. Installed the new defroster units with 4 screws and the easy plug in wiring harness. Bingo! Defrost timer
... Read more was probably OK but new one is easy to do.
Fixed in one day vs waiting for service call & payng $$$.
Per the trouble shooting guide on the home page of the website. I suspected the defrost timer was bad because ice had heavily accumulated on the back wall of the freezer compartment and the temperature inside the refrigerator was warm. First, I removed all the freezer racks. Then removed the (4) screws on the back wall in the freezer c
... Read moreompartment. I then removed the ben from the ice maker to allow more room. Once I saw all the ice, I unplugged the refrigerator, and used a hair dryer to defrost ( it took about an hour to get it all). Once the ice was all gone, I then moved into the refrigerator compartment and removed the top shelve. This allowed me more room and access to the defrost timer which was behind the back panel. I used the trouble shooting guide to test the old timer prior to removing the new one from the package, (just in case I needed to send it back). Through this test I determined that the timer was bad, it wasn't the heating element or the t-stat. It was very easy to access, I removed the two knobs and lifted up the panel. I located the defrost timer and removed the screws as directed. I replaced the timer just as I had removed it, plugging in the electrical terminals per the removal process. I then reversed the order and put the panel and top shelve back on. Once all complete, I then moved back into the freezer compartment and replace the back panel and then the ice ben. I plugged it in and haven't had a problem since. This site has saved me a tremendous amount of money, a service contractor quoted us $300, to determine the problem. I ordered the part and it was sitting on our door stoop the next morning.
I applied some tips learned by reading other reviews. So before I started I grabbed my trusty vise grip pliers and a small screw driver. I locked onto the switch actuator, the part that the refrigerator door pushes in, with the vise grips and pulled on it just hard enough to get the screw driver inserted in the right side to push in the c
... Read moreatch clip so the switch could be pulled out further each time the catch clip was depressed to the next detent. Then I used the screw driver on the left site to encourage the switch past the detents on the left and very quickly the switch was out of the mount. The wires from the refrigerator pulled out with the old switch. I unplugged the old switch from the wires and plugged in the new switch and shoved the new switch back into the mount, wiggled it a couple of times to make sure it was secure and the job was done. Once I applied the vise gripes at first, the whole job took less than a minute.