


Models
>
B9458B0
B9458B0 Roper Wall Oven - Overview
Sections of the B9458B0
[Viewing 6 of 6]


Manuals & Care Guides for B9458B0
Click to downloadKeep searches simple, eg. "belt" or "pump".

Surface Burner Knob
PartSelect #: PS11741145
Manufacturer #: WP330190
This part is sold individually. The surface burner knob is black and chrome in color. It measures approximately 1-1/2 inches in diameter. The surface burner knob is for ranges and allows you to contro...
$37.33
In Stock

Temperature Sensor
PartSelect #: PS388521
Manufacturer #: 8053344
This temperature sensor is used with self cleaning ovens. Its 1000 ohm resistance increases with temperature. This sensor has male leads and comes with ceramic wire nuts.
No Longer Available

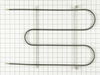
Broil Element - 240V
PartSelect #: PS11743368
Manufacturer #: WP660579
This broil element is found on the roof of the oven and has push-on terminals.
$92.14
In Stock

Hex Nut
PartSelect #: PS11738304
Manufacturer #: WP112432
This 10-32-inch hex nut works with multiple appliances in your home as a fastener. This specific model is sold individually. Hex nuts usually have 6 even sides and together they are used with bolts an...
$8.04
In Stock
 – Part Number: 328148")
Oven Light Insulation Retainer (Up. & Lo.)
PartSelect #: PS598043
Manufacturer #: 323630
No Longer Available
Questions And Answers for B9458B0
We're sorry, but our Q&A experts are temporarily unavailable.
Please check back later if you still haven't found the answer you need.
Common Symptoms of the B9458B0
[Viewing 6 of 6]Little to no heat when baking
Fixed by
these parts
these parts

Show All
Little to no heat when broiling
Fixed by
these parts
these parts
Show All
Oven is too hot
Fixed by
these parts
these parts
Show All
Element will not heat
Fixed by
these parts
these parts
Show All
Will Not Start
Fixed by
these parts
these parts
Show All
Oven not heating evenly
Fixed by
these parts
these parts
Show All
Keep searches simple. Use keywords, e.g. "leaking", "pump", "broken" or "fit".
F3 Error message
Two screws remove the front of the sensor (put a pan under the sensor to catch the screws), One nut removes the rear cover to access the rear of the sensor. Separating the two halves of wiring harness takes a little dexterity. BIG TIP! Tie a string to the back of the sensor wire and pull the sensor out from the front making sure the strin
... Read more
g still shows thru the back. If you don't you have a 15 minute job trying to fish the wires at an angle thru the insulation (a very frustrating task). Untie the string from the old and tie it securely to the new. Pull the string from the back and Voila! your new sensor can be plugged in or wirer nutted to the old connection on the back of the stove. Replace the nut and the two screws and you're done!
Read less
Parts Used:
-
Charles from Brecksville, OH
-
Difficulty Level:Easy
-
Total Repair Time:15 - 30 mins
-
Tools:Screw drivers
157 of 198 people
found this instruction helpful.
Was this instruction helpful to you?
Thank you for voting!
Burnt out broiler element
Turned off power to range because I was scared. Unscrewed broiler element, pulled part forward and pulled off wires that were attached to the back, attached wires to new element, pushed it back in place, screwed it back on to oven. Cooked my bruchette!
Parts Used:
-
Starla from Vashon, WA
-
Difficulty Level:Really Easy
-
Total Repair Time:Less than 15 mins
-
Tools:Screw drivers
19 of 20 people
found this instruction helpful.
Was this instruction helpful to you?
Thank you for voting!
My stove top is 30 years old. I was down to one knob. I looked up the part by brand and age. the pictures were accurate and the size dimensions were perfect.
Pulled off the one remaining knob, installed the new ones. One minute and the stove works perfectly.
Parts Used:
-
Mark from Albuquerque, NM
-
Difficulty Level:Really Easy
-
Total Repair Time:Less than 15 mins
12 of 12 people
found this instruction helpful.
Was this instruction helpful to you?
Thank you for voting!