


Models
>
ACF4255AC
ACF4255AC Amana Range - Overview
Models starting with ACF4255AC
Click on the best match to narrow your results.
Keep searches simple, eg. "belt" or "pump".

Light Bulb - 40W
PartSelect #: PS884734
Manufacturer #: 8009
This an authentic OEM 40-Watt replacement light bulb, used in a number of household appliances. It is specially designed to withstand extreme temperatures, which is why these replacement bulbs are mos...
$11.73
In Stock

Appliance Scraper
PartSelect #: PS408570
Manufacturer #: WA906B
Use this scraper for your ceramic/glass cooktop. It has a retractable blade and is an all-purpose tool for cooktops, mirrors, windows and tile. Use it to also remove paint, paper, dirt, stickers and more.
$10.79
In Stock

Radiant Surface Burner Element 1500W
PartSelect #: PS11764909
Manufacturer #: W10823699
This surface element is made for under glass set-ups and supplies the heat to a cooking area on top of the range. It has an outside diameter of approximately 7 inches (1500 watts), and is a genuine OE...
$106.72
In Stock

Single Hex Head Screw
PartSelect #: PS11742731
Manufacturer #: WP489069
Sold individually. The size of this screw is 1/4" hex head and 10-12 x 1/2".
$5.42
In Stock

Drawer Wheel
PartSelect #: PS2033102
Manufacturer #: 31733401
Also known as a roller.
No Longer Available

Dual Radiant Element with Limiter
PartSelect #: PS11764926
Manufacturer #: W10823726
With the dual element you are able to adjust the size of the burner you want to use to match your pots/pans.
$211.99
In Stock

Main Power Terminal Block
PartSelect #: PS11745232
Manufacturer #: WP8203546
Sold individually.
$24.59
In Stock


Surface Ribbon Element with Limiter - 8"
PartSelect #: PS11764914
Manufacturer #: W10823710
This is a 2000 watt 240 volt surface element.
$183.86
In Stock


Common Symptoms of models starting with ACF4255AC
[Viewing 2 of 2]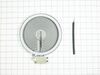


Keep searches simple. Use keywords, e.g. "leaking", "pump", "broken" or "fit".
Outer Heater ring not working on dual burner.
Turned off power to unit.
Tilted up Glass top and removed two screws holding rear hinges to range. Then I unplugged wire harness from lower range and placed the Glass top facing down on counter top with towel for cushion. Removed 1 screw holding center of burner to support frame, two alignment screws on perimeter, and two screws hol ... Read more ding support frame to glass top. This allowed me to slide out the old element with all wiring connections intact.
Placed the new assembly in same location under support frame, noting numbered positions of two alignment screws from old unit. This is necessary to properly align heater to surface glass. Replaced all screws connecting burner to frame. Then I removed each wire one-by-one from old unit, reconnecting to same location on new unit.
Replaced top in reverse order from removal. Powered on the circuit breaker and verified proper operation of dual unit with large/small selecttor switch. Total time to repair about 30 minutes.
Read less
Parts Used:

-
Mark from Richardson, TX
-
Difficulty Level:Really Easy
-
Total Repair Time:30 - 60 mins
-
Tools:Screw drivers
23 of 27 people
found this instruction helpful.
Was this instruction helpful to you?
Thank you for voting!
The burner was not heating up
I removed only 3 screws that allowed me to lift the glass top on the stove. I removed the burner and I could see where it short circuited. I ordered the new burner element. After it arrived I replaced it by moving the wires from the old element to the new element, and put it back together.
I am sure that I saved at least $200 in "lab ... Read more or".
I am sure that I saved at least $200 in "lab ... Read more or".
Read less
Parts Used:

-
Jeffrey from Miami Lakes, FL
-
Difficulty Level:Really Easy
-
Total Repair Time:Less than 15 mins
-
Tools:Pliers, Screw drivers
10 of 13 people
found this instruction helpful.
Was this instruction helpful to you?
Thank you for voting!
Inner burner of dual burner element burned out
Pulled stove out and unplugged it (energized wire at burner even with burner turned off) Removed screws to lift cook top Removed burner support brace Removed three screws to remove burner Removed connections from old burner, installed on new burner Replaced screws in burner to brace Replaced burner brace Lowered cook top and instal
... Read more
led screws Plugged in stove and pushed it into space
Read less
Parts Used:
-
Don from Red Wing, MN
-
Difficulty Level:A Bit Difficult
-
Total Repair Time:30 - 60 mins
-
Tools:Pliers, Screw drivers
8 of 9 people
found this instruction helpful.
Was this instruction helpful to you?
Thank you for voting!