


Models
>
95-1967-23-03
95-1967-23-03 Tappan Refrigerator - Overview
Sections of the 95-1967-23-03
[Viewing 6 of 6]
Keep searches simple, eg. "belt" or "pump".

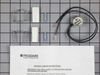
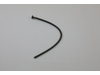
Defrost Timer - 60Hz 120V
PartSelect #: PS423801
Manufacturer #: 215846602
This Defrost Timer works like a clock by switching on the defrost heater circuit after a predetermined amount of compressor run time. This allows the defrost circuit to clear the evaporator of ice or ...
$38.64
In Stock

Light Bulb
PartSelect #: PS12751166
Manufacturer #: 316538904
This OEM 40 watt appliance light bulb is used for some ranges, refrigerators, freezers, and microwaves. Simply locate the existing bulb, unscrew it from its socket, and replace with new light bulb. If...
$19.73
In Stock

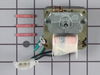
Defrost Thermostat
PartSelect #: PS469269
Manufacturer #: 5303917954
This limiter thermostat cuts out when the temperature inside your refrigerator reaches 55 degrees Fahrenheit and kicks back in when the internal temperature drops to 20 degrees Fahrenheit. If you disc...
$22.68
In Stock

Evaporator Fan Motor Kit
PartSelect #: PS450319
Manufacturer #: 5300158289
The evaporator fan motor kit is specifically made for your refrigerator to run the evaporator fan in your refrigerator. It is mounted on the center hub and has three lead wire terminals; its shaft has...
$101.85
In Stock

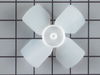
Evaporator Fan Blade
PartSelect #: PS473177
Manufacturer #: 5308000010
This evaporator fan blade is a genuine OEM part that is sourced directly from the manufacturer. The evaporator fan blade circulates air through the refrigerator to control the amount of cold air goes ...
$47.83
In Stock

Light Socket
PartSelect #: PS3655096
Manufacturer #: 218906802
The light socket on your refrigerator houses the light bulb and connects it to the power source. If you notice that your refrigerator light does not come on when you open the door, you may need to rep...
$21.98
In Stock

Hexagonal Screw
PartSelect #: PS1526503
Manufacturer #: 241710601
Sold individually.
$11.21
In Stock

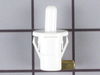
Ice Cube Tray
PartSelect #: PS423293
Manufacturer #: 215667501
The ice cube tray is made of plastic, is white in color, and is sold individually. This is a part for your freezer. The ice cube tray is sturdy but flexible to allow you to easily release the ice once...
$7.75
In Stock

Door Hinge Pin Bearing
PartSelect #: PS428213
Manufacturer #: 218519300
This white hinge pin bearing pivots the freezer and refrigerator door.
No Longer Available

Hex Head Screw
PartSelect #: PS1532376
Manufacturer #: 5304455650
Sold individually.
$12.02
In Stock

Filter - Drier
PartSelect #: PS464532
Manufacturer #: 5303305677
A filter-drier in a refrigerator has two essential functions. The first is to absorb system contaminants, such as water, which can create acids. The second is to provide physical filtration. This mean...
$12.10
In Stock

Light Switch
PartSelect #: PS461251
Manufacturer #: 5303289051
This part turns the light on/off as the door opens and closes.
$21.05
Special Order
Questions And Answers for 95-1967-23-03
We're sorry, but our Q&A experts are temporarily unavailable.
Please check back later if you still haven't found the answer you need.
Common Symptoms of the 95-1967-23-03
[Viewing 13 of 13]Fridge too warm
Fixed by
these parts
these parts

Show All
Freezer not defrosting
Fixed by
these parts
these parts
Show All
Freezer section too warm
Fixed by
these parts
these parts
Show All
Noisy
Fixed by
these parts
these parts
Show All
Light not working
Fixed by
these parts
these parts

Show All
Leaking
Fixed by
these parts
these parts
Show All
Fridge runs too long
Fixed by
these parts
these parts
Show All
Will Not Start
Fixed by
these parts
these parts
Show All
Fridge and Freezer are too warm
Fixed by
these parts
these parts
Show All
Freezer too cold
Fixed by
these parts
these parts
Show All
Fridge too cold
Fixed by
these parts
these parts
Show All
Frost buildup
Fixed by
these parts
these parts
Show All
Too warm
Fixed by
these parts
these parts
Show All


Keep searches simple. Use keywords, e.g. "leaking", "pump", "broken" or "fit".
Fridge got warm and freezer coils were frosted
Fridge is a side by side. The freezer is pretty narrow for a guy with wide shoulders.
Pulled plug.
Had to remove bottom drawers then used nut driver to remove screws closest to back wall in drawer runners. Once the back screws were removed the runners could be swung up or down out of way so back cover could be re ... Read more moved.
Once back cover was removed thermostat was located attached to top pipe going into coil using a spring clamp.
Cut the wires just outside the crimp connectors going into thermostat. Released the spring clamp buy squeezing botton together.
Removed old badly corroded thermostat.
I wish I had attached the crimp connectors to the new thermostat wires before mounting it. Reaching way in the back, while turning shoulders verticly and trying to get the wire connectors set from both sides was awkward and uncomfortable...The biggest PIA of the whole task.
Once connected I let the fridge (thermostat) cool for 10 min. Turned the dial defrost timer to get it into defrost mode. Stupidly touched the heating element to see if it was getting warm...it was very hot.
Coils steamed...every looked like it was working. Unplugged, put back cover back on and retattached drawer mounts.
Plugged back in and everying is working great!
Read less
Parts Used:
-
Stephen from Warrington, PA
-
Difficulty Level:Easy
-
Total Repair Time:30 - 60 mins
-
Tools:Nutdriver, Pliers, Screw drivers
336 of 400 people
found this instruction helpful.
Was this instruction helpful to you?
Thank you for voting!
Noisy fan
1. Removed the 7 nuts using the nut driver from the freezer back panel inside the freezer.
2. Remove the back panel. The evaporator motor and fan are located above the coils.
3. Unplug the wiring harness.
4. Remove the two gold mounting screws holding the motor and fan in place.
5. Remove the motor and fan including th ... Read more e brackets.
6. Install the new motor and fan onto the mounting bracket.
6a. Attach the green ground to the mounting bracket.
7. Screw the two gold screws back into the freezer.
8. Attach the new wiring harness. Note, the old harness had a mounting hole/space for it to connect to the wiring harness of the freezer. The new motor's harness was not long enough for this, so it is connected freely to the freezer harness.
9. Use the hair dryer to melt any ice that may have formed on the coils and hole where the fan goes.
10. Turn the freezer on to see if the fan turns on.
11. Reinstall the back panel.
All done!
Read less
Parts Used:

-
Jordan from Maumee, OH
-
Difficulty Level:Easy
-
Total Repair Time:1- 2 hours
-
Tools:Nutdriver
152 of 178 people
found this instruction helpful.
Was this instruction helpful to you?
Thank you for voting!
Side-by-side .. freezer working, fridge not cooling
My freezer was frozen but my refrigerated side was not cooling, the temp was actually around 60-degrees. After inspecting i noticed no air was flowing through the vent from freezer side to fridge side. I removed everything from freezer and took the back wall panel off inside freezer section and immedietely noticed alot of ice on coils etc
... Read more
. After researching i found the defrost timer was not working and thus allowing frost and ice to build up on coils and block air flow. My defrost timer was located on the front bottom left behind kick panel, using a phillips screwdriver i removed 2 screws and then disconnected wire harness to the defrost timer. Then i inserted new defrost timer and connected wire harness and then put the 2 screws back in. My fridge is now working great and the ice build-up is gone and i am getting good air flow .. temps on fridge side are now between 32-34degrees. This was an easy project and saved me alot of money doing myself
Read less
Parts Used:
-
Tad from Lancaster, OH
-
Difficulty Level:Easy
-
Total Repair Time:15 - 30 mins
-
Tools:Screw drivers
46 of 50 people
found this instruction helpful.
Was this instruction helpful to you?
Thank you for voting!