


Appliance Parts
- Accessories
- Dishwasher
- Dryer
- Stove / Oven
- Microwave
- Refrigerator
- Washer
- See more... See less...
Lawn Equipment Parts
- Lawn Mower
- Chainsaw
- Blower
- Generator
- Air Compressor
- Lawn Tractor
- Pressure Washer
- See more... See less...
Shop With Confidence


How to Fix A Range Or Oven That Won't Start

Click a Part Below to Start Your Repair:
Fuses Broil Element Bake Element Surface Burner Element Temperature Sensor Infinite Switch Electronic Control Board Safety Valve Oven Burner IgniterAbout this repair:
- Rated as EASY
- 4518 repair stories
- 24 step by step videos
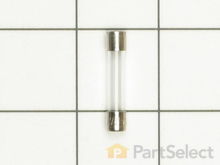
Fuses
If your oven has internal fuses, a wiring or component problem could have caused a fuse to blow. A blown fuse is an indication that a component has shorted or failed, and the problem will need to be corrected. Most ovens that use fuses will have an indication of the circuits that are affected by a particular fuse. If an oven fuse has blown, then you should inspect the oven element and the associated wiring to determine the cause before replacing the fuse. Do not change the rating of the fuses. The same will apply to a fuse labeled for a surface burner.
How to tell if your range or oven fuses are bad:
- Before beginning, ensure that you have disconnect power from the appliance by disconnecting the electricity at your circuit breaker.
- Once the power is disconnected, refer to your owner’s manual (or wiring diagram) to identify which fuse you are inspecting; most models have multiple fuses controlling different functions.
- Remove and visually inspect the fuse. When you look from the top, if you see the fusible link is intact, the fuse is good.
- If the fusible link is not intact, you will need a replacement fuse.


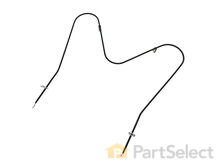
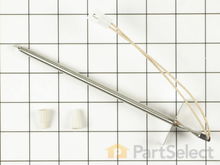
Broil Element
The broil element is the heating element that is found at the top of the oven and produces a very high heat for broiling. If the broil element isn’t working, you should first do a visual inspection for signs that the element has blistered or separated. If the element appears normal, then you can check for continuity with a multimeter.
How to test an oven broil element with a multimeter:
- Ensure that you have disconnected power from the appliance at the circuit breaker panel before beginning.
- Begin by removing the back panel and locate the terminals for the broil element and inspect the terminals and wires for signs of overheating or damage.
- To test the element, disconnect the terminals, remove the element from the range, and set your multimeter to Rx1.
- Touch the probes to the element’s terminals, you are testing for continuity and should have a reading of between 19 and 115 ohms, however, this varies from model to model. Refer to your owner’s manual to determine what your reading should be.
- If you find signs of damage on the element or if the element does not have continuity, you will need a replacement broil element.


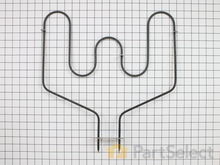
Bake Element
The bake element is the heating element that is found at the bottom of the oven. Most electric ovens use both the bake element and the broil element in a bake cycle, with the bake element performing 90 percent of the heating. If the bake element isn’t working, the oven may not heat. To help determine if the bake element is defective you should first do a visual check. If the element is blistered or separated, then it should be replaced. If the element appears to look normal, then turn the oven on to a bake function for a minute and then turn it off. Check the element for signs of heating and if it is still cold then it may be defective.
How to test an oven bake element with a multimeter:
- Before you can perform the test, you need to disconnect the power source from your appliance.
- Remove the back panel to inspect the wiring and terminals of your bake element. You are looking to see if the wires are loose or corroded, as well as for any signs of damage or wear.
- If the element appears to be fine visually, remove it from the appliance and test it for continuity with a multimeter. Set your multimeter to the Rx1 setting and touch the terminals with the probes.
- Refer to your owner’s manual for what the exact reading should be as it varies from model to model. It will fall somewhere between 19 and 115 ohms of resistance.
- If your element is damaged or no longer has continuity, you will need a replacement bake element.

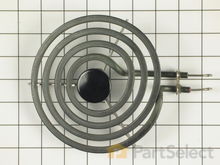
Surface Burner Element
Surface burners are typically either a coil type, solid type or a ribbon coil as used in smooth top ranges. All of these consist of a heating wire that uses electric current to produce heat. Coil type elements can be checked for continuity by removing them from the terminal block and testing them with a multimeter.
How to test a surface burner element with a multimeter:
- Before you can start testing your element, it is important that you disconnect your appliance from the power source.
- Remove and visually inspect your surface burner element for signs of wear, holes, bubbling, damage, or burning. You will need to remove the main top of your appliance in order to access the surface burner element.
- Using a multimeter on Rx1, touch the probes to the element’s terminals to test it for continuity. The exact reading you receive varies from model to model, you will need to check your owner’s manual to determine what reading you should expect. To test for a shorted element, place one probe on the outside surface and place the other on each of the terminals one at a time. If either terminal show continuity during this test, it is defective.
- If your burner is damaged, or if you do not receive the correct readings from the tests above, you will need a replacement surface burner element.


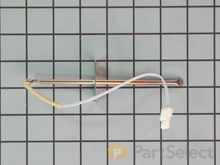
Temperature Sensor
On modern electronic control ranges, the oven temperature sensor is the part that regulates the oven temperature. If it is not working properly it could be the reason why the range or oven won’t start. Most modern ovens will display a fault code if the oven sensor is at fault.
How to test an oven’s temperature sensor with a multimeter:
- Ensure that you have disconnected the power source from your appliance before beginning.
- Locate your temperature sensor. It will likely be attached to the rear inside wall of the oven, near the top. Once you have located it, remove it in order to test it.
- Temperature sensors will give different resistance readings at different temperatures; you will need to test it at room temperature. Refer to your owner’s manual to determine what the reading of a functional temperature sensor should be for your model. Once you know this, set your multimeter to Rx1 and touch the probes to the terminals to test for continuity.
- If you receive a reading outside the recommended range, you need a replacement temperature sensor.
Infinite Switch
The infinite switch on the control panel controls the power to each surface element. If you have no heat at an element and the element and terminal block check ok, then you may have a defective infinite switch.
How to test an oven infinite switch with a multimeter:
- Before beginning this test, or any other test on an oven, verify that you have disconnected the power from your appliance.
- Infinite switches are most often found by removing the back panel. Locate and remove the infinite switch from your appliance in order to test it for continuity. You should also inspect the wires near the switch for any signs of overheated wires or faulty terminals.
- After removing the switch, set your multimeter to Rx1. You are going to be testing for continuity between the following sets of terminals: L1 & H1, L2 & H2.
- If either of the tests above don’t show continuity, you need a replacement infinite switch.


Electronic Control Board
Most modern ovens use an electronic control board to control the oven functions. These models will use the control board to operate the oven safety valve on a gas range or oven, and the bake and broil elements on an electric range or oven.
How to inspect the electronic control board in an oven or range:
- Begin by verifying that you have disconnected your appliance from the power source.
- Locate and remove the electronic control board in order to inspect it. It will most likely be located directly behind the control panel. You will likely need to remove the top panel to access it.
- Inspect your control board for any signs of burnt, shorted, or damaged contacts. You should also look for any other signs of wear or damage on the control board.
- If you find any of the symptoms described above, you may need a replacement electronic control board.


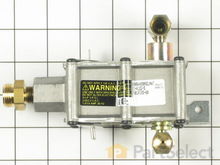
Safety Valve
The oven safety valve (also called the gas valve) is the part that ensures that gas is not released until the igniter has reached the correct temperature needed to ignite the gas. While this part can fail, it is uncommon.
How to test the safety valve in your oven with a multimeter:
- Allow your oven to completely cool before beginning and then unplug your oven/range.
- Locate your safety valve, it will likely be found near the burners and/or igniters. You will need to remove the back panel as well as heat shields in order to access the valve. Once you have found it, remove it from the appliance.
- Set your multimeter to Rx1 to test it for continuity. On some models there will be two sets of terminals: one for broil and one for bake, if your model has two sets of terminals, simply test each set individually. Using the meter’s probes, touch the terminals of the valve. Your reading should be in the 0-50 ohm range.
- If your reading is not in this range, or the test does not produce a reading, you will need a replacement safety valve.

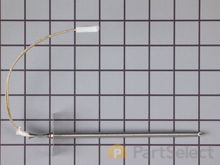
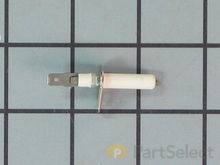
Oven Burner Igniter
The oven burner igniter commonly known as the hot surface igniter is used in modern gas oven burners to open the gas valve and to ignite the gas. As the igniter draws electric current it will heat to a high temperature and glow, as well as cause the bi metal in the oven safety valve to warp and open the valve releasing the gas to be ignited. This sequence normally takes about a minute. Igniters come in both flat and round styles and are very fragile.
How to inspect an oven burner igniter:
- After ensuring that you have disconnected the gas supply from your appliance, begin by determining if the issue is with your gas supply lines or your igniter. If you stove-top igniters are functioning normally, but your oven won’t light, then it is likely an issue with the igniter and not the gas.
- Locate the igniter in your oven. The location varies between models, but it is generally found near the oven burners. Depending on your model, you may need to remove the bottom cover of your oven to access it.
- Once you have located it, gently clean any dirt or debris off it using a toothbrush, softly blow on it when you are done. Afterward, clean the pilot hole where the gas comes out using a small needle to remove any dirt or gunk that may be blocking the gas flow.
- Inspect your igniter to see if your issue has been resolved, double check that you have disconnected the gas supply and hit the ignition button on your stove. Visually inspect to see if your igniter is sparking.
- If your igniter is not sparking, you will need a replacement oven burner igniter.


More Repair Parts
Still not sure which part is broken? We can offer you custom troubleshooting help if you search with your model number.
