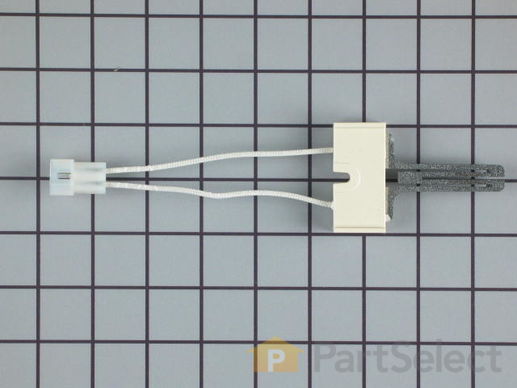
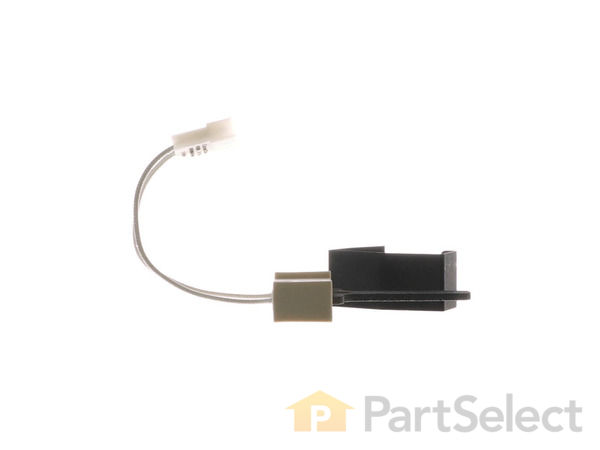
Part Location Diagram of 5303937186 Frigidaire Igniter
See part 74 in the diagram
( Grid squares measure 1x1 inch )
Customer Service Representative

Get in touch, we're here to help!

Daily 8am - 9pm EST

customerservice@partselect.com

Igniter 5303937186

 Fits your DE620EXW2!

Rated by 7 customers 

Easy 

30 - 60 mins 

Ratings submitted by customers like you who bought this part.

$ 59.49
  In Stock
Get FREE EconoShip on orders over $100! T&C apply

Get this part fast! Average delivery time for in-stock parts via standard shipping: 1.8 days.

 Fits your DE620EXW2!
PartSelect Number PS900236
Manufacturer Part Number 5303937186
Manufactured by Frigidaire
Product Description

Igniter Specifications

The burner igniter is used in dryers and activates or lights the gas burner to heat the dryer during a cycle. *Please note: Do not handle this igniter by the gray part, because it is fragile. If your dryer is producing no heat, not enough heat, or it will not start, replacing this part may be the solution. Tools required for this repair project are: putty knife, screwdriver, and wrench. Remember to unplug your appliance from the power source before beginning this installation project. Refer to the manual provided by the manufacturer for further installation instructions.
How Buying OEM Parts Can Save You Time and Money

How Buying OEM Parts Can Save You Time and Money

Troubleshooting
This part works with the following products:
Dryer, Washer Dryer Combo.
This part works with the following products:
Frigidaire, Kenmore, Kelvinator, Gibson.
Part# 5303937186 replaces these:
AP3674313, 1036069, 08001685, 08010845, 08015456, 3281151, 5303281151, 5303937186, 8001685, 8010845, 8015456, F000134211, F134211-000, F134211000, F139743-000, F139743000, G139743-000, Q000622141, Q622141, WQ622141
Back to Top
Customer Repair Stories
 Average Repair Rating: 3.6 / 5.0, 7 reviews. What's this?
Sort by:
  • 1
Sorry, we couldn't find any existing installation instruction that matched.
No heat to dry clothes.
There was a lot of screws. And I cleaned everything well. The one part was bad so I replaced them all to make sure it'll last.
Other Parts Used:
Igniter M Series Ignition Coil Kit Flame Sensor
  • James from SAGINAW, MI
  • Difficulty Level:
    Easy
  • Total Repair Time:
    30 - 60 mins
  • Tools:
    Nutdriver, Screw drivers
1 person found this instruction helpful.
Was this instruction helpful to you?
Thank you for voting!
Flame would come on and go out,and little or no heat
Unhooked power,shut off gas, pulled top cover off,two Philips screws one on each side hold the front panel in.took belt off, pulled drum,than change out, flame sensor,M coils,and igniter,be careful igniter breaks very easy,I broke my new one so had to use my old one so really the problem with no heat was either the Mcoils or the flame sensor
Other Parts Used:
Igniter Upper Drum Glide M Series Ignition Coil Kit Flame Sensor
  • Gary from Columbus, MI
  • Difficulty Level:
    Really Easy
  • Total Repair Time:
    30 - 60 mins
  • Tools:
    Screw drivers
1 person found this instruction helpful.
Was this instruction helpful to you?
Thank you for voting!
No heat
Raise the top and remove the front panel assembly. One philips screw, 24mm gas line coupler and 3 electrical connectors frees the burner assembly. Slid the old igniter out and the new one in.2 philips screws to remove the coil retainer and replace the coils.
Other Parts Used:
Igniter M Series Ignition Coil Kit
  • Matthew from JOLIET, IL
  • Difficulty Level:
    Very Easy
  • Total Repair Time:
    15 - 30 mins
  • Tools:
    Screw drivers, Wrench set
2 of 2 people found this instruction helpful.
Was this instruction helpful to you?
Thank you for voting!
dryer get hot on first start up and when up to temp it woulden get hot
because the parts were not to bad in price i canged the egnighter the coils and the thermostate, I changed the sensor and that was not the problem so after i purchest the parts mentioned above it fixed the problem
i first removed the 2 phillips screws holding the egnighter and removed the old egnighter two phillips screws and installed the new one and i removed the two philips screws holding the plate on the coils and removed the wires and installed the new coils, to the right the thermostate in the fan assembley removed tthe two phillps screws removed the wires and installed the new one reassemble the dryer and good to go I couldent beleve how fast the parts came in like the next day Thank you Parts select
Other Parts Used:
Igniter Cycling Thermostat
  • Deborah from Kensington, CT
  • Difficulty Level:
    Easy
  • Total Repair Time:
    15 - 30 mins
  • Tools:
    Nutdriver, Pliers, Screw drivers, Wrench (Adjustable)
7 of 17 people found this instruction helpful.
Was this instruction helpful to you?
Thank you for voting!
Not heat from the dryer
First of all, let me thank your wonder web site and service.


Here is the step-by-step procedure:


Unplugged the power.

Accessed the heater assembly from the front left lower corner.

Turned off the small gas valve.

Unscrewed the copper nut connecting the small gas valve and the heater assembly.

Disconnected the 3 wire connectors.

Unscrewed 2 screws under the heater assembly.

Took out the heater assembly.

Unscrewed the screw for the igniter assembly.

Installed the new igniter assembly. Be very careful with the M shaped coil. I broke a new one. That is why I have order the same part twice. But it still cost me less for hiring a tech or buying a new dryer.

Carefully put the heater assembly back into it position.

Connected the gas connector.

Secured the heater assembly to the bottom of the dryer with 2 screws.

Connected 3 wire connectors.

Turned on the small gas valve.

Plugged in and ran a test.

It worked!!.
  • Hui from Chicago, IL
  • Difficulty Level:
    Easy
  • Total Repair Time:
    15 - 30 mins
  • Tools:
    Nutdriver, Screw drivers, Wrench set
19 of 23 people found this instruction helpful.
Was this instruction helpful to you?
Thank you for voting!
My igniter seemed to be bad, but I really didn't know for sure. After asking advice from one of the subscribers at partselect, I decided to give the repair a try.
The appliance is gas, which made me a little nervous. However, knowing that I had the gas off, I carefully began disassembly. The burner unit is a very simple set up and within a few minutes I had the entire assembly out and noticed that in fact the igniter was broken. I ordered a new one from partselect.com and it was delivered in 2 days! The worst part of the assembly was when I accidentally bumped the new igniter against the underside of the dryer and broke the brand new one!!!..So, I ordered a second igniter and 2 days later installed it in about 30 minutes.
  • randall from Athens, TN
  • Difficulty Level:
    A Bit Difficult
  • Total Repair Time:
    30 - 60 mins
  • Tools:
    Nutdriver, Pliers, Screw drivers, Wrench set
4 of 8 people found this instruction helpful.
Was this instruction helpful to you?
Thank you for voting!
dryer won't stay hot, gas smell
Pulled unit out from wall to access back panel. Top needs to be removed to get to the screws that hold on the front panel and door. These need to be removed to get to the valve and burner.

Once your in, the sensor, thermostat, and igniter are right up front. Sensor and thermostat were easy, the igniter breaks very easily...how do I know? Cause I broke the one I bought and had to get a new one.

I also replaced the coil set for the gas valve, because I had read that they can go bad and cause a gas fume smell. The coils are cheap, so you may as well as do them at the same time.

Anyway, once the repair was complete, I reassembled the unit and hooked up the vent.

Runs like new, and the clothes dry quickly.
Other Parts Used:
Igniter Flame Sensor Cycling Thermostat
  • Dirk from Sonoma, CA
  • Difficulty Level:
    A Bit Difficult
  • Total Repair Time:
    30 - 60 mins
  • Tools:
    Pliers, Screw drivers
64 of 74 people found this instruction helpful.
Was this instruction helpful to you?
Thank you for voting!
  • 1
Questions and Answers

Ask our experts a question about this part and we'll get back to you as soon as possible!

1 question answered by our experts.
Sort by:
  • 1
Sorry, we couldn't find any existing answers that matched.Try using some different or simpler keywords, or submit your new question by using the "Ask a Question" button above!
Iawata
February 4, 2023
How would I test the ignitor?
For model number 417.71712511
PartSelect logo
Hello Lawata, Thank you for your inquiry. You can test the igniter with a multi meter to see if they are working correctly or not. They should be reading between 0 - 1100 ohms to be working correctly. If you are unfamiliar with how a multimeter functions, we have videos available to assist you. We hope this helps with your repair.

Was this helpful?
Thank you for voting!
  • 1
You May Also Need ?
Model Cross Reference
This part works with the following models:
PartSelect Number: PS900236
Manufacturer Part Number: 5303937186
Brand
Model Number
Description
Kenmore
41759012890
Dryer - Kemore Dryer 41759012890
Frigidaire
41759022890
Dryer - Gas
Kenmore
41779042900
Dryer - Kenmore Dryer Model 417.79042900 (41779042900, 417 79042900) Parts
Kenmore
41779042990
Dryer
Kenmore
41779042991
Dryer
Kenmore
41779052990
Dryer
Kenmore
41779052991
Dryer
Kenmore
41788980100
Dryer - Kenmore Dryer Model 417.88980100 (41788980100, 417 88980100) Parts
Kenmore
41788989100
Dryer
Kenmore
41788989800
Dryer
Kenmore
41790032990
Dryer
Kenmore
41790042990
Dryer
Kenmore
41790042991
Dryer
Kenmore
41790052990
Dryer
Kenmore
41790052991
Dryer
Kenmore
41790142000
Dryer
Kenmore
41790862990
Washer Dryer Combo
Kenmore
41790862991
Washer Dryer Combo
Kenmore
41790862992
Washer Dryer Combo
Kenmore
41790872990
Washer Dryer Combo
Kenmore
41790872991
Washer Dryer Combo
Kenmore
41790872992
Washer Dryer Combo
Kenmore
41791042000
Dryer
Kenmore
41791042001
Dryer
Kenmore
41791052000
Dryer
Kenmore
41791052001
Dryer
Kenmore
41791142000
Dryer
Kenmore
41791142001
Dryer
Kenmore
41792042100
Dryer
Kenmore
41792042101
Dryer
Customer Service Representative

Get in touch, we're here to help!

Daily 8am - 9pm EST

Contact Customer Service