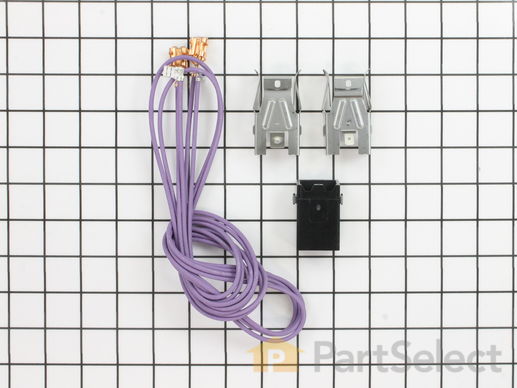
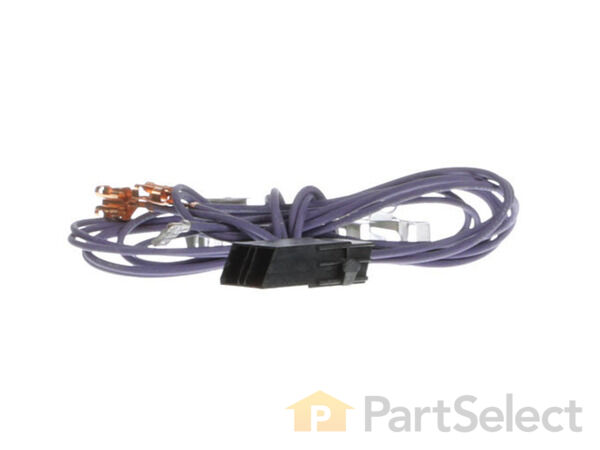
Part Location Diagram of WB17T10006 GE Surface Burner Terminal Block Kit
See part 961 in the diagram
Replacing your General Electric Range Surface Burner Terminal Block Kit
( Grid squares measure 1x1 inch )
Customer Service Representative

Get in touch, we're here to help!

Daily 8am - 9pm EST

customerservice@partselect.com

Surface Burner Terminal Block Kit WB17T10006

 Fits your RB740BH2CT!
★★★★★
★★★★★
25 Reviews

Rated by 20 customers 

Really Easy 

30 - 60 mins 

Ratings submitted by customers like you who bought this part.

$ 24.52
  In Stock
Get FREE EconoShip on orders over $100! T&C apply

Get this part fast! Average delivery time for in-stock parts via standard shipping: 1.8 days.

 Fits your RB740BH2CT!
PartSelect Number PS783534
Manufacturer Part Number WB17T10006
Manufactured by GE
Product Description

Surface Burner Terminal Block Kit Specifications

This kit includes the female contact with wires, terminal block and mounting clip.
How Buying OEM Parts Can Save You Time and Money

How Buying OEM Parts Can Save You Time and Money

Part Videos

Replacing your General Electric Range Surface Burner Terminal Block Kit

Replacing your General Electric Range Surface Burner Terminal Block Kit
Troubleshooting
This part fixes the following symptoms:
Element will not heat | Will Not Start
This part works with the following products:
Range.
This part works with the following products:
General Electric, Kenmore, Hotpoint.
Part# WB17T10006 replaces these:
AP3203326, 1038747, WB17T10006, WB17K10003, WB17T10001, WB17X10007
Back to Top
Customer Reviews
Average Rating:
★★★★★
★★★★★
25 Reviews
4.8
Filter By Rating:
  • 5 Stars
    21
  • 4 Stars
    3
  • 3 Stars
    0
  • 2 Stars
    1
  • 1 Star
    0
Sort by:
  • 1
  • 2
  • 3
Sorry, we couldn't find any existing reviews that matched. Try using some different or simpler keywords.
  • 1
  • 2
  • 3
Customer Repair Stories
 Average Repair Rating: 4.0 / 5.0, 20 reviews. What's this?
Sort by:
  • 1
  • 2
Sorry, we couldn't find any existing installation instruction that matched.
Terminal block connectors worn out wasn’t making a good connection with the stove top burner
Cut 4 inch’s off the new terminal block wires then using my wire strippers stripped 1/2 inch off the ends , the old terminal block wires I stripped 1/2 inch at the ends using a wire nuts on both wires and electrical tape connected the terminal block to the stove plugged the new burner in and the burner worked 100%.
  • Lance from HAHIRA, GA
  • Difficulty Level:
    Really Easy
  • Total Repair Time:
    30 - 60 mins
  • Tools:
    Nutdriver
2 of 2 people found this instruction helpful.
Was this instruction helpful to you?
Thank you for voting!
It was burned out
I just follow Steve's Installation Vidio. My range works.
Thanks Steve
  • lan from SANTA CLARA, CA
  • Difficulty Level:
    Really Easy
  • Total Repair Time:
    Less than 15 mins
  • Tools:
    Socket set
1 person found this instruction helpful.
Was this instruction helpful to you?
Thank you for voting!
My front big burner on My stove had stopped working.
I went online and and saw a man on Utube that had the same problem with His stove and He had His video showing how to fix it so I ordered the part from Parts Select using My model number from My stove and took the old broken part off and installed My new part all by Myself. It has been working great and I am so glad to have it working again.
Other Parts Used:
Receptacle Clip Surface Burner Terminal Block Kit
  • Bobbie from RICHMOND, KY
  • Difficulty Level:
    Easy
  • Total Repair Time:
    30 - 60 mins
  • Tools:
    Nutdriver, Pliers, Screw drivers, Socket set
1 of 2 people found this instruction helpful.
Was this instruction helpful to you?
Thank you for voting!
on off switch smoked and smelled hot
standard procedure, very simple
  • john from MILROY, PA
  • Difficulty Level:
    Really Easy
  • Total Repair Time:
    15 - 30 mins
  • Tools:
    Pliers, Screw drivers
1 person found this instruction helpful.
Was this instruction helpful to you?
Thank you for voting!
ONE OF SURFACE BURNER NOT WORKING
I UNPLUGGED THE WIRE, ASSEMBLE THE BURNER ELEMENT KITS
LIFTED UP THE SURFACE BURNER PANEL,
OPENED THE BACK RANGE COVER,
UNSCREW THE NUT HOLDING THE BURNER CONNECTOR, DISCONNECT THE REPLACEMENT WIRES ON THE BACK PANEL
TRACE THE NEW WIRES CLIPS TO THE BACK PANEL & TIGHTEN THEM WITH EXISTING NUTS
SCREW THE OTHER ENDS BACK WITH NUT HOLDING THE BURNER CONNECTOR
  • QUANG from LANCASTER, PA
  • Difficulty Level:
    Really Easy
  • Total Repair Time:
    30 - 60 mins
  • Tools:
    Nutdriver
1 person found this instruction helpful.
Was this instruction helpful to you?
Thank you for voting!
Two blocks kept shorting out.
After watching the video and ordering the parts and searching for the right size socket (which took most of the time) and finding medical tape as I had no electrical tape I took of the back unhooked the terminals and following the wires to determine which ones needed to be replaced I followed the video instructions on reverse as my son had spliced new terminal blocks into the old wires I taped each new wire to the one it was replacing and pulled it through the back of the stove and into the front attached the new wires to the new block and pushed the clips on the other end of the wires to the knob boxes. I rolled up the excess wire and taped it securely with medical tape so it wouldn't unravel and be in the way when I reattached the back shield on the stove. After I repeated the process for the second terminal (I had two that kept shorting out) I reassembled the stove plugged it back into the wall and used both burners that night to cook dinner! I have had no problems with those burners since then. Really if you watch the video first and follow the instructions you should have no problems. It is really quite simple if someone hasn't tried to repair the problems without replacing the wires. Splicing new blocks into old wires just doesn't work. If I have this problem again, which I hope I don't, I will be confident in my ability to fix the problem myself. Thank you parts select for repair video and the parts.
  • Evelyn from FRANKLIN, NH
  • Difficulty Level:
    Easy
  • Total Repair Time:
    1- 2 hours
  • Tools:
    Socket set
1 person found this instruction helpful.
Was this instruction helpful to you?
Thank you for voting!
Replaced burner and it worked perfectly!
All I had to do was to plug the burner in and it worked.
Other Parts Used:
Surface Burner Terminal Block Kit Surface Burner Element - 8 Inch
  • Marie from ROYSTON, GA
  • Difficulty Level:
    Really Easy
  • Total Repair Time:
    Less than 15 mins
1 person found this instruction helpful.
Was this instruction helpful to you?
Thank you for voting!
burner terminal block was worn out
I unhooked the main power cord, unhooked the worn out block terminal cut the tape that was holding all the wires together. Removed the back panel and followed the wires unhooked the 2 wires and installed the new block terminal. Tied all the wires back, attached the back panel and plugged the power cord back into the outlet. i tested the burner to see if it was working. The burner is working great, instructions were easy to follow and my wife is happy. Thank you
  • Mario from RENO, NV
  • Difficulty Level:
    Really Easy
  • Total Repair Time:
    30 - 60 mins
  • Tools:
    Nutdriver, Pliers
1 person found this instruction helpful.
Was this instruction helpful to you?
Thank you for voting!
Replaced the outlet the one of the top burners on top of my stove, it went very well.
I followed the instructions on the video, the only thing they left out is where the wires go through to the back of the stove being that there are sharp edges. A role of glass tape would have been handy to replace the old tape. Thanks for asking, I hope this helps someone else.
  • Charles from MECHANIC FLS, ME
  • Difficulty Level:
    Easy
  • Total Repair Time:
    30 - 60 mins
  • Tools:
    Screw drivers
1 person found this instruction helpful.
Was this instruction helpful to you?
Thank you for voting!
burner was not heating
unplug it and plug the new one in
  • lucille from HAPPY CAMP, CA
  • Difficulty Level:
    Very Easy
  • Total Repair Time:
    15 - 30 mins
  • Tools:
    Screw drivers
1 person found this instruction helpful.
Was this instruction helpful to you?
Thank you for voting!
  • 1
  • 2
Questions and Answers

Ask our experts a question about this part and we'll get back to you as soon as possible!

20 questions answered by our experts.
Sort by:
  • 1
  • 2
Sorry, we couldn't find any existing answers that matched.Try using some different or simpler keywords, or submit your new question by using the "Ask a Question" button above!
Marty
December 6, 2017
How many burners will this kit fix? I want to replace all 4, from the switch all the way to replacing the connector block for the burner. Thank you!
For model number ABS300J1WW
PartSelect logo
Hi Marty, Thank you for your question. These kits only contain enough parts to replace one element terminal block. You would need to buy 4 kits. I hope this helps. Thank you and have a great day!

19 people found this helpful.

Was this helpful?
Thank you for voting!
Patricia
October 5, 2017
The front large burner on the stove is over heating - turns bright red even on low setting. What part needs replacing?
For model number JBP25D0K4WH
PartSelect logo
Hi Patricia, Thank you for your question. It could either be the switch that controls your front burner or the burner itself that is the issue. You would have to test both parts to see which one is broken. Good luck with your repair.

5 people found this helpful.

Was this helpful?
Thank you for voting!
Mickey
October 14, 2017
I need the right front wire big burner in front it is a long one this comes 2 connect from end 2end
For model number jbp23d-r2ww
PartSelect logo
Hello Mickey, thank you for contacting us. This kit would have all the wires or the surface burners included. Hope this helps!

4 people found this helpful.

Was this helpful?
Thank you for voting!
ANNE
August 16, 2017
Do i need to buy 4 of these if i am replacing all 4 brown plastic thingies
For model number JDP39BOW5BB
PartSelect logo
Hello Anne, Thank you for contacting us. These kits only contain enough parts to replace one element terminal block. You would need to buy 4 kits. I hope this helps!

4 people found this helpful.

Was this helpful?
Thank you for voting!
Alfred
August 28, 2017
My ceramic Receptacle is completely burnt and fall apart into many pieces, will I need to buy item 83 together with item 82 , or can I use the original clip with item 83? The original clip looks ok.
For model number jbp23sr5ss
PartSelect logo
Hi Alfred, Thank you for the question. As long as the clip is okay then it can be refused. Good luck with the repair.

4 people found this helpful.

Was this helpful?
Thank you for voting!
Robert
April 22, 2018
My surface burner light will not go off but stove is off stove works fine and turns off.Can you let me know the problem and part numbers i need to replace
For model number Jbp21bb1wh
PartSelect logo
Hi Robert, Thank you for your question. If the surface burner light will not go off, then this is issue is with one of the burner switches and you will need to check each one with a multimeter to see which one is causing the issue. I hope this helps. Thank you and have a great day!

4 people found this helpful.

Was this helpful?
Thank you for voting!
Harold
March 11, 2019
Will this part fix burner from going to high no matter the setting on the control knob?
For model number JBS07H2WW
PartSelect logo
Hi Harold, thank you for your question. Be sure to cut power to your appliance and remove any parts before doing tests. There are a couple of parts that could cause this issue specifically. You will need a multi meter to be able to test the parts. The first part you will want to check is your element. It should be reading between 0 - 50 ohms to be working correctly. The other part to check would be your infinite (or surface burner) switch. When you remove that part from the appliance, connect each probe from your multi meter to the prongs and then turn the switch to an on position. If you get no continuity then the switch is the issue. It could also be your wiring that is the issue but you should see visual damage on that part in most cases. I hope that helps. Good luck with your repair.

4 people found this helpful.

Was this helpful?
Thank you for voting!
Deborah
September 24, 2019
My large front burner when turned on low with in 2-3 mins is glowing red hot . I’ve tried switching the burner but same thing so i know it’s not the same element itself,on your website it looks like there are only 2 possible things.What do you recommend.Thank you deb Hayward
For model number JBP23SR5SS
PartSelect logo
Hello Deborah, Thank you for the question. This normally indicates the switch that controls the element PartSelect Number PS236750 is defective and will need to be replaced. Hope this helps!

2 people found this helpful.

Was this helpful?
Thank you for voting!
Related Parts:
Rosario
January 23, 2020
Does this work with small burners too?
For model number JBP35DM1WW
PartSelect logo
Hello Rosario, Thank you for the question. Yes, this Terminal Block Kit works on both size burner elements. We hope this helps.

2 people found this helpful.

Was this helpful?
Thank you for voting!
Nina
August 14, 2021
My GE range is just over 1 year old. Last night the front right burner heated red hot when on medium. I use that burner all the time and it has never over heated. When i turned the burner off, it did turn off. When i pulled the burner out of the terminal, i saw some red residue on the plug of my burner in the terminal too. I'm reading about people replacing either the switch or the terminal. Would this be a terminal replacement?
For model number JBS360DM2BB
PartSelect logo
Hello Nina, Thank you for writing. Yes you are correct to choose Surface Burner Terminal Block Kit PartSelect Number PS783534. Good luck with your repair.

1 person found this helpful.

Was this helpful?
Thank you for voting!
  • 1
  • 2
Model Cross Reference
This part works with the following models:
PartSelect Number: PS783534
Manufacturer Part Number: WB17T10006
Brand
Model Number
Description
General Electric
15451-0
Range
General Electric
154510
Range
General Electric
155910
Range
Kenmore
36261101000
Range
Kenmore
36261101001
Range
Kenmore
36261108000
Range
Kenmore
36261108001
Range
Kenmore
36261741000
Range
Kenmore
36261741001
Range
Kenmore
36261742000
Range
Kenmore
36261742001
Range
Kenmore
36261748000
Range
Kenmore
36261748001
Range
Kenmore
36262492000
Range
Kenmore
36262492001
Range
Kenmore
36262780100
Range
Kenmore
36262780101
Range
Kenmore
36262780102
Range
Kenmore
36262780103
Range
Kenmore
36262781000
Range
Kenmore
36262781001
Range
Kenmore
36262781002
Range
Kenmore
36262781003
Range
Kenmore
36262781004
Range
Kenmore
36262788000
Range
Kenmore
36262788001
Range
Kenmore
36262788002
Range
Kenmore
36262788003
Range
Kenmore
36291112000
Range
Kenmore
36291112001
Range
Customer Service Representative

Get in touch, we're here to help!

Daily 8am - 9pm EST

Contact Customer Service