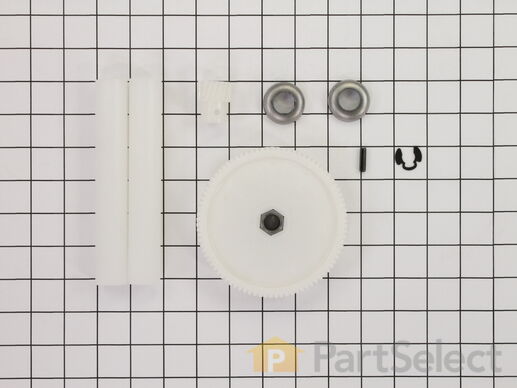
Part Location Diagram of 882699 Whirlpool Drive Gear Kit
See part 6 in the diagram
( Grid squares measure 1x1 inch )
Customer Service Representative

Get in touch, we're here to help!

Daily 8am - 9pm EST

customerservice@partselect.com

Drive Gear Kit 882699

 Fits your KUCS03CTWH1!
★★★★★
★★★★★
46 Reviews

Rated by 27 customers 

Easy 

30 - 60 mins 

Ratings submitted by customers like you who bought this part.

$ 49.23
  In Stock
Get FREE EconoShip on orders over $100! T&C apply

Get this part fast! Average delivery time for in-stock parts via standard shipping: 1.8 days.

 Fits your KUCS03CTWH1!
PartSelect Number PS398589
Manufacturer Part Number 882699
Manufactured by Whirlpool
Product Description

Drive Gear Kit Specifications

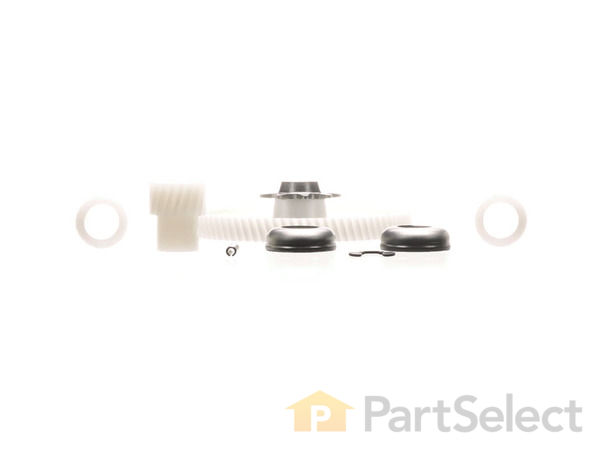
This is the drive gear kit for the ram that compacts the trash inside your compactor. If your compactor ram is getting stuck, there is excess noise during its cycle, or if your compactor does not stop at the end of its cycle, the driving gear may be the issue. The gear is white, plastic and approximately 4.5 inches in diameter. This drive gear kit includes both gears, pin spring, retaining clip (c-ring), ram stop, ram cam, and instructions. Make sure to disconnect the power to your trash compactor before beginning the repair.
How Buying OEM Parts Can Save You Time and Money

How Buying OEM Parts Can Save You Time and Money

Troubleshooting
This part fixes the following symptoms:
Compactor ram gets stuck | Noisy | Doesn’t stop at end of compacting cycle | Won’t start
This part works with the following products:
Trash Compactor.
This part works with the following products:
Whirlpool, Kenmore, KitchenAid, Jenn-Air.
Part# 882699 replaces these:
AP3122987, 735285, 882699, 14211018, 41001084, 4149667, 4154800, 4163381, 4163385, 7-49046, 7-49052, 7-49130, 7-76839, 7-77124, 749046, 749052, 749130, 776839, 777103, 777124 , 882699, W10451279, Y4149667, Y776839, Y777124 Show less
Back to Top
Customer Reviews
Average Rating:
★★★★★
★★★★★
46 Reviews
4.6
Filter By Rating:
  • 5 Stars
    34
  • 4 Stars
    9
  • 3 Stars
    1
  • 2 Stars
    0
  • 1 Star
    2
Sort by:
  • 1
  • 2
  • 3
Sorry, we couldn't find any existing reviews that matched. Try using some different or simpler keywords.
  • 1
  • 2
  • 3
Customer Repair Stories
 Average Repair Rating: 3.2 / 5.0, 27 reviews. What's this?
Sort by:
  • 1
  • 2
  • 3
Sorry, we couldn't find any existing installation instruction that matched.
Install NewDrive Gear Kit,( I also added,2 poor nuts and all 4 wheels)
My compactor is quite heavy, I moved it onto the kitchen floor unplugged and removed the cover plate from the bottom exposing the drive gears. The small (pinion ) gear was stripped as well as a section of the drive gear. I followed the video and removed the (fulthy) ram. The interior filth was so great I removed all parts to my garage and spent a lot of time cleaning them especially the ram.By the time my parts arrived, it was all clean and ready to go. I had also found that one of the power nuts was broken and had ordered new wheels and power nuts. Assembly was straight forward and it works like new now,
Other Parts Used:
Drawer Roller Power Nut Drive Gear Kit Wheel Assembly - Kit of 2
  • Michael from Morgan Hill, CA
  • Difficulty Level:
    Really Easy
  • Total Repair Time:
    More than 2 hours
  • Tools:
    Nutdriver, Screw drivers, Socket set, Wrench set
4 of 5 people found this instruction helpful.
Was this instruction helpful to you?
Thank you for voting!
none
As per directions
Other Parts Used:
Directional Switch Drive Gear Kit
  • craig from OCALA, FL
  • Difficulty Level:
    Very Easy
  • Total Repair Time:
    30 - 60 mins
  • Tools:
    Pliers, Screw drivers, Socket set
1 person found this instruction helpful.
Was this instruction helpful to you?
Thank you for voting!
Compactor would not return to starting position
Like others who experienced this problem, I removed compactor from under the counter and laid it on its side. I removed the screws holding the cover plates to the motor and gear/chain box. The larger (4" +/-) plastic drive gear which moves the chain that lowers or raises the compactor ram was broke. Using a socket and ratchet, I turned the shaft the gear was attached to in a counterclockwise direction and moved the compacting ram from the bottom position to the top so I could finally open the door, It takes a lot of turns to move the compacting ram to the top so be patient. I then loosened the bolts, in the base, that holds the motor secure and slid the base toward the broken gear putting slack in the chain. I removed the split ring from the shaft and removed the sprocket which originally is part of the gear but was left on the shaft when the gear broke in three places. I elected to not remove the original washer and spacer and put the new gear with sprocket on the shaft, put the chain on the socket and installed the split ring. Slid the motor base back to original position putting slight tension on chain and a proper clearance between the gear and drive shaft (sheet of paper seperation). Reinstalled the covers, tested and was finished.
  • Alan from Gillette, WY
  • Difficulty Level:
    Easy
  • Total Repair Time:
    30 - 60 mins
  • Tools:
    Nutdriver, Pliers, Socket set
3 of 3 people found this instruction helpful.
Was this instruction helpful to you?
Thank you for voting!
Compactor would only stop and reverse if you turned it on and off. Very noisey.
First let me say that I read many of the other posts regarding this repair and without them I wouldn't have had a clue how to fix this. Since the ram apparently moved up and down when I shut it off and turned it back on I reasoned the directional switch must be the problem. Ordered the part, Quick delivery. To replace the switch I removed the draw and removed two screws on the frame that hold the control panel in place. Lift up to remove. My unit is a stand alone unit although it is installed under the counter. There are two additional screws to remove the top and expose the ram and power screw drives. To remove the directional switch from the control panel you need to remove two hex head screws that hold it in place. This is a little difficult because of the small space. With the help of a small nut driver I was able to remove it. Note: the screws are held in place by a flat piece of metal that acts as a nut. Be careful not to drop it. Then simply remove the wire leads (all color and letter coded) and remove the switch. I was careful to reattach the leads to the new switch as I removed each one. Be sure to replace the switch with the limiting lever in the same position as it was in (it is vertical). Put everything back together and you should be good to go. That didn't happen for me! Problem persisted! Next on my list was the power nut. I got access to the ram and power screw drives (see above for instructions). The two power nuts are plastic wing nuts that are held in place by metal covers. The metal covers are each held down by two hex head screws. To gain access to the power nuts you have to remove the metal covers. Note the position of the nuts in relationship to the power screw shafts so that when you reassemble it they will be in the same position as when you started. In my case the top of the screw shafts were even with the top of the power nuts. (CAUTION: the ram is held by this assembly. Depending on what position your ram is when you started this repair it may fall! My ram was in the up position and when I removed the second cover it slammed down to the bottom of the drive screws). My advice is to be prepared by bracing up the ram before removing the metal covers. No harm when the ram fell but it did startle me. I then removed one of the power nuts. It was split in half. The other nut was fine but I decide to replace it anyway. Ordered parts. Quick delivery. Before I attempted to replace the power nuts I removed the ram (it just lifts out) and cleaned every thing. I put some new grease in the places that I had removed it. Then sprayed WD40 on the power screws. When I put the ram back in, I broke the new directional switch I had put in. So be careful!!! I still had the old one so I ultimately put it back in. I then replaced the power nuts. This was a little difficult because I had to hold the ram up while I was putting the metal covers back on. I would suggest you either brace the ram or get someone to hold it while you put the metal covers back on (In retrospect I suppose I could have just put the nuts on when the ram was down). Reassembled everything. Should be good to go. That didn't happen for me! Problem was still there! I turn it on, ram goes down. I turn it off, ram goes up. Desperation!! The only other thing it could be is the drive gear assembly. Ordered parts. Quick delivery. The gear drive is on the bottom of the machine. Lay the machine on it's side to gain access to the bottom cover. There are 5 hex head screws that hold it on. Remove screws and cover. It's pretty simple from here. The drive gear was missing a few teeth but the rest were in tact. This explains why the ram was still moving up and down and led me to believe it was something other than the drive. The only difficult part was the removal of the pin in the drive shaft. I wound up using a bolt the about the same diameter and a hammer to drive it out. Then just reassemble. There are some instructions that come with the gear parts that tell you how to set the spacing in the gears but I had no problem just replacing the parts without making any "adjustments". Should be good to go! Yessssss! Everything worked perfectly!!! My final words of advice. If your machine has this problem CHECK THE DRIVE FIRST. It the easiest thing to do because you can visually inspect it and know or eliminate it as the problem. It's about a 5 minute job and can may save you some of the problems I had. A big thanks to PartSelect for sponsoring these posts. The repair company that I normally use told me the machine was too old and probably wasn't worth the $100 just to come out and look at it, never mind the additional cost to repair it. All in I spent less than $100 and had I checked the drive first, I could have been done for less than $30.
  • Bill from DERRY, NH
  • Difficulty Level:
    Easy
  • Total Repair Time:
    30 - 60 mins
  • Tools:
    Nutdriver, Screw drivers, Socket set
3 of 3 people found this instruction helpful.
Was this instruction helpful to you?
Thank you for voting!
ram would not go up and down gears went bad
layed it in the kictuchen floor took of bottom and changed the gears that's all there was to it piece of cake
  • Elbert from FRANKLIN, OH
  • Difficulty Level:
    Really Easy
  • Total Repair Time:
    15 - 30 mins
  • Tools:
    Nutdriver, Screw drivers
1 person found this instruction helpful.
Was this instruction helpful to you?
Thank you for voting!
Trash plunger would go down but not back up
Compactor ram would go to bottom but not return back up after compaction. Keep running until unplugged. After unplugging flipped unit on its side and remover bottom plate (5) nut screws, exposing gears. Found that the main large gear had fine crack which caused it to spin loosely. Ordered gear assembly and lossened four mount screw on motor to move it forward and give slack on chain. Hint: Loosen motor mount bolts, DO NOT REMOVE bolts COMPLETELY! Removed broken plastic gear and reassembled with new. Held/ pushed motor back to retention chain and secured four (4) mount bolts Then reassembled bottom plate with screw nuts and it worked perfectly!!
  • Mark from Westport, MA
  • Difficulty Level:
    Easy
  • Total Repair Time:
    15 - 30 mins
  • Tools:
    Pliers, Screw drivers, Socket set
3 of 3 people found this instruction helpful.
Was this instruction helpful to you?
Thank you for voting!
Plastic Drive gear broke
The plastic drive gear broke and the unit was locked in the down position. The repair kit contained all of the parts required to fix the problem plus other replacement parts for the gear drive unit. It was very easy (about 20 min.) to replace the gear and other parts. The unit works fine now.
  • Terry from Spring, TX
  • Difficulty Level:
    Really Easy
  • Total Repair Time:
    15 - 30 mins
  • Tools:
    Pliers, Socket set
6 of 8 people found this instruction helpful.
Was this instruction helpful to you?
Thank you for voting!
Compactor would not open. Ram was down
Once I discovered that the ram was down, I had to determine why. Opened up the bottom and discoverer the drive gear was broken. Ordered the parts kit and made the repair. Did not know what the other parts in the kit were for, but it works.
  • James from Flagstaff, AZ
  • Difficulty Level:
    Easy
  • Total Repair Time:
    30 - 60 mins
  • Tools:
    Nutdriver, Wrench (Adjustable)
1 of 2 people found this instruction helpful.
Was this instruction helpful to you?
Thank you for voting!
Plastic Gear Wheel Broke
Emptied all garbage! Laid machine on its side. Removed cover. Removed left over gear parts by removing pin. Loosened chain by removing two top left corner screws. Place new plastic gear in position with chain. Returned screws to top left corners. Returned pin to gears. Make sure chain is taught. Replace cover. Lift back up from its side. Test.
  • Reagan from Glenshaw, PA
  • Difficulty Level:
    Easy
  • Total Repair Time:
    30 - 60 mins
  • Tools:
    Pliers, Screw drivers, Socket set, Wrench (Adjustable)
1 of 3 people found this instruction helpful.
Was this instruction helpful to you?
Thank you for voting!
Jammed KitchenAid Trash Compactor.
With nothing in the KitchenAid Instructions nor anything on the internet… I had to go it alone.
Actually quite simple… I laid the unit over on its front and removed the 5 screws holding on the bottom plate. This exposed the motor and drive train which turns the two compacting screws on each side. The main drive gear was broken.
Taking a wrench to the main drive… I was able to free up the jam… a piece of glass from a broken bottle.

I went to the internet and did a search on KitchenAid Trash Compactor Parts and discovered PartSelect.com… They had me enter the Model Number of my unit and a parts diagram and list came up… I found the gear I needed… ordered it and in two days it was here. Instructions came with the gear on replacement and in no time I was back in business.

I was impressed with the simplicity of KitchenAid’s Compactor, and the ease in which I was able to get my part from PartSelect.com!
  • Jan from Gilroy, CA
  • Difficulty Level:
    Easy
  • Total Repair Time:
    30 - 60 mins
  • Tools:
    Pliers, Screw drivers, Wrench (Adjustable)
2 of 4 people found this instruction helpful.
Was this instruction helpful to you?
Thank you for voting!
  • 1
  • 2
  • 3
Questions and Answers

Ask our experts a question about this part and we'll get back to you as soon as possible!

9 questions answered by our experts.
Sort by:
  • 1
Sorry, we couldn't find any existing answers that matched.Try using some different or simpler keywords, or submit your new question by using the "Ask a Question" button above!
Victor
May 29, 2019
Your youtube video shows several parts in the drive gear kit but the picture for part #882699 only shows the main drive gear. Do the other parts such as the mother gear, retainer clip, washers, ram stops and pin come in the kit as well?
For model number GX900QPLB0
PartSelect logo
Hello Victor, Thank you for the question. This drive gear kit includes both gears, pin spring, retaining clip (c-ring), ram stop, ram cam, and instructions. Thank you for your inquiry, good luck with this repair!

12 people found this helpful.

Was this helpful?
Thank you for voting!
Al
May 21, 2019
My drive gear wheel is dwg4149668. Will this gear replace my broken gear.
PartSelect logo
Hello Al, thank you for contacting us, In order for us to locate the correct parts and repair information we will require the model number of the unit. Once you have located the model number please feel free to resubmit the question and we will be happy to help you. Look forward to hearing from you!

3 people found this helpful.

Was this helpful?
Thank you for voting!
Rod
February 10, 2022
Compactor won’t automatically return after compacting . Must press off to complete cycle. Gear drive ok
For model number GC900QPHBO
PartSelect logo
Hello Rod, thank you for writing. We have researched the model you have provided and have found the part you are looking for is the Directional Switch PartSelect Number PS11744742. The function of the directional switch on your trash compactor is to ensure the ram lowers to compress your trash, then returns to the top position. If your trash compactor does not complete this task, will not stop at the end of the compacting cycle, or is noisy during operation, you may need to replace the directional switch. We hope to hear from you soon.

1 person found this helpful.

Was this helpful?
Thank you for voting!
Related Parts:
Ken
July 26, 2019
Ram always goes down and up ok. At end of return to up cycle it frequently runs and pounds/shakes machine several times before it stops. This all started when the foot treadle start switch acted up. Repaired and replaced the metal piece attached to treadle and which contacts the start button on frame of machine at bottom.
For model number kucs03ftss0
PartSelect logo
Hello Ken, Thank you for contacting us. I suggest checking the Directional Switch, PartSelect Number PS11744742 with a multi meter and check for continuity. You can also check the Drive Gear Kit for wear or damage. Hope this helps!

1 person found this helpful.

Was this helpful?
Thank you for voting!
Related Parts:
Sharon
July 8, 2021
Our part number in the big gear is 4149668, 4149667 is listed, will the repair kit work for the 4149668
PartSelect logo
Hello Sharon, thank you for contacting us, In order for us to locate the correct parts and repair information we will require the model number of the unit. Once you have located the model number please feel free to resubmit the question and we will be happy to help you. We are looking forward to hearing from you!

Was this helpful?
Thank you for voting!
David
November 6, 2021
Will this gear fit whirlpool model GX900QPPS4?
For model number GX900QPPS4
PartSelect logo
Hello David, Thank you for your inquiry. We have researched the model number you have provided and and show that this part is listed as compatible to your model. We hope this helps.

Was this helpful?
Thank you for voting!
Maurice
December 23, 2021
Broken start knob
For model number Tc407w6
PartSelect logo
Hello Maurice, thank you for your question. The knob is listed on our site as Key PartSelect Number PS386676. We hope this helps.

Was this helpful?
Thank you for voting!
Timothy
November 22, 2022
We start the compactor and it goes down but then starts grinding when its operating and won't stop unless you turn it off and then back on. Then it will return to the top. Replaced gear a year ago but it seems wobbly. Not sure if that's the problem though after seeing something about a reverse switch.
For model number 13619101
PartSelect logo
Hello Timothy, thank you for contacting us. The issue is most probably related to the directional switch, part number PS11744742, the rotary switch, part number PS382679, and the drive gear kit, part number PS398589. Please reach out to customer service if you need help placing an order. Glad to be of help!

Was this helpful?
Thank you for voting!
Related Parts:
Gregg
April 27, 2023
Is part # PS398589 for Manufacturer # 882699 Jenn-Air Trash Compacter in stock? If not, how long is the backorder?
For model number TC50781
PartSelect logo
Hello Gregg, Thank you for the question. According to the Website Availability, this is a On Order part. This means we do not currently have the part in stock and waiting on a shipment from. As long as Jenn-Air has stock ready to ship, this takes about 10-15 Business Days for the part to arrive at the Warehouse and approximately 3-7 business days to ship out and arrive to you. We hope this helps!

Was this helpful?
Thank you for voting!
  • 1
Model Cross Reference
This part works with the following models:
PartSelect Number: PS398589
Manufacturer Part Number: 882699
Brand
Model Number
Description
Kenmore
19025
Trash Compactor - Kenmore Trash Compactor Model 19025 (1988) (19025(1988)) Parts
Whirlpool
45FF
Freezer - FREEZER
Whirlpool
4EAF
Freezer - FREEZER
KitchenAid
4KUCC150S0
Trash Compactor
KitchenAid
4KUCC150S1
Trash Compactor
KitchenAid
4KUCC150S2
Trash Compactor
KitchenAid
4KUCC151T0
Trash Compactor
KitchenAid
4KUCC151T1
Trash Compactor
KitchenAid
4KUCC151T4
Trash Compactor
Kenmore
6221338550
Trash Compactor
Kenmore
6221358550
Trash Compactor
Kenmore
6221388550
Trash Compactor
Kenmore
6228369301NZ
Trash Compactor
Kenmore
6228415001NO
Trash Compactor
Kenmore
6228416001GO
Trash Compactor
Kenmore
62284169900
Trash Compactor
Kenmore
6228419001GO
Trash Compactor
Kenmore
62284199910
Trash Compactor
Kenmore
62284199920
Trash Compactor
Kenmore
6651330590
Trash Compactor
Kenmore
6651336580
Trash Compactor
Kenmore
6651336581
Trash Compactor
Kenmore
6651336582
Trash Compactor
Kenmore
6651338550
Trash Compactor
Kenmore
6651338580
Trash Compactor
Kenmore
6651338581
Trash Compactor
Kenmore
6651338582
Trash Compactor
Kenmore
6651339580
Trash Compactor
Kenmore
6651339581
Trash Compactor
Kenmore
6651340590
Trash Compactor
Customer Service Representative

Get in touch, we're here to help!

Daily 8am - 9pm EST

Contact Customer Service