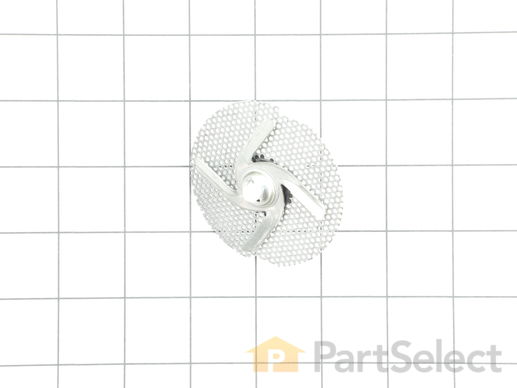
Part Location Diagram of W10083957 Whirlpool Chopper Assembly
See part 6 in the diagram
( Grid squares measure 1x1 inch )
Customer Service Representative

Get in touch, we're here to help!

Daily 8am - 9pm EST

customerservice@partselect.com

Chopper Assembly W10083957

 Fits your DU1055XTVD8!
★★★★★
★★★★★
45 Reviews

Rated by 15 customers 

Easy 

30 - 60 mins 

Ratings submitted by customers like you who bought this part.

$ 34.77
  In Stock
Get FREE EconoShip on orders over $100! T&C apply

Get this part fast! Average delivery time for in-stock parts via standard shipping: 1.8 days.

 Fits your DU1055XTVD8!
PartSelect Number PS1734917
Manufacturer Part Number W10083957
Manufactured by Whirlpool
Product Description

Chopper Assembly Specifications

This chopper assembly chops up/mince the food particles to prevent from clogging the dishwasher pump.
How Buying OEM Parts Can Save You Time and Money

How Buying OEM Parts Can Save You Time and Money

Troubleshooting
This part fixes the following symptoms:
Not cleaning dishes properly | Noisy | Not draining | Will Not Start
This part works with the following products:
Dishwasher.
This part works with the following products:
KitchenAid, Kenmore, Whirlpool, Maytag.
Part# W10083957 replaces these:
AP4260709, 1447034, 8268383, W10083957, W10083957V, W10083957VP, WP8268383VP
Back to Top
Customer Reviews
Average Rating:
★★★★★
★★★★★
45 Reviews
4.7
Filter By Rating:
  • 5 Stars
    36
  • 4 Stars
    6
  • 3 Stars
    2
  • 2 Stars
    0
  • 1 Star
    1
Sort by:
  • 1
  • 2
  • 3
Sorry, we couldn't find any existing reviews that matched. Try using some different or simpler keywords.
  • 1
  • 2
  • 3
Customer Repair Stories
 Average Repair Rating: 3.7 / 5.0, 15 reviews. What's this?
Sort by:
  • 1
  • 2
Sorry, we couldn't find any existing installation instruction that matched.
Dishes were not getting clean because upper and lower spray arms were not spraying.
The cause of the problem was that the chopper was worn out. As a result, the chopper screen was clogged with unchopped food bits. This severely reduced the amount of water getting to the circulation pump/impeller. This was what caused the spray arms not to spray. As a result of replacing the chopper, the dishwasher now works like new.

As far as how I did the repair, I followed the excellent how-to video provided by PartSelect that you can access when you click on the Chopper Assembly from the Pump and Motor Parts diagram for this dishwasher.
  • George from RICHLAND, WA
  • Difficulty Level:
    Really Easy
  • Total Repair Time:
    15 - 30 mins
  • Tools:
    Pliers
1 person found this instruction helpful.
Was this instruction helpful to you?
Thank you for voting!
Dishwasher not washing
I looked up 'dishwasher not washing' and it came up with a list of ideas to the problem. I bought the part 'food chopper' for the kitchen aid dishwasher and watched a how to video on YouTube.
I realized plumbers don't get paid bc it's hard they get paid bc it's gross.
Super easy to do. Dishwasher works great now
  • Allyson from JACKSONVILLE, FL
  • Difficulty Level:
    Really Easy
  • Total Repair Time:
    30 - 60 mins
  • Tools:
    Screw drivers
1 person found this instruction helpful.
Was this instruction helpful to you?
Thank you for voting!
Reinstall NEW Chopper Assembly
tom boy single Mom- not too difficult! Follow the video and installation procedures. My only problem was lining up the chopper blade, with the need to install on an angle and connect copper assembly with the motor, and align with groove, needle nose pliers did not work for me, due to the fact, pliers seemed to angle the chopper assembly and did not received equal pressure between the blade and the screen.( I did not have a collection of needle nose pliers to chose from) I used a fork to give even pressure distribution and keep the assembly even and it slipped right into position, remembering to line up all connections between the motor and the chopper assembly, the fork give me the ability to angle the assembly. Its like having a new dishwasher, I use the light setting now when washing a load. Saved $$$$$$$ and X-mas is on the way!!! Thanks Parts Direct!!! Will re-order when the next appliance repair occurs.
  • Pamela from CRESSON, PA
  • Difficulty Level:
    A Bit Difficult
  • Total Repair Time:
    30 - 60 mins
  • Tools:
    Pliers, Screw drivers
1 person found this instruction helpful.
Was this instruction helpful to you?
Thank you for voting!
Top rack of dishes wasn't being cleaned.
All parts were really easy to replace. I just followed the video for each part.
Other Parts Used:
Spray Arm Seal Chopper Assembly Spinner Kit
  • Rod from Cody, WY
  • Difficulty Level:
    Really Easy
  • Total Repair Time:
    15 - 30 mins
1 person found this instruction helpful.
Was this instruction helpful to you?
Thank you for voting!
Top Rack of Dishwasher Not Cleaning
After several weeks of decreasingly clean dishes on the top rack of our dishwasher, I did some digging & found that my chopper assembly was broken (the washer had come off & the parts were loose). I ordered a new chopper assembly here. Once I received it, the entire repair took less than 30 minutes. I removed the old chopper assembly, used a shop vac to remove the excess water & food particles, then reinstalled the new chopper assembly using the instructional video provided. The dishwasher is back up & running like brand new. The top rack is getting cleaned thoroughly once again. PartSelect made the process extremely easy & affordable!
  • Bree from GREENVILLE, SC
  • Difficulty Level:
    Easy
  • Total Repair Time:
    30 - 60 mins
  • Tools:
    Pliers, Screw drivers
2 of 2 people found this instruction helpful.
Was this instruction helpful to you?
Thank you for voting!
top rack quick washing water was not spinning throught top
checked all the plactic tubes for clogs used water hose and they worked ok checked into top of pump found chopper assembly had come apart replaced washes like a new one
  • John from MORGANTOWN, WV
  • Difficulty Level:
    Easy
  • Total Repair Time:
    30 - 60 mins
  • Tools:
    Pliers, Screw drivers
2 of 2 people found this instruction helpful.
Was this instruction helpful to you?
Thank you for voting!
Chopper assembly failure
If your chopper assembly has a catastrophic failure like mine did, chances are it took out the teeth on the circulation motor as well. This will lead to the teeth on the chopper being destroyed by the impeller as soon as you turn the dishwasher back on. First, follow the instructional video to remove the motor (found on this site on the circulation motor page) and chopper assembly (also found on this site on the chopper assembly page). The impeller is screwed onto the input shaft of the motor, and you must keep it from turning so that you can unscrew the impeller assembly. I removed the back cover of the motor (there are four screws holding it on) and held a flat pry bar on the rotating assembly inside the motor to keep it from turning, then unscrewed the impeller from the shaft. Mine came off very easy, but be careful not to let your pry bar slip or damage the motors internals. After that, install the washer and grommet from the impeller seal kit on to the impeller, and screw it back on while keeping the motor from turning with your pry bar. Lastly, reinstall the motor and chopper assembly per the aforementioned instructional videos. The whole thing took around an hour to do, and it is much cheaper than replacing the entire circulation motor.
Other Parts Used:
Impeller Chopper Assembly
  • Ashley from EDMOND, OK
  • Difficulty Level:
    Easy
  • Total Repair Time:
    1- 2 hours
  • Tools:
    Nutdriver, Screw drivers
9 of 9 people found this instruction helpful.
Was this instruction helpful to you?
Thank you for voting!
dishwasher was noisey holding dirty water.
removed the upper and lower baskets, removed the lower wash arm by rotating the center bearing assembly (its the flat piece in the very center of the lower wash arm) by the way it has a reverse thread...not righty tighty and lefty loosey... it is reverse the normal rotation.. i unlocked the upper arm assembly from it's clip on to mount as well as the clip on to mount on the back wall, looking at the very center pump cover strainer, you will see that the assembly that goes from the pump area to the very top of the machine needs to be rotated clock wise where it locks into the pump strainer assembly. now remove the four star type screws from the face of the strainer, now you can lift out the entire bottom of the machine you will see the half round cover in the bottom of the well, remove one smaller size star screw. simply remove the chopper assembly and install the new assembly as indicated in the instructions provided, be sure to use the trick with the open end wrench as per instruction sheet, makes it easy. now follow the bread crumbs you left on the yellow brick road to reassemble.
  • michael from CONCORD, CA
  • Difficulty Level:
    A Bit Difficult
  • Total Repair Time:
    30 - 60 mins
  • Tools:
    Nutdriver, Pliers, Screw drivers, Wrench set
2 of 2 people found this instruction helpful.
Was this instruction helpful to you?
Thank you for voting!
Chopper blade fell off.
Very simple just remove the rakes and then unscrew the covers and pop out the old chopper assembly and replace with the new and then just put all cover back and it works great.
  • Tonya from RICHMOND, KY
  • Difficulty Level:
    Very Easy
  • Total Repair Time:
    15 - 30 mins
  • Tools:
    Pliers, Screw drivers
3 of 4 people found this instruction helpful.
Was this instruction helpful to you?
Thank you for voting!
After a loud noise the dishwasher quit and would only buzz when the main motor was supposed to be running.
Primarily, I read the instructions on line and watched the great videos explaining the repair. While the DW was out, I decided to change out the Drain Pump and the Chopper Assembly, even though only the Circulation Pump and Motor was my problem. These three items are the primary mechanical wear components and it made sense to me to replace these items. Perhaps I'll get another 10 years out of the DW. Two notes about the repairs. If you replace the chopper it isn't clear in the video where exactly it fits into the housing as the video mechanic did a great job of blocking the view of this part of the procedure. It took me awhile to figure out the chopper screen didn't go in the narrow trough, but just outside of that trough. Also, to lubricate the gaskets when putting the motor and the drain pump back in, I use a light coating of petroleum jelly. It is a good lubricant to facilitate the insertion of the both pumps. The pumps slid in easily and there were no leaks when I test ran the DW outside of the cabinetry. If you have a modicum of mechanical ability this job is a very simple, straight forward process. Good Luck!
Other Parts Used:
Circulation Pump and Motor Dishwasher Drain Pump Chopper Assembly
  • William from AUSTIN, TX
  • Difficulty Level:
    Easy
  • Total Repair Time:
    30 - 60 mins
  • Tools:
    Pliers, Screw drivers, Socket set, Wrench set
26 of 32 people found this instruction helpful.
Was this instruction helpful to you?
Thank you for voting!
  • 1
  • 2
Questions and Answers

Be the first to ask our experts a question about this part!

Model Cross Reference
This part works with the following models:
PartSelect Number: PS1734917
Manufacturer Part Number: W10083957
Brand
Model Number
Description
Kenmore
66513212K901
Dishwasher
Kenmore
66513212K902
Dishwasher
Kenmore
66513213K900
Dishwasher
Kenmore
66513213K901
Dishwasher
Kenmore
66513213K902
Dishwasher
Kenmore
66513219K901
Dishwasher
Kenmore
66513219K902
Dishwasher
Kenmore
66513242K900
Dishwasher
Kenmore
66513242K901
Dishwasher
Kenmore
66513243K900
Dishwasher
Kenmore
66513243K901
Dishwasher
Kenmore
66513249K900
Dishwasher
Kenmore
66513249K901
Dishwasher
Whirlpool
DW324K1ABL0
Dishwasher - Undercounter
Whirlpool
DW324K1ASS0
Dishwasher - Undercounter
Whirlpool
DW324K1AWH0
Dishwasher - Undercounter
Whirlpool
DW524L1ABL0
Dishwasher - Undercounter
Whirlpool
DW524L1ASS0
Dishwasher - Undercounter
Whirlpool
DW524L1AWH0
Dishwasher - Undercounter
Whirlpool
DW524M1ACU0
Dishwasher - Undercounter
Whirlpool
DW524M1ASS0
Dishwasher - Undercounter
Whirlpool
DW724M1ASS0
Dishwasher - Undercounter
Whirlpool
GU3000XTXB0
Dishwasher - Undercounter
Whirlpool
GU3000XTXB1
Dishwasher - Undercounter
Whirlpool
GU3000XTXB2
Dishwasher - Undercounter
Whirlpool
GU3000XTXB3
Dishwasher - Undercounter
Whirlpool
GU3000XTXQ0
Dishwasher - Undercounter
Whirlpool
GU3000XTXQ1
Dishwasher - Undercounter
Whirlpool
GU3000XTXQ2
Dishwasher - Undercounter
Whirlpool
GU3000XTXQ3
Dishwasher - Undercounter
Customer Service Representative

Get in touch, we're here to help!

Daily 8am - 9pm EST

Contact Customer Service