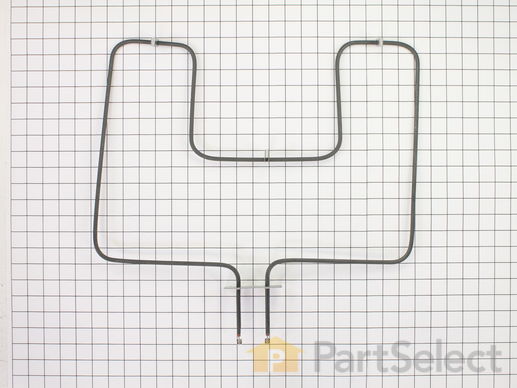
Part Location Diagram of 318255006 Frigidaire Oven Bake Element
See part F67 in the diagram
Replacing your Frigidaire Range Oven Bake Element
( Grid squares measure 1x1 inch )
Customer Service Representative

Get in touch, we're here to help!

Daily 8am - 9pm EST

customerservice@partselect.com

Oven Bake Element 318255006

 Fits your CEH343001!
★★★★★
★★★★★
22 Reviews

Rated by 20 customers 

Really Easy 

15 - 30 mins 

Ratings submitted by customers like you who bought this part.

$ 170.85
  In Stock
Get FREE EconoShip on orders over $100! T&C apply

Get this part fast! Average delivery time for in-stock parts via standard shipping: 1.8 days.

 Fits your CEH343001!
PartSelect Number PS3633414
Manufacturer Part Number 318255006
Manufactured by Frigidaire
Product Description

Oven Bake Element Specifications

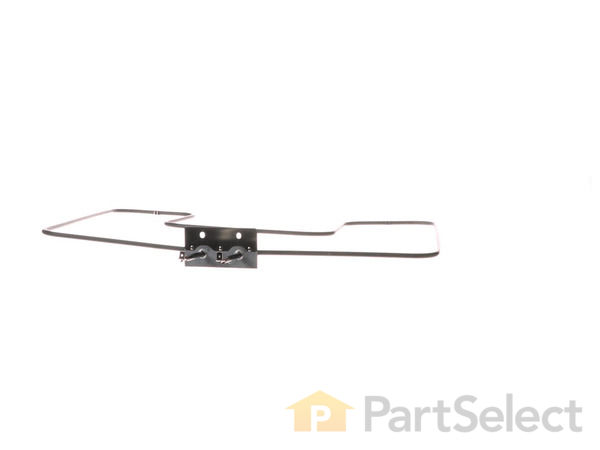
The 3000W bake element is located on the bottom of the oven cavity to supply heat for baking. The element terminals are male quarter inch spade connectors and have push-on wire terminals. If your oven is not heating evenly, the element will not heat, or there is little to no heat when baking, you may need to replace the element. This genuine OEM bake element. Please remember to disconnect the power to your oven before you start your repair.
How Buying OEM Parts Can Save You Time and Money

How Buying OEM Parts Can Save You Time and Money

Part Videos

Replacing your Frigidaire Range Oven Bake Element

Replacing your Frigidaire Range Oven Bake Element
Troubleshooting
This part fixes the following symptoms:
Little to no heat when baking | Element will not heat | Oven not heating evenly | Will Not Start
This part works with the following products:
Range, Wall Oven.
This part works with the following products:
Frigidaire, Kenmore, Gibson, Westinghouse.
Part# 318255006 replaces these:
AP5590131, 2220750, 318255006, 09990063, 2118181010@, 2118181040, 318255000, 318255002, 5303310512
Back to Top
Customer Reviews
Average Rating:
★★★★★
★★★★★
22 Reviews
4.6
Filter By Rating:
  • 5 Stars
    15
  • 4 Stars
    6
  • 3 Stars
    1
  • 2 Stars
    0
  • 1 Star
    0
Sort by:
  • 1
  • 2
  • 3
Sorry, we couldn't find any existing reviews that matched. Try using some different or simpler keywords.
  • 1
  • 2
  • 3
Customer Repair Stories
 Average Repair Rating: 4.3 / 5.0, 20 reviews. What's this?
Sort by:
  • 1
  • 2
Sorry, we couldn't find any existing installation instruction that matched.
Oven Bake Element caught fire
Unplug the oven (very important). Unscrew the bad element and screw in the new one. Plug oven back in.
  • Julia from NEW BADEN, IL
  • Difficulty Level:
    Really Easy
  • Total Repair Time:
    15 - 30 mins
1 person found this instruction helpful.
Was this instruction helpful to you?
Thank you for voting!
Heating element broken
I followed the instructions from the lady taking my order she talked me through the steps
  • Richard from HIGH POINT, NC
  • Difficulty Level:
    Very Easy
  • Total Repair Time:
    Less than 15 mins
  • Tools:
    Pliers, Screw drivers
1 person found this instruction helpful.
Was this instruction helpful to you?
Thank you for voting!
burnt out element
Followed instructions on website. Went perfectly.
  • Rockie from KEIZER, OR
  • Difficulty Level:
    Really Easy
  • Total Repair Time:
    30 - 60 mins
  • Tools:
    Screw drivers
1 person found this instruction helpful.
Was this instruction helpful to you?
Thank you for voting!
Bake element burned out in my slide in range
Turn off circuit breaker
Open oven remove two oven racks
Position flash light
Remove two Phillips head screws that hold the element in place
Gently slide out element until you locate the two small wires
Gently Detach the two small wires from the back of the burned out element
Position the new element in the bottom of the oven and attach the two small wires to the back of the new element
Gently slide the element back in place and replace the two Phillips screws that hold the element in place
Make certain the new element is lying flat on the bottom of the oven
Replace the two oven racks
Turn on the circuit breakers and test the oven
  • Sheila from Dayton, OH
  • Difficulty Level:
    Easy
  • Total Repair Time:
    30 - 60 mins
  • Tools:
    Screw drivers
1 person found this instruction helpful.
Was this instruction helpful to you?
Thank you for voting!
Bake element in our drop-in oven stopped working
We turned off the power, took out the element, installed new element.
  • Ashley from CARRIERE, MS
  • Difficulty Level:
    Really Easy
  • Total Repair Time:
    30 - 60 mins
  • Tools:
    Screw drivers
1 person found this instruction helpful.
Was this instruction helpful to you?
Thank you for voting!
Bake element stopped working
1. SHUT OFF POWER TO YOUR RANGE! (I flipped the circuit breaker at the box to do this. To be totally safe, you can shut off the power to the whole house.) 2. Remove the oven racks. 3. Undo the two screws (save for step 8) holding the bake element in place. (This took some doing for me, as the screws did not want to come out easily. Maybe use some penetrating oil and be careful not to strip the screws.) 4. Gently pull the bake element toward you, exposing the contacts and wires. 5. Remove the wires from the old element's contacts. (Remember which contact 6. Attach the wires to the new element's contacts. 7. CAREFULLY push the wires back into the wall of the oven. (Pay attention to the insulation. Make sure that some insulation is near the wall.) 8. Fasten element to wall of oven with screws you saved from step 2.
  • Stephen from ROCHESTER, NY
  • Difficulty Level:
    Really Easy
  • Total Repair Time:
    Less than 15 mins
  • Tools:
    Pliers, Screw drivers
9 of 12 people found this instruction helpful.
Was this instruction helpful to you?
Thank you for voting!
Bake element was cracked
Remove the lower bake element by removing the 2 retaining screws that secure the element to the inside oven back. Carefully slide the element out. There are 2 wires attached to the terminals of the element. While removing be careful to not pull the insulation out with the wiring. Attach the wires to the terminals of the new element and reinstall in reverse order.
  • Alan from ROCHESTER, NY
  • Difficulty Level:
    Really Easy
  • Total Repair Time:
    15 - 30 mins
  • Tools:
    Screw drivers
1 person found this instruction helpful.
Was this instruction helpful to you?
Thank you for voting!
Element had burned out
Extremely easy. Two screws and electric connection that had easy pop on-off connection.
  • John from Pearland, TX
  • Difficulty Level:
    Really Easy
  • Total Repair Time:
    Less than 15 mins
  • Tools:
    Screw drivers
4 of 7 people found this instruction helpful.
Was this instruction helpful to you?
Thank you for voting!
Replaced Bake Element
Based on previous responses we anticipated this repair to be easy, however, it was a little more challenging than expected. The method of repair was easy enough, just would have been better if there had been more wire to pull out to connect to the new bake element. It took two of us to fish for the wires back inside the stove with a needle-nose pliers after removing the element. One had to hold the wire with the pliers while it took the other to attach it to the new element with second pair of pliers as there was no room for using fingers. Retrieving and attaching the second wire to the element was even more challenging because now the half-attached element was in the way. Disappointed and not sure why the element burned out in the first place on a 4year old appliance.
  • Sandy from Baileys Harbor, WI
  • Difficulty Level:
    A Bit Difficult
  • Total Repair Time:
    15 - 30 mins
  • Tools:
    Pliers, Screw drivers
12 of 15 people found this instruction helpful.
Was this instruction helpful to you?
Thank you for voting!
Bake element was broken and drip pans were rusted out.
The drip pans were a snap to replace, and the bake element was almost as easy. It just took a screwdriver to pull out the broken element, detached the wires, plugged them to the new ones and screwed it back in. Super easy fix and it works great.
Other Parts Used:
Oven Bake Element Drip Bowl - 6" Drip Bowl - 8"
  • Eric from Baton Rouge, LA
  • Difficulty Level:
    Really Easy
  • Total Repair Time:
    Less than 15 mins
  • Tools:
    Screw drivers
1 of 6 people found this instruction helpful.
Was this instruction helpful to you?
Thank you for voting!
  • 1
  • 2
Questions and Answers

Ask our experts a question about this part and we'll get back to you as soon as possible!

33 questions answered by our experts.
Sort by:
  • 1
  • 2
  • 3
Sorry, we couldn't find any existing answers that matched.Try using some different or simpler keywords, or submit your new question by using the "Ask a Question" button above!
Dan
November 30, 2018
The bottom heating element in the oven burned up i.E., it looked like a fireworks sparkler. I turned off the oven but the sparkling continued and the undamaged section of the element continued to glow red. I had to trip the breaker to shut off power to the element. I've replaced elements on other ovens before but, have never seen this occur. Is this common? Can i just replace the element or is something else going on?
For model number GLES388ASD
PartSelect logo
Hello Dan, Thank you for your inquiry. Although it is not common, it can happen that the element overheats and melts. You can start by replacing the element but we would also recommend checking the wiring for any visible wear and also check the temperature sensor as well. Hope this helps!

30 people found this helpful.

Was this helpful?
Thank you for voting!
Nasser
September 3, 2019
How many watts for the bottom stove elements
For model number CFEF372ECF5
PartSelect logo
Hello Nasser, Thank you for the question. This element is 3000 watts and 240 volts and is 20" wide, 15-1/2" long. Hope this helps!

14 people found this helpful.

Was this helpful?
Thank you for voting!
Tannan
February 19, 2019
I replaced the bottom bake element. Oven still so t get warmer then 150. Any suggestions would help as we can’t afford a new stove at the time!!
For model number PLEB30S8ACB
PartSelect logo
Hello Tannan, Thank you for contacting us. I suggest checking the following part: PS820208 Temperature Sensor. You can test the part with a multimeter. If you are unfamiliar with the functions of a multimeter we have videos available to assist you.

11 people found this helpful.

Was this helpful?
Thank you for voting!
Tiffany
November 14, 2017
Yes this the correct lower baking element to replace the one that came with the oven when first bought, that's not working now? Having a hard time finding the right part/part number for my oven! Thanks so, so much!
For model number FES300ASD
PartSelect logo
Hi Tiffany, Thank you for contacting us. Based on the model number you provided in your question to us, the bake element you have referenced in your question to us will work on your appliance. I hope this helps. Thank you and have a great day!

7 people found this helpful.

Was this helpful?
Thank you for voting!
Daniel
November 14, 2017
Purchased a bake element for a Kenmore elite range, turned off power, removed the 2 screws holding existing bake element pulled bake element out, just enough to grab and detach the 2 wires. Once removed i installed new one, replaced screws and tested and still cannot get any heat from bake element, so i am looking for the next step in trouble shooting the issue. I do know after testing with a meter that i do not get any power at the bake element connection, where the 2 yellow wires clip on. I traced one yellow wire up to oven control panel, and the other yellow wire connects to a red wire mid way then connects to the right side of yellow wire at the oven control panel. My side oven works fine along with all surface burners. The previous bake element somewhat worked, but only got up about 200deg, and no more when set at 400deg. Any assistance would be helpful. Thanks
For model number 79099503994
PartSelect logo
Hi Daniel, Thank you for your question. If your bake element is testing fine, the only other part to check would be your temperature sensor. You can test that part with a multi meter as well. However if that part is also testing fine, then it is most likely your electronic control board that is the issue. I hope that helps. Good luck with your repair.

5 people found this helpful.

Was this helpful?
Thank you for voting!
Jean
November 1, 2017
How do you get to the bottom element in the oven when it is under the bottom panel?
For model number Fges3065kfd
PartSelect logo
Hi Jean, Thank you for your question. You would have to pull out your bottom drawer to get to this part. Pull your drawer out all of the way. Press down on the right and left hand side locking tabs to remove the drawer completely. There is a service panel with three screws, remove those screws and that panel. That will reveal the element for you to change out. Good luck with your repair.

4 people found this helpful.

Was this helpful?
Thank you for voting!
Lindsey
September 25, 2017
Show how to disconnect the bake element . Please
For model number FES355DSB
PartSelect logo
Hi Lindsey, Thank you for your question. We have an installation video on this part underneath the part information. Here is the URL: https://youtu.be/w7aFK06-rLU . Good luck with your repair.

3 people found this helpful.

Was this helpful?
Thank you for voting!
Elaine
November 4, 2017
Will this oven element for fes388wgcj fit and work for model # fes388wgci?
For model number FES388WGCI
PartSelect logo
Hi Elaine, Thank you for the question. We do not have the Model number ending with "i" listed as a valid model number.You can check your old element to see if it matches this element. This bake element (including terminals) is 20 inches wide x 18 inches long, and connects with 5-inch push-on wire terminals. Hope this helps!

2 people found this helpful.

Was this helpful?
Thank you for voting!
Jed
November 10, 2017
When reattaching the bake element does it matter which of the leads is connected to which side? When i took out the old element i didn't see which wire attached to which lead.
For model number FEB30S5AS
PartSelect logo
Hi Jed, Thank you for your question. We actually have an installation video that may be able to help you out there. Here you are: https://youtu.be/w7aFK06-rLU . Good luck with your repair.

1 person found this helpful.

Was this helpful?
Thank you for voting!
David
August 21, 2017
The element we need to replace measures 20.5 inches front to back x 19 inches wide. Its a Frigidaire drop in glass top stove. Could you tell me which element that we need. Thank you
For model number FED367ASC
PartSelect logo
Hi David, Thank you for your inquiry. The bottom or bake element listed under your model number is in stock and the part number for it is PS3633414. I hope this helps. Thank you and have a great day!

1 person found this helpful.

Was this helpful?
Thank you for voting!
Related Parts:
  • 1
  • 2
  • 3
Model Cross Reference
This part works with the following models:
PartSelect Number: PS3633414
Manufacturer Part Number: 318255006
Brand
Model Number
Description
Frigidaire
74403
Range - DUAL FUEL RANGE
Kenmore
79045062400
Range
Kenmore
79045062401
Range
Kenmore
79045069400
Range
Kenmore
79045072400
Wall Oven
Kenmore
79045074401
Wall Oven
Kenmore
79045079401
Wall Oven
Kenmore
79045252400
Range
Kenmore
79045254400
Range
Kenmore
79045262500
Range
Kenmore
79045262501
Range
Kenmore
79045262502
Range
Kenmore
79045262503
Range
Kenmore
79045662100
Range
Kenmore
79045662103
Range
Kenmore
79045669102
Range
Kenmore
79045669103
Range
Kenmore
79045669104
Range
Kenmore
79045702300
Range
Kenmore
79045704300
Range
Kenmore
79045709300
Range
Kenmore
79045712100
Range
Kenmore
79045712102
Range
Kenmore
79045712103
Range
Kenmore
79045714100
Range
Kenmore
79045714102
Range
Kenmore
79045719100
Range
Kenmore
79045781300
Wall Oven
Kenmore
79045782300
Wall Oven
Kenmore
79045784300
Wall Oven
Customer Service Representative

Get in touch, we're here to help!

Daily 8am - 9pm EST

Contact Customer Service