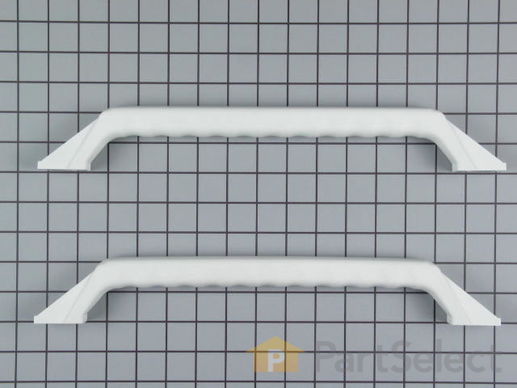
Part Location Diagram of WR12X869 GE Door Handle Kit
See part 7 in the diagram
( Grid squares measure 1x1 inch )
Customer Service Representative

Get in touch, we're here to help!

Daily 8am - 9pm EST

customerservice@partselect.com

Door Handle Kit WR12X869

 Fits your CSK27PFZBWW!
★★★★★
★★★★★
4 Reviews

Rated by 12 customers 

Really Easy 

15 - 30 mins 

Ratings submitted by customers like you who bought this part.

$ 188.15
  Special Order
Get FREE EconoShip on orders over $100! T&C apply
 Fits your CSK27PFZBWW!
PartSelect Number PS289808
Manufacturer Part Number WR12X869
Manufactured by GE
Product Description

Door Handle Kit Specifications

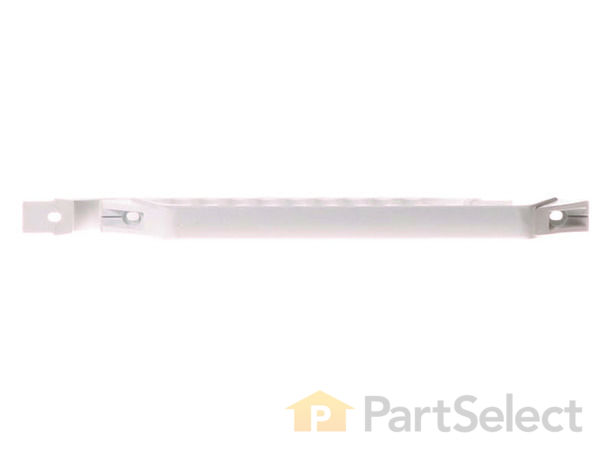
This kit contains two white door handles. They are not sold separately. Mounting screws are NOT included.
How Buying OEM Parts Can Save You Time and Money

How Buying OEM Parts Can Save You Time and Money

Troubleshooting
This part works with the following products:
Refrigerator.
This part works with the following products:
General Electric, Hotpoint.
Part# WR12X869 replaces these:
AP2062249, 292002, WR12X869, WR12X0852, WR12X0869, WR12X10544, WR12X10545, WR12X852
Back to Top
Customer Reviews
Average Rating:
★★★★★
★★★★★
4 Reviews
4.3
Filter By Rating:
  • 5 Stars
    3
  • 4 Stars
    0
  • 3 Stars
    0
  • 2 Stars
    1
  • 1 Star
    0
Sort by:
  • 1
Sorry, we couldn't find any existing reviews that matched. Try using some different or simpler keywords.
  • 1
Customer Repair Stories
 Average Repair Rating: 4.2 / 5.0, 12 reviews. What's this?
Sort by:
  • 1
  • 2
Sorry, we couldn't find any existing installation instruction that matched.
The old pull handle had turned an ugly mustard-yellow color after 20 years of service. It desperately needed replacement. In all other respects, the refrigerator still looked and worked great!
1. Upper and lower door trim leading above and below the middle handle section needing replacement both need to be removed first.

2. On the top trim piece, insert the rounded knife tip at the very top of the trim. Knife should be inserted between the outer chrome strip and the white strip that runs down the center of the trim.

3. Then twist the knife to gently pry the top of the white strip away from the chrome strip.

4. Once this is done, gently use your fingers to free the white strip all the way down to the center handle, popping the strip free at its bottom. Don't be in a hurry and be gentle, or you may bend the sheet metal white trim piece and ruin its appearance for re-installation.

5. Repeat the same for the lower door trim, though this time starting at the bottom of the door and working the white strip loose in the upward direction. For future reference, I made sure I labelled each piece temporarily with marked masking tape to keep track of which strip came from the top, and which from the bottom. This way, I could re-install them in their original positions.

6. At the top and bottom of the middle plastic handle, there were now visible single screws which held the chrome pieces securing the plastic handle to the door. (They had been hidden by the white filler strips.)

7. Remove both of these screws, saving them for re-use in the re-installation process.

8. Remove the two chrome pieces. It is a good time now to thoroughly clean the white strips and all door parts.

9. Remove the old plastic pull handle from its two chrome end pieces, replacing it with the new white plastic pull handle.

10. Use the two saved screws to re-attach the new pull handle to the door.

11. Starting at the top, gently pop the old top white center strip into the upper chrome trim piece track.

12. Gently work the full length of the white center piece into the chrome trim piece moving slowly from top to bottom. Take care to be gentle and avoid bending the white strip by being in too much of a hurry.

13. Do the same to the bottom trim, though starting here at the bottom and working upwards to the pull handle.

You are done and your fridge now looks like new!
  • Robert from PARK RIDGE, NJ
  • Difficulty Level:
    Really Easy
  • Total Repair Time:
    30 - 60 mins
  • Tools:
    Screw drivers
1 person found this instruction helpful.
Was this instruction helpful to you?
Thank you for voting!
Door handles worn out, cracked, looked terrible
After contemplating for months on replacing my GE side-by-side refrigerator and realizing the only reason I wanted to is because the door handles were disgusting, I found this site and decided to try to replace them first. After reading other instructions shared, it was a relatively simple fix. You'll need a flathead screwdriver to pop off the trim and a torque screwdriver to remove and reinstall the handle screws. That's it. Looks great! Wish I would have done this sooner as it would have saved me a lot of worry time. The cost of replacing my refrigerator is a nice perk, too!
  • Cindy from BROOKLYN, WI
  • Difficulty Level:
    Really Easy
  • Total Repair Time:
    15 - 30 mins
  • Tools:
    Screw drivers
2 of 2 people found this instruction helpful.
Was this instruction helpful to you?
Thank you for voting!
uncommon/unusual screws
Flat or philips screwdriver does not fit, Hex keys do not fit either. Had to buy a set of 6-pointed Torx keys to remove and re-install the existing screws. With the right tool it is an easy job.
  • Arthur from Camarillo, CA
  • Difficulty Level:
    Easy
  • Total Repair Time:
    15 - 30 mins
6 of 8 people found this instruction helpful.
Was this instruction helpful to you?
Thank you for voting!
Handles Were Worn Out
Removed trim strips with flat head screw driver. Unscrewed handle and then put new ones on and snap trim stips back on
  • Wilfred from Miami, FL
  • Difficulty Level:
    Really Easy
  • Total Repair Time:
    15 - 30 mins
  • Tools:
    Screw drivers
1 of 9 people found this instruction helpful.
Was this instruction helpful to you?
Thank you for voting!
Discolored Door Handles
Easy to do - first use a butter knife to remove the decorative cover on the handle trim - then unscrew clean and replace - done in 15 minutes!
  • Doug from Brunswick, OH
  • Difficulty Level:
    Really Easy
  • Total Repair Time:
    Less than 15 mins
  • Tools:
    Screw drivers
4 of 6 people found this instruction helpful.
Was this instruction helpful to you?
Thank you for voting!
old handles-----dirty,stickey
removed upper and lower facia strips, exposing the screws holding on the handles. replacinf the metal strips was trickey---they bend easily, and are difficult to get them to snap back in.
  • jon from alameda, CA
  • Difficulty Level:
    A Bit Difficult
  • Total Repair Time:
    30 - 60 mins
  • Tools:
    Pliers, Screw drivers
4 of 6 people found this instruction helpful.
Was this instruction helpful to you?
Thank you for voting!
handles and trim to handles deteriroated to UGLY
removed upper and lower strips above and below handle. unscrewed starz screws, replaced. Also replaced strips which had rusted out.

Got my parts in less than two days. Postage on the first one (handles), none on the second order (strips).
Great.
  • Georgia from Atlantic Beach, FL
  • Difficulty Level:
    Really Easy
  • Total Repair Time:
    Less than 15 mins
  • Tools:
    Screw drivers
5 of 7 people found this instruction helpful.
Was this instruction helpful to you?
Thank you for voting!
Faded door handles
Simply lifted up the molding with a flat head screw driver, removed the screws then removed the old handles and replaced with the new ones. Pressed the molding back into place. Easy a pie. Great Service too.
  • Errol from Locust Grove, GA
  • Difficulty Level:
    Really Easy
  • Total Repair Time:
    Less than 15 mins
  • Tools:
    Screw drivers
8 of 8 people found this instruction helpful.
Was this instruction helpful to you?
Thank you for voting!
Finish on handles had worn off over the years - they looked awful !
WIth a flathead screwdriver, I "popped off" the 4 long thin white "cover" strips that run from the top and bottom of the doors to the beginning of the door handles. This exposed the screws that held the old handles in place. Simply remove the old handles, replace with new ones, then replace the "cover strips" . It was very easy and looks so much better. I should have done it years ago !
  • Lynelle from Jacksonville, FL
  • Difficulty Level:
    Really Easy
  • Total Repair Time:
    15 - 30 mins
  • Tools:
    Screw drivers
63 of 67 people found this instruction helpful.
Was this instruction helpful to you?
Thank you for voting!
door handles were discolored and worn
1 Remove trim pieces above and below the handles. Loosen by prying from base with flat screw driver.
2. Remove the two screws fastenig each door handle to its door. Remove handles.
4. Secured each new door handle to its door with existing screws.
5. Clean and reinstall trim pieces.
  • Richard from Santa Barbara, CA
  • Difficulty Level:
    Easy
  • Total Repair Time:
    15 - 30 mins
  • Tools:
    Screw drivers
39 of 42 people found this instruction helpful.
Was this instruction helpful to you?
Thank you for voting!
  • 1
  • 2
Questions and Answers

Ask our experts a question about this part and we'll get back to you as soon as possible!

2 questions answered by our experts.
Sort by:
  • 1
Sorry, we couldn't find any existing answers that matched.Try using some different or simpler keywords, or submit your new question by using the "Ask a Question" button above!
Dale
August 6, 2019
Does this white handle have a chrome frame hard parts or is the frame white also. We are looking for chrome hard parts with white soft grips.
For model number TPX24PR
PartSelect logo
Hello Dale, thank you for your question. The manufacturer has substituted this part from the original. The handles are only white, with no chrome on them. I hope this helps!

4 people found this helpful.

Was this helpful?
Thank you for voting!
Steve Farrow
September 12, 2019
Is the door handle hard plastic or soft?
For model number TRX24PRXBWW WR12X869
PartSelect logo
Hello Steve, thank you for your question. I believe this is a hard plastic handle. It is the only handle set compatible with your specific model number. I hope this helps!

3 people found this helpful.

Was this helpful?
Thank you for voting!
  • 1
Model Cross Reference
This part works with the following models:
PartSelect Number: PS289808
Manufacturer Part Number: WR12X869
Brand
Model Number
Description
Hotpoint
CSK27PFTCWW
Refrigerator - Side-by-side 94 Korean Disp
Hotpoint
CSK27PFXAWW
Refrigerator - Side-by-side 95 Korean Disp
Hotpoint
CSK27PFXBWW
Refrigerator - Side-by-side
Hotpoint
CSK27PFXDWW
Refrigerator - Side-by-side X Series
Hotpoint
CSK27PFXEWW
Refrigerator - Side-by-side X Series
Hotpoint
CSK27PFZAWW
Refrigerator - Side-by-side Z Series
Hotpoint
CSK27PFZBWW
Refrigerator
General Electric
MSK27PFTCWW
Refrigerator
General Electric
MSK27PFXAWW
Refrigerator
General Electric
MSK27PFXDWW
Refrigerator
General Electric
MSK27PFXEWW
Refrigerator
General Electric
MSK27PFZAWW
Refrigerator
General Electric
MSK27PFZBWW
Refrigerator
General Electric
MSK28DHZAWW
Refrigerator
General Electric
MSK28DHZCWW
Refrigerator
General Electric
TFC22PRSAWW
Refrigerator
General Electric
TFC22PRSBWW
Refrigerator
General Electric
TFC24PRSAWW
Refrigerator
General Electric
TFC24PRSBWW
Refrigerator
General Electric
TFC27PFSAWW
Refrigerator
General Electric
TFC27PFSBWW
Refrigerator
General Electric
TFCW22RRAWH
Refrigerator
General Electric
TFCW24RRAWH
Refrigerator
General Electric
TFCW27FRAWH
Refrigerator
General Electric
TFCW27FRBWH
Refrigerator
General Electric
TFCW27RRAWH
Refrigerator
General Electric
TFEW22RRAWH
Refrigerator
General Electric
TFEW24RRAWH
Refrigerator
General Electric
TFEW27FPAWH
Refrigerator
General Electric
TFEW27FRAWH
Refrigerator
Customer Service Representative

Get in touch, we're here to help!

Daily 8am - 9pm EST

Contact Customer Service