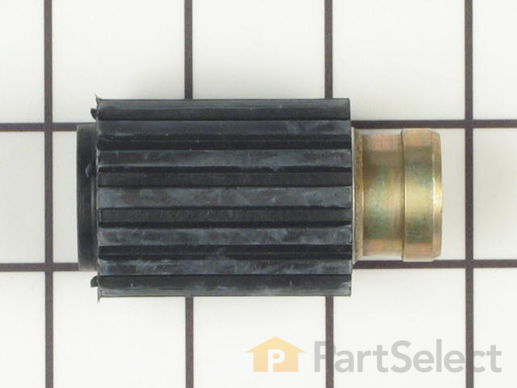
Part Location Diagram of WH1X1944 GE Agitator Coupling
See part 303 in the diagram
( Grid squares measure 1x1 inch )
Customer Service Representative

Get in touch, we're here to help!

Daily 8am - 9pm EST

customerservice@partselect.com

Agitator Coupling WH1X1944

 Fits your WWA7050GAL!
★★★★★
★★★★★
2 Reviews

Rated by 3 customers 

A Bit Difficult 

1- 2 hours 

Ratings submitted by customers like you who bought this part.

$ 53.59
  Special Order
Get FREE EconoShip on orders over $100! T&C apply
 Fits your WWA7050GAL!
PartSelect Number PS270786
Manufacturer Part Number WH1X1944
Manufactured by GE
Product Description

Agitator Coupling Specifications

This coupling is used for 20 spline drive shaft transmissions.
How Buying OEM Parts Can Save You Time and Money

How Buying OEM Parts Can Save You Time and Money

Troubleshooting
This part fixes the following symptoms:
Will not agitate
This part works with the following products:
Washer.
This part works with the following products:
General Electric, Hotpoint.
Part# WH1X1944 replaces these:
AP2044578, 3365, WH01X1944, WH1X1944, WH1X1944R
Back to Top
Customer Reviews
Average Rating:
★★★★★
★★★★★
2 Reviews
4.0
Filter By Rating:
  • 5 Stars
    1
  • 4 Stars
    0
  • 3 Stars
    1
  • 2 Stars
    0
  • 1 Star
    0
Sort by:
  • 1
Sorry, we couldn't find any existing reviews that matched. Try using some different or simpler keywords.
  • 1
Customer Repair Stories
 Average Repair Rating: 2.3 / 5.0, 3 reviews. What's this?
Sort by:
  • 1
Sorry, we couldn't find any existing installation instruction that matched.
agitator worn out
Took agitator out of machine knocked old coupling out and inserted new one into agitator/washing machine. Part arrived promptl and correctly. Thank you. JD
  • JD from Smyrna, TN
  • Difficulty Level:
    Easy
  • Total Repair Time:
    Less than 15 mins
  • Tools:
    Socket set
6 of 12 people found this instruction helpful.
Was this instruction helpful to you?
Thank you for voting!
Agitator coupling rubber separated from metal part
In my case the rubber bonded to the agitator coupling had stuck inside the agitator cover (plastic part that comes in contact with clothes). The metal part with the splines could not be removed by gripping with pliers. A pulling tool needed to be used to remove the tool. I used a valve spring compressor tool for overhead cam engines, but any pulling type tool with a center bolt and jaws that will fit between the rubber seal and the bottom of the agitator coupling would work. After removing metal part of coupling from agitator shaft and cleaning up the rusted teeth on the agitator shaft that caused the difficult removal, I pried out the rubber part of the agitator coupling from the plastic agitator cover by inserting a screw driver from the top hole in the agitator cover and getting it under the rubber to separate the toothed parts of the rubber from the matching grooves and then pushed it out the bottom of the agitator coupling. Then came the difficult part of the project - inserting the new coupling. I found the instructions that came with the new part very unrealistic and was not able to simply wet the rubber on the new coupling after installing it on top of agitator shaft and then push it into the plastic agitator cover - it simply would not go down more than 1/8" in the cover. If you attempt to do this job using the method described in the instructions you will likely end up with a damaged agitator, or cover as you will likely resort to hammering the cover on which is not recommended because of shock to agitator teeth. In my solution this is where a long bolt, 2 large diameter washers that the bolt fit through, several nuts larger than the bolt diameter and finally a nut that fit the long bolt came into play. Using these parts and a socket set with several long socket extensions I used the bolt, washers and nuts to draw the agitator coupling into position in the plastic coupling. This worked extremely easily once all the parts were in the right place and put no stress on any of the parts being assembled. To do this, first I installed the new agitator coupling on the agitator shaft - making sure it would remove fairly easily before continuing, then I pushed the agitator cover over the agitator coupling as far as I could to get it connected well enough to the agitator coupling so that when I pulled the agitator cover back off the agitator shaft the coupling would come with it (still in place with the rubber teeth from the coupling started in the corresponding grooves on the inside of the cover). With the agitator cover removed I placed a washer that was wider than the top of the agitator cover onto the long bolt (the bolt must be about 8 inches long) and then passed the bolt through the hole in the top of the agitator cover, through the splined hole in the agitator coupling (the bolt must be small enough in diameter to fit through the agitator couping hole). With the bolt and washer pushed all the way down on top of the agitator cover I turned the cover over and placed it upside down on the floor so that the cover pushed down on the washer and bolt and held them in place. I then used an extracting tool (something with little claws that protrude or retract) to lower first another washer large enough in diameter to cover the diameter of the agitator coupling bottom and then several nuts larger than the bolt diameter onto the exposed end of the bolt that comes out on the other side of the agitator coupling inside the long narrow tube of the agitator cover. Once I had enough nuts in place to leave only enough threads on the bolt for the washer and nut that fit that bolt, I set the nut on the end of the bolt and used the correct sized socket with several long socket extensions attached to it to hand tighten the nut onto the end of the bolt. Then securing the head of the bolt with a wrench to keep the bolt from turning, I placed a socket wrench on the extensions and socket that covered the nut and then tightened th
  • Arlene from Oak Ridge, NC
  • Difficulty Level:
    Difficult
  • Total Repair Time:
    More than 2 hours
  • Tools:
    Screw drivers, Socket set
23 of 30 people found this instruction helpful.
Was this instruction helpful to you?
Thank you for voting!
Replaced the Agitator coupling
First, you will need to remove the agitator, if it hasn't fallen off by itself. Than, you will need a pulley to remove the coupling from the spinning pole . I used one of those pulleys with three arms to remove it , Second, I lubricated the inside of the new coupling with a little oil, and sided it down on the spinning pole. It was a little hard to installed but, I used a hammer and tapped it in. Third, I also put some lubricant on the new coupling to help the agitator slide down a little easier on the new coupling.

P.S. Check inside agitator for old rubber of the old coupling and remove it. (only if it has fallen off the old coupling.)
  • jose from lAREDO, TX
  • Difficulty Level:
    Difficult
  • Total Repair Time:
    15 - 30 mins
49 of 60 people found this instruction helpful.
Was this instruction helpful to you?
Thank you for voting!
  • 1
Questions and Answers

Ask our experts a question about this part and we'll get back to you as soon as possible!

3 questions answered by our experts.
Sort by:
  • 1
Sorry, we couldn't find any existing answers that matched.Try using some different or simpler keywords, or submit your new question by using the "Ask a Question" button above!
Tim
September 1, 2017
How is the agitator coupling (still available) replaced? Does the old one come out from the top of the agitator, or dropped out the bottom? Is it held in place by anything special, or is it just pressed into the agitator neck?
For model number WWA8360GAL
PartSelect logo
Hi Tim, Thank you for the question. You will need to remove the agitator, than you will need to remove the coupling from the spinning .Next use lubricated inside of the new coupling with a little grease or oil, and sided it down on the spinning. You can used a hammer and tapped it in if need be. A good hint from a previous customer - Check inside agitator for old rubber of the old coupling and remove it. Good luck with the repair!

4 people found this helpful.

Was this helpful?
Thank you for voting!
Lorenzo
June 10, 2019
The agitator on my washer only works when there are light, small loads (no scrubbing action with larger loads). Will replacing this part correct that problem? If not, what part(s) do i need?Thanks! lorenzo
For model number WWA8310GAL
PartSelect logo
Hello Lorenzo, thank you for your question. We would recommend checking that part before purchasing. It is possible that the agitator coupling has become worn and is not able to move the agitator smoothly with larger loads. If that isn't the issue, there could be an issue with the belt, pulley, motor, or clutch. I hope this helps!

1 person found this helpful.

Was this helpful?
Thank you for voting!
Marcos
November 14, 2019
Will this part fit my washer?
For model number GTW330ASK2WW
PartSelect logo
Hello Marcos, Thank you for the question. Checking the model number, it is not listing a Agitator Coupling. The Agitator fits onto the shaft of the Washer Gear Case, PartSelect Number PS12298171. Hope this helps!

Was this helpful?
Thank you for voting!
Related Parts:
  • 1
Model Cross Reference
This part works with the following models:
PartSelect Number: PS270786
Manufacturer Part Number: WH1X1944
Brand
Model Number
Description
General Electric
52050119
Washer
General Electric
52150119
Washer
General Electric
52170119
Washer
General Electric
52170128
Washer
General Electric
52170129
Washer
General Electric
52178128
Washer
General Electric
52190117
Washer
General Electric
52190118
Washer
General Electric
52190119
Washer
General Electric
52198117
Washer
General Electric
52198118
Washer
General Electric
52198119
Washer
General Electric
53040117
Washer
General Electric
53040118
Washer
General Electric
53040119
Washer
General Electric
53048117
Washer
General Electric
53048118
Washer
General Electric
53048119
Washer
General Electric
53050119
Washer
General Electric
53150119
Washer
General Electric
53170119
Washer
General Electric
53180119
Washer
General Electric
53180128
Washer
General Electric
53180129
Washer
General Electric
53188128
Washer
General Electric
53190117
Washer
General Electric
53190118
Washer
General Electric
53190119
Washer
General Electric
53198117
Washer
General Electric
53198118
Washer
Customer Service Representative

Get in touch, we're here to help!

Daily 8am - 9pm EST

Contact Customer Service