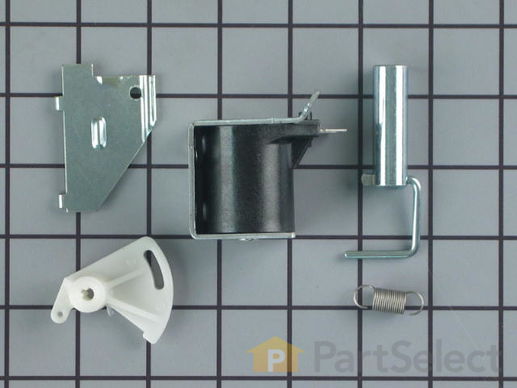
Part Location Diagram of WD21X802 GE Drain Solenoid Repair Kit
See part 493 in the diagram
( Grid squares measure 1x1 inch )
Customer Service Representative

Get in touch, we're here to help!

Daily 8am - 9pm EST

customerservice@partselect.com

Drain Solenoid Repair Kit WD21X802

 Fits your HDA997-03!
★★★★★
★★★★★
2 Reviews

Rated by 8 customers 

Easy 

30 - 60 mins 

Ratings submitted by customers like you who bought this part.

$ 84.05
  In Stock
Get FREE EconoShip on orders over $100! T&C apply

Get this part fast! Average delivery time for in-stock parts via standard shipping: 1.8 days.

 Fits your HDA997-03!
PartSelect Number PS260462
Manufacturer Part Number WD21X802
Manufactured by GE
Product Description

Drain Solenoid Repair Kit Specifications

This kit includes the armature and link assembly. You may need the solenoid bracket which is sold separately. This valve opens in order for the water to drain out of the dishwasher.
How Buying OEM Parts Can Save You Time and Money

How Buying OEM Parts Can Save You Time and Money

Troubleshooting
This part fixes the following symptoms:
Not draining | Will not fill with water | Leaking
This part works with the following products:
Dishwasher.
This part works with the following products:
General Electric, Hotpoint, Kenmore, Amana.
Part# WD21X802 replaces these:
AP2039683, 2333, WD21X0440, WD21X0664, WD21X0710, WD21X0802, WD21X440, WD21X664, WD21X710
Back to Top
Customer Reviews
Average Rating:
★★★★★
★★★★★
2 Reviews
3.0
Filter By Rating:
  • 5 Stars
    0
  • 4 Stars
    1
  • 3 Stars
    0
  • 2 Stars
    1
  • 1 Star
    0
Sort by:
  • 1
Sorry, we couldn't find any existing reviews that matched. Try using some different or simpler keywords.
  • 1
Customer Repair Stories
 Average Repair Rating: 3.0 / 5.0, 8 reviews. What's this?
Sort by:
  • 1
Sorry, we couldn't find any existing installation instruction that matched.
Frozen soleniod valve
Pulled washer out about 6" without disconnecting any hoses. This way i could use both hands from the left side & front after i took the kick plate off.
  • Ronald from MONTGOMRY VLG, MD
  • Difficulty Level:
    A Bit Difficult
  • Total Repair Time:
    15 - 30 mins
  • Tools:
    Nutdriver, Pliers, Screw drivers
3 of 3 people found this instruction helpful.
Was this instruction helpful to you?
Thank you for voting!
Dishwasher not draining on all cycles.
My GE Potscrubber 940 would not drain on all cycles. After checking the basin traps and not finding any blockage in the water drain line, I suspected that the problem was with the drain solenoid, since the motor was running smooth. I removed the dishwasher, primarily by removing the water supply line on the left side from the water inlet valve and disconnecting the electrical connections. Make sure you turn off the water and electricity before you do any work on the dishwasher. With the dishwasher taken out and on its side, the drain solenoid unit will be visible near the motor in the middle assuming that the front bottom panel of the dishwasher has been removed. I found mine to be all crudded up. I removed the electrical connections and the solenoid bracket. Then by using my multimeter, I found a bad resistance reading (infinity) for the solenoid. I ordered the Drain Solenoid Repair Kit and replaced all the items except the plastic rocker arm. Naturally, just reverse your steps to get the dishwasher back together. Turn the water and electricity back on and fire her up. Check for proper operation and any leaks and you should be done.
Other Parts Used:
Corner Tub Baffle - Lower Right Drain Solenoid Repair Kit
  • Dale from Kent, WA
  • Difficulty Level:
    A Bit Difficult
  • Total Repair Time:
    1- 2 hours
  • Tools:
    Pliers, Screw drivers, Wrench (Adjustable), Wrench set
4 of 6 people found this instruction helpful.
Was this instruction helpful to you?
Thank you for voting!
Would not cycle / would not drain
Timer - (easy):
Turn off power for unit at breaker box. Open the front door and remove the screws holding the front cover. Locate timer. Unplug timer and remove screws holding timer in place. Reverse process to install new timer.

Drain solenoid - (a little harder):
Turn off water to dishwasher under sink and disconnect from plumbing. Disconnect drain line. Remove any screws holding dishwasher in place and start pulling unit from it's cavity. It should come about half way out. At this time you can peer under the unit and see the drain solenoid.

If you don't know what you're doing (like me) I recommend the following. Remove the water line from the dishwasher (and possibly the drain line) It should now be easy to pull the unit all the way out and tip it on it's side, fully exposing the drain solenoid.

Note: The drain solenoid provided to me was encapsulated in a different bracket than the original one in my dishwasher unit. It was necessary to pry the solenoid out by bending the bracket and installing in the original bracket. Then squeeze back together in a vice with a few gentle love taps with a hammer to squeeze it all back together. It was still a little loose but the solenoid just goes up and down so no big deal.

There's a little metal clip holding the white plastic arm to the drain valve. Let's say this O represents the diameter of the metal rod it's hooked to. That clip is removed by a small screwdriver pushing the clip away from that rod, this way: 0 ==> It will make sense once you do it.

From there it's pretty easy to replace the solenoid unit and reverse the steps above to re-install the unit.

Chris
Other Parts Used:
Drain Solenoid Repair Kit Timer
  • Chris from West Bloomfield, MI
  • Difficulty Level:
    Easy
  • Total Repair Time:
    1- 2 hours
  • Tools:
    Pliers, Screw drivers, Wrench set
4 of 7 people found this instruction helpful.
Was this instruction helpful to you?
Thank you for voting!
Would not drain
The repair kit solenoid was mounted in a metal bracket. My unit has the solenoid and mounting bracket as one piece. If the solenoid was separate it would have been an easy fix. As it was I had to cut the solenoid out of the bracket to mount it in my unit which this kit was suppose to fit.
  • David from Doylestown, OH
  • Difficulty Level:
    A Bit Difficult
  • Total Repair Time:
    30 - 60 mins
  • Tools:
    Nutdriver
3 of 7 people found this instruction helpful.
Was this instruction helpful to you?
Thank you for voting!
leaked and would not drain
unscrewed bracket unplugged solenoid , pried off spring clip pulled nylon arm off and took off old push on nut. I had to squeeze the push on nut together with pliers from two angles to get it loose
Other Parts Used:
Push On Nut Drain Valve Shaft Seal Drain Solenoid Repair Kit SOLEN BRKT
  • Thomas from Franklin, WI
  • Difficulty Level:
    A Bit Difficult
  • Total Repair Time:
    15 - 30 mins
  • Tools:
    Pliers, Screw drivers, Socket set
8 of 12 people found this instruction helpful.
Was this instruction helpful to you?
Thank you for voting!
Dishwasher would not drain
I simply removed the front toe kick panels.
The solonoid is staring you in the face.
I removed the small nuts on back side of the solonoid bracket and removed the retaining clip and springs.
I installed the new solonoid and was very surprised how easy it was.

I DID turn the power OFF at the breaker panel prior to starting the repair.
  • SCOTT from ROMEOVILLE, IL
  • Difficulty Level:
    Really Easy
  • Total Repair Time:
    15 - 30 mins
  • Tools:
    Screw drivers, Wrench set
6 of 8 people found this instruction helpful.
Was this instruction helpful to you?
Thank you for voting!
Water not draining from dishwasher
I had never done work on my dishwasher - I was a rookie in this area. Turns out the work itself was quite simple. Pulled the dishwasher out, turned it over, and was able to easily replace the motor and pump assembly. The drain tube was also an easy replace. A couple key notes:

1. I also purchased a new drain solenoid and impeller kit. Note that both of these items are already included in the Motor and Pump kit replacement. There is no need to by both, now I have extras.

2. The end of the drain tube has to be trimmed if you are routing the drain tube to an air gap mounted on your kitchen sink. You have to cut the large diameter end of the tube to get to the narrow portion that will fit on your air gap.

3. The first cycle you run with the new motor/pump assembly is noisy. When you first fire it up the components in the pump are all dry, and they squeal until the water gets to them. I initially thought I had done something wrong, but once the water started flowing all the peculiar sounds cleared up.
Other Parts Used:
Motor and Pump Kit Drain Hose Drain Solenoid Repair Kit Impeller and Seal Kit
  • Mark from Morgan Hill, CA
  • Difficulty Level:
    Easy
  • Total Repair Time:
    1- 2 hours
  • Tools:
    Screw drivers, Socket set
266 of 314 people found this instruction helpful.
Was this instruction helpful to you?
Thank you for voting!
Water wouldn't drain.
After disconnecting the supply and drain hoses I unscrewed the security screws and slid the unit out of it's space under the counter. I tipped the machine about 30-45 degrees to one side and examined the underside. I noticed a solenoid that appeared to control a valve leading to the drain tube. I cycled the washer through a wash cycle and noticed that the solenoid never activated. I removed the solenoid and found it filled with debris. I cleaned it out and reinstalled it, but it still did not function. I ordered the part from PartSelect.com because they had the clearest description of the part I needed. Delivery was quick and installation took only a few minutes. After hooking everything back up and sliding the machine back in place, it works like new.
  • Lawrence from Silverdale, WA
  • Difficulty Level:
    Easy
  • Total Repair Time:
    15 - 30 mins
  • Tools:
    Nutdriver, Screw drivers
7 of 8 people found this instruction helpful.
Was this instruction helpful to you?
Thank you for voting!
  • 1
Questions and Answers

Ask our experts a question about this part and we'll get back to you as soon as possible!

1 question answered by our experts.
Sort by:
  • 1
Sorry, we couldn't find any existing answers that matched.Try using some different or simpler keywords, or submit your new question by using the "Ask a Question" button above!
George
May 29, 2019
My dishwasher pumps water out at the same time it's filling with water. Is the drain valve the right part? Thanks
For model number GSD500X-72WB
PartSelect logo
Hello George, thank you for inquiring. For this symptom you will want to look into either this Drain Solenoid Repair Kit part PS260462, the Motor and Pump Kit part PS260801, or the Float Switch part PS260235. We hope this helps.

2 people found this helpful.

Was this helpful?
Thank you for voting!
  • 1
You May Also Need ?
Model Cross Reference
This part works with the following models:
PartSelect Number: PS260462
Manufacturer Part Number: WD21X802
Brand
Model Number
Description
General Electric
1200L02
Dishwasher - DISHWASHER
Kenmore
18385
Dishwasher - DISHWASHER
General Electric
3000B10
Dishwasher - DISHWASHER
General Electric
3000W10
Dishwasher - DISHWASHER
Kenmore
361402891
Dishwasher - Kenmore Dishwasher Model 36.1402891 (361402891, 36 1402891) Parts
Kenmore
3631401190
Dishwasher
Kenmore
3631401191
Dishwasher
Kenmore
3631401590
Dishwasher
Kenmore
3631401591
Dishwasher
Kenmore
3631401592
Dishwasher
Kenmore
3631401890
Dishwasher
Kenmore
3631401891
Dishwasher
Kenmore
3631401892
Dishwasher
Kenmore
3631402190
Dishwasher
Kenmore
3631402191
Dishwasher
Kenmore
3631402192
Dishwasher
Kenmore
3631402590
Dishwasher
Kenmore
3631402591
Dishwasher
Kenmore
3631402592
Dishwasher
Kenmore
3631402890
Dishwasher
Kenmore
3631402891
Dishwasher
Kenmore
3631402892
Dishwasher
Kenmore
3631404193
Dishwasher
Kenmore
3631404194
Dishwasher
Kenmore
3631404196
Dishwasher
Kenmore
3631404197
Dishwasher
Kenmore
3631404593
Dishwasher
Kenmore
3631404594
Dishwasher
Kenmore
3631404595
Dishwasher
Kenmore
3631404596
Dishwasher
Customer Service Representative

Get in touch, we're here to help!

Daily 8am - 9pm EST

Contact Customer Service