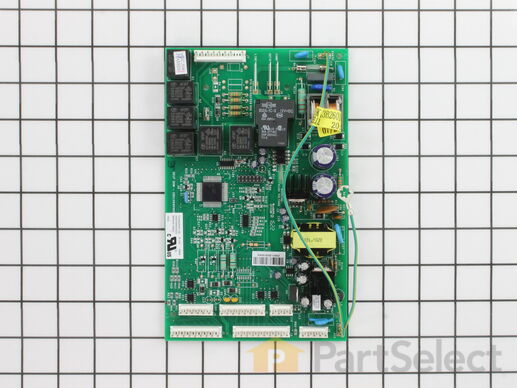
Part Location Diagram of WR55X10942C GE Main Control Board Assembly
See part 801 in the diagram
Replacing your General Electric Refrigerator Main Control Board Assembly
( Grid squares measure 1x1 inch )
Customer Service Representative

Get in touch, we're here to help!

Daily 8am - 9pm EST

customerservice@partselect.com

Main Control Board Assembly WR55X10942C

 Fits your ESF25LGRCWW!
★★★★★
★★★★★
10 Reviews

Rated by 143 customers 

Easy 

15 - 30 mins 

Ratings submitted by customers like you who bought this part.

$ 498.55
  In Stock
Get FREE EconoShip on orders over $100! T&C apply

Get this part fast! Average delivery time for in-stock parts via standard shipping: 1.8 days.

$55Recycling Rebate
 Fits your ESF25LGRCWW!
PartSelect Number PS16729744
Manufacturer Part Number WR55X10942C
Manufactured by GE
Product Description

Main Control Board Assembly Specifications

This electronic board (Main Control Board Assembly, Control Board, Motherboard) controls the temperature and defrost functions of the unit. This control board is located on the back of the refrigerator, and measures 8 inches by 5 inches. It’s constructed of metal and plastic, and comes in green. This kit includes one main control board with built in defrost controls. If broken due to electrical surges or normal use, your fridge may experience temperatures that are too warm or too cold, or inconsistent defrost cycles. If this happens, the part should be replaced.
How Buying OEM Parts Can Save You Time and Money

How Buying OEM Parts Can Save You Time and Money

Part Videos

Replacing your General Electric Refrigerator Main Control Board Assembly

Replacing your General Electric Refrigerator Main Control Board Assembly
Troubleshooting
This part fixes the following symptoms:
Will Not Start | Freezer section too warm | Fridge too warm | Clicking sound
This part works with the following products:
Refrigerator.
This part works with the following products:
General Electric, Hotpoint.
Part# WR55X10942C replaces these:
WR55X10024, WR55X10037, WR55X10045, WR55X10056, WR55X10065, WR55X10079, WR55X10083, WR55X10086, WR55X10090, WR55X10097, WR55X10109, WR55X10110, WR55X10151, WR55X10160, WR55X10171, WR55X10174, WR55X10177, WR55X10187, WR55X10188, WR55X10210 , WR55X10228, WR55X10289, WR55X10294, WR55X10297, WR55X10314, WR55X10328, WR55X10333, WR55X10335, WR55X10336, WR55X10339, WR55X10358, WR55X10366, WR55X10372, WR55X10379, WR55X10381, WR55X10385, WR55X10396, WR55X10413, WR55X10416, WR55X10426, WR55X10427, WR55X10432, WR55X10436, WR55X10456, WR55X10473, WR55X10474, WR55X10523, WR55X10524, WR55X10526, WR55X10529, WR55X10543, WR55X10552, WR55X10554, WR55X10558, WR55X10589, WR55X10597, WR55X10603, WR55X10606, WR55X10614, WR55X10616, WR55X10626, WR55X10656, WR55X10659, WR55X10699, WR55X10712, WR55X10715, WR55X10722, WR55X10942, WR55X10942-12PK, WR55X10942P, WR55X11036 Show less
Back to Top
Customer Reviews
Average Rating:
★★★★★
★★★★★
10 Reviews
5.0
Filter By Rating:
  • 5 Stars
    10
  • 4 Stars
    0
  • 3 Stars
    0
  • 2 Stars
    0
  • 1 Star
    0
Sort by:
  • 1
Sorry, we couldn't find any existing reviews that matched. Try using some different or simpler keywords.
  • 1
Customer Repair Stories
 Average Repair Rating: 4.0 / 5.0, 143 reviews. What's this?
Sort by:
  • 1
  • 2
  • 3
Sorry, we couldn't find any existing installation instruction that matched.
The Ground wires wasn't in same location on board
i had to improvise And relocate ground wire to get a proper ground .. That's all , the video was a GREAT HELP...
  • Johnnie from KANSAS CITY, MO
  • Difficulty Level:
    Easy
  • Total Repair Time:
    30 - 60 mins
1 person found this instruction helpful.
Was this instruction helpful to you?
Thank you for voting!
Refrigerator and freezer would stop cooling. Would happen suddenly without warning. Reset of refrigerator would solve the problem and it would run fine for several days before doing it again.
Only tool I used was 1/4 inch socket. Using the 1/4 inch socket, the screws were removed from the panel covering the control board. (this is on the back in the lower right corner). When this panel is off you are looking at the control board. Next remove all the plug in connectors. Don't worry about remembering where they go. They all are different and can only go in their specific place. After removing the connectors, pull the board out. Replace the plug in connectors before putting the new board back in , then snap the board back into place.(held in by four pins). Replace the cover.
  • Jonathan from NEW ORLEANS, LA
  • Difficulty Level:
    Very Easy
  • Total Repair Time:
    15 - 30 mins
  • Tools:
    Socket set
2 of 2 people found this instruction helpful.
Was this instruction helpful to you?
Thank you for voting!
Freezer would not freeze and fridge would not cool after power outages
I used a volt/ohm meter and checked for power to compressor and start run relays, diagnosis- was remove and replace motherboard
  • Cecilia from NATALIA, TX
  • Difficulty Level:
    Really Easy
  • Total Repair Time:
    15 - 30 mins
  • Tools:
    Screw drivers
1 person found this instruction helpful.
Was this instruction helpful to you?
Thank you for voting!
No Cooling on either freezer or refrigerator
Everything seemed to be working right, but no cooling, so I tried turning on and off the switch that turns the light on 5 times within two seconds, refrigerator did not shot. so I removed the main board and I notice a short had taken place on one of the relay legs. I ordered the main board and replaced it. The main board is on the back of the freezer covered with a sheet metal panel about 8"x8" and is secured with hex sheet metal screws. Everything is working now. Please make sure to unplug the unit from power before removing the main board.
  • jaime from SYLMAR, CA
  • Difficulty Level:
    Very Easy
  • Total Repair Time:
    Less than 15 mins
  • Tools:
    Screw drivers, Socket set
1 person found this instruction helpful.
Was this instruction helpful to you?
Thank you for voting!
Unit was dead
Removed and replaced control board
  • Carl from BELLVILLE, TX
  • Difficulty Level:
    Really Easy
  • Total Repair Time:
    15 - 30 mins
  • Tools:
    Nutdriver, Pliers
1 person found this instruction helpful.
Was this instruction helpful to you?
Thank you for voting!
Electric surge from lightening strike close to house
Obvious that main electronic board was fried. Refrigerator and freezer both not working although fan was running. Replaced main board and run capacitor. Compressor not running. Pulled starter relay and checked compressor connections for continuity. Checked ok. Ordered starter relay and installed with new capacitor. Compressor started and has been running quiet and cold ever since. Thanks to videos on partsselect website for offering the confidence to try the fix myself. Total spent on parts and shipping,$350. I had electric provider install surge protection behind meter for a cost of $5.70 a month. Hope it works as advertised.
Other Parts Used:
Main Control Board Assembly Run Capacitor
  • Richard from Clarksville, GA
  • Difficulty Level:
    Easy
  • Total Repair Time:
    30 - 60 mins
  • Tools:
    Nutdriver, Pliers, Screw drivers
4 of 5 people found this instruction helpful.
Was this instruction helpful to you?
Thank you for voting!
clickking sounds
Unplugged unit.. Removed control board cover.. Removed all plugs from control board then removed board its self.. Replaced in reverse order.. Unit is working as new..
  • Aurelio from MAYS LANDING, NJ
  • Difficulty Level:
    Very Easy
  • Total Repair Time:
    Less than 15 mins
2 of 2 people found this instruction helpful.
Was this instruction helpful to you?
Thank you for voting!
Lost all power except light bulbs.
For the Main Control board: I took pictures of connectors and matched them to same numbered connectors on the new board, but it's hard to get it wrong, really. Since the old board zapped a hole right through the plastic sheet behind it, I made a new one with the original as a template. For the ice auger, I left the blades on the old, broken one til I was ready to swap them to the new one to keep them in order, and used a new nut though the old one probably would have still worked. The clear crusher cover plate does wiggle on the auger assembly, blades and all. Just be sure to take pictures to remember how it all goes together. The trickiest part is removing the crusher assembly without breaking plastic--only use just enough force to release the claws. You'll have to at least partly take apart the rod pieces underneath. I cleaned everything with warm, dish soap water and some white vinegar mixed in. Some parts I put in the dishwasher. This a good time to clean the entire frig, too. You may want to also have new water line connector hardware on hand, too, just in case it gets damaged/leaks if disconnected and reconnected for servicing. Always unplug the frig first to start. I used a small, indoor/outdoor temperature device to check the freezer and frig temps to check when done to make sure it worked. Finally, it really, really helped having a "loaner" frig during this time!
Other Parts Used:
Main Control Board Assembly BUCKET AUGER Dispenser Crusher Cover Front Dispenser Bucket Auger Nut DOOR DAIRY
  • Lloyd from MADISON, WI
  • Difficulty Level:
    Easy
  • Total Repair Time:
    30 - 60 mins
  • Tools:
    Nutdriver, Wrench (Adjustable)
1 person found this instruction helpful.
Was this instruction helpful to you?
Thank you for voting!
warm freezer/ refeg no fan running
first empty both sides then took apart freezer area ice maker-light cover-back cover and exposed fanchecked all connections ordered fan[had no amp probe to see if power at motor repaceed fan still fan didnot runmoved fridg out from wall found control board didnt find any thing wrongto the eye ordered control board remove all connectionsused plyers be easy to remove from board squezed little whit tabs[3 or 4] to remove board from fridge installed new board snapping the pegs back into holes then reinstallwire connectors [ps the board comes with a few extra ports dont worryjust connect to the ones on the old board] dont forget to hook up green groung wire when you put cover back on then plug in and turned on closed up the freezer and reinstalled icemaker and other parts started and all seems ok good luck
  • Thomas from Carmel, NY
  • Difficulty Level:
    A Bit Difficult
  • Total Repair Time:
    30 - 60 mins
  • Tools:
    Nutdriver, Pliers, Screw drivers
0 of 1 people found this instruction helpful.
Was this instruction helpful to you?
Thank you for voting!
Relay on motherboard was clicking-Quit cooling
Followed the partselect video on how to replace motherboard and the video described the exact replacement procedure.
  • Rodney from Dallas, TX
  • Difficulty Level:
    Easy
  • Total Repair Time:
    Less than 15 mins
  • Tools:
    Socket set
2 of 3 people found this instruction helpful.
Was this instruction helpful to you?
Thank you for voting!
  • 1
  • 2
  • 3
Questions and Answers

Ask our experts a question about this part and we'll get back to you as soon as possible!

14 questions answered by our experts.
Sort by:
  • 1
  • 2
Sorry, we couldn't find any existing answers that matched.Try using some different or simpler keywords, or submit your new question by using the "Ask a Question" button above!
Elizabeth
May 27, 2022
Every time there is a power outage, my refrigerator goes off for a couple days, but comes back on eventually. Last time I changed out the Compressor switch, the surge capacitor, and since the refrigerator was older and after reading that the fan should always operate when plugged in, I also changed the fan motor. Once again power went off last night and now the fridge is off. The interior lights work so I know there is power. I also did a resistance check on the compressor and that checked good. Without a drawing I cannot figure out what component would act in this way. I am leaning toward the motherboard. Could you please advise me on this?
For model number DSD26DHWABG
PartSelect logo
Hello Elizabeth, Thank you for the question. This is normally an indication the Control Board was shorted during the power surge and may need to be replaced. If you need help placing an order, customer service is open 7 days a week. Please feel free to give us a call. We look forward to hearing from you!

3 people found this helpful.

Was this helpful?
Thank you for voting!
Daniel
March 2, 2023
The water and ice dispenser occasionally stop working. When the dispenser handle is depressed, the LED above, for the Water, Crushed or Cubed turns off and nothing is dispensed (no motor activity whatsoever, like a dead mother board). Pressing a couple of the temperate control buttons turns ALL the LEDS back on for 20 seconds or so and then the dispenser usually goes back to normal operating mode. Sometimes it takes a couple of times to get it to return functionality. Suspect it’s probably an issue with the main circuit board?
For model number GSS25WSTISS
PartSelect logo
Hello Daniel, thank you for getting in touch. Based on our research, if you see no motor activity and it is taking too much effort to function properly, the only solution left to get your appliance to work smoothly is replacing your control board, part number PS16729744. We hope this solves your problem!

1 person found this helpful.

Was this helpful?
Thank you for voting!
Amilcar
October 13, 2023
Refrigerator: Notice a ticking sound (constant click) , check temp kind of warm. Check temp settings and controls adjustment not working. I power cycle the unit the ticking went away and controls are working. Unit have done this 2 times.It seems the control board could be going bad?!? Wanted to check before purchase.
For model number GSS25SGRBSS
PartSelect logo
Hello Amilcar, thank you for your inquiry. Based on the understanding of the information provided, the issue is most probably with the control board, part number PS16729744. You may need to replace it to fix the issue. We hope this solves your problem!

1 person found this helpful.

Was this helpful?
Thank you for voting!
James
May 26, 2022
CAN THIS MAIN BOARD CAUSE THE ICE MAKER NOT TO WORK? I HAVE REPLACED THE ICE MAKER AND THE WATER SOLENOID VALVE IS WORKING PROPERLY AND WATER LINE IS NOT FROZEN, BUT STILL NO ICE.
For model number HSS22IFPACC
PartSelect logo
Hi James, Thank you for your question. If your ice maker is not making ice and the water lines are fine and you have already replaced the ice maker and the water inlet valve, then you will need to check the electronic control board, the micro switch and the dispenser door solenoid assembly. Once you have determined the part you need, please feel free to call customer service. We are open 7 days a week and anyone will be happy to assist you. We look forward to hearing from you!

1 person found this helpful.

Was this helpful?
Thank you for voting!
Related Parts:
Lorenzo
January 19, 2024
Hii wil this fit on a Psw26sgpa refrigerator??
PartSelect logo
Hello Lorenzo, Thank you for asking. The Main Control Board for this model is listed as PartSelect #: PS16729744. Good luck with the repair!

Was this helpful?
Thank you for voting!
David
January 19, 2024
The main control board part # is given as: WR55X10942C but GE has made many different revs under this part #. I am having trouble finding the correct board rev. The current board rev in it is: 200D6221g010. Will your board really work in this frig?
For model number GSS25WSTASS
PartSelect logo
Hi David, thank you for reaching out. According to our research, the main control board, part number PS16729744, you have mentioned is compatible with your model and it will work in this refrigerator. We hope that helps!

Was this helpful?
Thank you for voting!
Paul
March 17, 2023
Have water to fill glass but no water to ice maker
For model number Gshs3kgbcss
PartSelect logo
Hi Paul, thank you for reaching out. According to our research, you may need to check the following parts: water inlet valve, part number PS16226572, water and ice filter, part number PS8746144, and fill tube, part number PS292253. If these parts are not causing the issue, then we would recommend replacing the ice maker, part number PS1993870, to fix the issue. We hope this sorts out your problem!

Was this helpful?
Thank you for voting!
Related Parts:
Larry
April 2, 2023
The freezer gets to cold, I reset the temp at 1 and the refri at 38. The temp on the refri stays at 38 but the freezer go to -9. Some times it stay at 1 but it changes to -9 frequently.
For model number GSS25Ta SS
PartSelect logo
Hi Larry, thank you for reaching out. According to our research, you may need to check the following parts to fix this issue: temperature sensor, part number PS304103, defrost thermostat, part number PS1017716, and main control board, part number PS16729744. We hope this information helps!

Was this helpful?
Thank you for voting!
Related Parts:
Lazaro
May 11, 2023
My fridge has a constant clicking sound and it cools both the freezer and the fridge but not as cold anymore. It has been two days now and it's been clicking every second. What could this be?
For model number gss22jepcww
PartSelect logo
Hi Lazaro, thank you for contacting us. According to our research, if the start relay is bad, the compressor will not start and you will hear a clicking noise. We would recommend checking it, the part number is PS11763818. We hope this sorts out your problem!

Was this helpful?
Thank you for voting!
Related Parts:
Casey
June 9, 2023
My fridge and freezer will operate as normal. Then the whole unit will make loud humming and clicking noises. After that the temperatures on both the fridge and freezer will become far to warm. I try to clean the components in the back of the fridge and unplug for a few minutes. Sometimes that helps reset it. Does this mother board sound like it may correct my issue?
For model number PFS22SISBSS
PartSelect logo
Hi Casey, thank you for the question. If your refrigerator is making an extremely loud humming sound, the compressor kit, part number PS8768493, is usually the cause, and it might be time to repair or replace it. Before replacing the compressor, clean the fridge's condenser coils and fan to ensure built-up dirt and dust are not the sources of the issue. We hope this helps!

Was this helpful?
Thank you for voting!
Related Parts:
  • 1
  • 2
Model Cross Reference
This part works with the following models:
PartSelect Number: PS16729744
Manufacturer Part Number: WR55X10942C
Brand
Model Number
Description
General Electric
39631UGTAWW
Refrigerator
General Electric
39631UGXAWW
Refrigerator
General Electric
39639USTAGV
Refrigerator
General Electric
39639USXAGV
Refrigerator
General Electric
A4425GDTABB
Refrigerator
General Electric
A4425GDTAWW
Refrigerator
General Electric
A4425GDTBBB
Refrigerator
General Electric
A4425GDTBWW
Refrigerator
General Electric
BSS25GFPACC
Refrigerator
General Electric
BSS25GFPAWW
Refrigerator
General Electric
BSS25GFPCCC
Refrigerator
General Electric
BSS25GFPCWW
Refrigerator
General Electric
BSS25GFPDCC
Refrigerator
General Electric
BSS25GFPDWW
Refrigerator
General Electric
BSS25GFPECC
Refrigerator
General Electric
BSS25GFPEWW
Refrigerator
General Electric
BSS25GFPHCC
Refrigerator
General Electric
BSS25GFPHWW
Refrigerator
General Electric
BSS25JFRFWW
Refrigerator
General Electric
BSS25JFRJWW
Refrigerator
General Electric
BSS25JFTAWW
Refrigerator
General Electric
BSS25JFTBWW
Refrigerator - T Series
General Electric
BSS25JFTCWW
Refrigerator - T Series
General Electric
BSS25JFTDWW
Refrigerator
General Electric
BSS25JFTEWW
Refrigerator - T Series
General Electric
BSS25JFTGWW
Refrigerator
General Electric
BSS25JFTHWW
Refrigerator
General Electric
BSS25JFTIWW
Refrigerator
General Electric
BSS25JFTJWW
Refrigerator
General Electric
BSS25JFTNWW
Refrigerator
Customer Service Representative

Get in touch, we're here to help!

Daily 8am - 9pm EST

Contact Customer Service