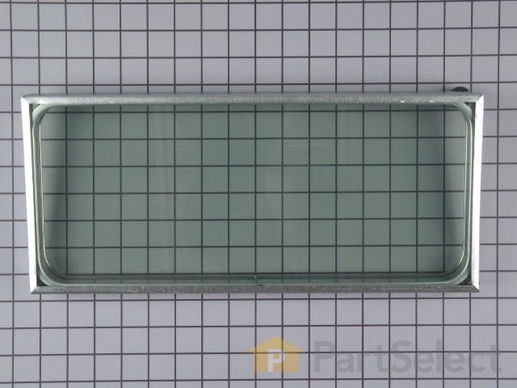
Part Location Diagram of WP5700M600-60 Whirlpool Interior Window Assembly
See part 12 in the diagram
( Grid squares measure 1x1 inch )
Customer Service Representative

Get in touch, we're here to help!

Daily 8am - 9pm EST

customerservice@partselect.com

Interior Window Assembly WP5700M600-60

 Fits your SU146!

Rated by 8 customers 

Really Easy 

30 - 60 mins 

Ratings submitted by customers like you who bought this part.

$ 462.67
  Special Order
Get FREE EconoShip on orders over $100! T&C apply
 Fits your SU146!
PartSelect Number PS11742862
Manufacturer Part Number WP5700M600-60
Manufactured by Whirlpool
Product Description

Interior Window Assembly Specifications

This part includes 2 panes of glass enclosed in a metal frame. It's the innermost window for your oven door.
How Buying OEM Parts Can Save You Time and Money

How Buying OEM Parts Can Save You Time and Money

Troubleshooting
This part works with the following products:
Wall Oven, Range, Microwave Oven Combo.
This part works with the following products:
Jenn-Air, Maytag, Kenmore, Hardwick.
Part# WP5700M600-60 replaces these:
AP6009693, 5-70029, 570029, 5700M600-60, 7-1648, 701648, JA99701648
Back to Top
Customer Repair Stories
 Average Repair Rating: 3.3 / 5.0, 8 reviews. What's this?
Sort by:
  • 1
Sorry, we couldn't find any existing installation instruction that matched.
Door Glass Broken inside
Removed the door removed 2 inner panels Installed and reassembled A Cake Walk NOTE be careful not to strip threads
  • William from IDAHO FALLS, ID
  • Difficulty Level:
    Very Easy
  • Total Repair Time:
    30 - 60 mins
  • Tools:
    Screw drivers, Socket set
1 person found this instruction helpful.
Was this instruction helpful to you?
Thank you for voting!
The outer glass panel of the interior glass assembly shattered when the oven was preheated to 400 deg.
We made the mistake of taking the door apart before we received the replacement parts. After waiting several days, which was fine, the parts arrived. Then we had to figure out how it went back together. My wife and I did it and enjoyed working on it. However....after getting it partly reassembled, we (I) found four extra screws. We took it apart again and then put it back together. Turning the door over we found that the glass assembly had slipped. This meant that we had to take it apart again. This went on two more times LOL. Then the gasket gave us a couple of small fits as well. All in all it was a neat experience. I do suggest, unless you are experienced in appliance repair, to NOT disassemble the door until the parts arrive.

The comments from others on the website were a great help.

Thank you.
Other Parts Used:
Interior Window Assembly Oven Door Seal
  • Paul from Hilton Head Island, SC
  • Difficulty Level:
    A Bit Difficult
  • Total Repair Time:
    1- 2 hours
  • Tools:
    Screw drivers, Socket set
9 of 11 people found this instruction helpful.
Was this instruction helpful to you?
Thank you for voting!
Interior window dirty (sealed unit; unable to clean)
Using exploded view and previous customers' comments, I disassembled the door. It was primarily a matter of finding all the screws. I recommend taking the door off first (I didn't), but watch your fingers. The hinges have very, very strong springs and you can hurt your or your helper's fingers if you're not prepared. The hardest part was keeping all the insulation in place while your're installing the assembly. I also replaced the gasket. That takes four hands, two to hold the gasket in place and two to reinstall the window assembly. To put the door back on the hinges, I pulled them out from the door at a 45-degree angle (takes some effort), put screwdrivers through holes in the hinges, and guided (with help) the door back on.
  • Shelton from Decatur, GA
  • Difficulty Level:
    A Bit Difficult
  • Total Repair Time:
    1- 2 hours
  • Tools:
    Screw drivers
5 of 7 people found this instruction helpful.
Was this instruction helpful to you?
Thank you for voting!
Installed new fiberglass gasket and glass window
I removed about 8 screws to disassemble the door to get the gasket in. This was an easy task. On the first use of the oven, it shattered one pane of the double glass door window. I think I installed it backwards since one pane is tempered glass, I believe. I installed the new window and am heating it up now - hope it doesn't break.
Other Parts Used:
Interior Window Assembly Grease Filter
  • Billy from Twentynine Palms, CA
  • Difficulty Level:
    Really Easy
  • Total Repair Time:
    30 - 60 mins
  • Tools:
    Nutdriver, Screw drivers
5 of 8 people found this instruction helpful.
Was this instruction helpful to you?
Thank you for voting!
Replace the Oven Door Glass Panel
Opened the oven door and locked the spring hinges in the opened position with two 10p nails. Removed the oven door. I dismantled the component parts of the door. I then removed and replaced the broken glass unit,reassembled the door, slid the door onto the hinges, tightened two screws to lock the door in place, removed the 10p nails, closed the door----- and that was it. Less than one hour. The job was accomplished using only a Phillips screwdriver.
  • John W from Battle Creek, MI
  • Difficulty Level:
    Really Easy
  • Total Repair Time:
    30 - 60 mins
  • Tools:
    Screw drivers
5 of 6 people found this instruction helpful.
Was this instruction helpful to you?
Thank you for voting!
Inside Glass of Oven Door broke and needed replacement.
Serviceman took out broken glass by removing door and separating front of door from back of door. He carefully removed all broken glass Then replaced with new glass and fastened door together . He did repair in 20 minutes. Oven is like new. Thank you very much for still stocking this part that allows me to keep my oven repaired.
  • Jay from Woodstock, NY
  • Difficulty Level:
    Really Easy
  • Total Repair Time:
    15 - 30 mins
  • Tools:
    Screw drivers
6 of 8 people found this instruction helpful.
Was this instruction helpful to you?
Thank you for voting!
Outer glass in the oven door window shattered
1.remove the trim around the door (8 screws)
2.remove over glass panel (part with the handle)
Caution; the springs on the door are exactly set for the weight of the door. When we removed the outer glass panel, I almost killed my wife when the door slammed shut.
3.Remove inner metal cover (6-8 screws).some of these screws were baked pretty tight so I used vise grips on their little heads to convince them to get turning.
4. To get the door window out you must also remove the inner enamel baked cover, held on by 5-6 screws from the back. This is also the pieces which holds the door seal in place, so it is a good time to change that as well.
5. After cleaning up all the broken glass from the old window, the new window slides right in - perfect fit!
Reverse the steps to put it all back together.

From the time the glass broke until it was completely repaired took only six days! Pretty amazing for a twenty year old oven.
Other Parts Used:
Oven Door Seal Interior Window Assembly
  • David from Durham, NC
  • Difficulty Level:
    Really Easy
  • Total Repair Time:
    30 - 60 mins
  • Tools:
    Screw drivers
14 of 17 people found this instruction helpful.
Was this instruction helpful to you?
Thank you for voting!
Seal rap around oven door window was separating from its frame.
The frame and window were supplied as a completed assembly. About 4 other panels had to be removed prior to installing the new window assembly. This was easy to do with a screwdriver removing about 16 screws and then replacing all panels back in place after replacing the new window assembly. No instructions were supplied with the part, but anyone with a little mechanical abillity could do it. You may need a helper to hold panels in place while they were being screwed back in place. Total job took about one hour
Other Parts Used:
Bake Element (16 Inch long x 19 Inch wide) Interior Window Assembly
  • Lester from Torrance, CA
  • Difficulty Level:
    Easy
  • Total Repair Time:
    1- 2 hours
  • Tools:
    Screw drivers
16 of 19 people found this instruction helpful.
Was this instruction helpful to you?
Thank you for voting!
  • 1
Questions and Answers

Ask our experts a question about this part and we'll get back to you as soon as possible!

4 questions answered by our experts.
Sort by:
  • 1
Sorry, we couldn't find any existing answers that matched.Try using some different or simpler keywords, or submit your new question by using the "Ask a Question" button above!
Jim
October 2, 2017
The glass broke in my door and I am replacing it with part number wp5700m600-60.Which way should the the gasket face around the the new part in reinstalling the glass?
For model number CWE1000
PartSelect logo
Hi Jim, Thank you for the question. There is a small lip to one side of the gasket,this lip is what you insert into the channel on the door to install it. The thicker side of the gasket faces out. Hope this helps!

2 people found this helpful.

Was this helpful?
Thank you for voting!
Debbie
December 3, 2017
My interior window/glass is fine but the thin metal strip closest to the glass on the inside of the oven is starting to degrade. Is that part available or must I replace the whole thing glass and all?
For model number S176
PartSelect logo
Hi Debbie, Thank you for the question. The Metal Frame is only sold as part of the Interior Window Assembly. Good luck with the repair!

1 person found this helpful.

Was this helpful?
Thank you for voting!
Fred
December 10, 2018
I took the door apart completely to replace door gasket. While doing this i disassembled the glass two pane window unit. Had to as parts were very rusty and had to be cleaned. Forgot to notice which of the two panes went to the outside of the door. The two panes vary in thickness, so does the thicker pane face the outside of the door or the inside of the oven? New assemblies are available, does it indicate which side faces out?
For model number s125
PartSelect logo
Hello Fred, Thank you for the question. Very sorry but since the two window panes are not sold separately and only as a pre-assembled Window Assembly we do not have this information. For more specialized assistance or to speak with someone about this, I would suggest calling the manufacturer of the appliance directly. Hope this helps!

Was this helpful?
Thank you for voting!
Larry
December 7, 2021
I have a broken glass on my Jenn Air oven Model S121. Will this replace it? Thanks for your help. Larry
For model number S121
PartSelect logo
Hello Larry, Thank you for contacting us. We have researched the model you have provided and have found the part you are looking for is PartSelect Number PS11742862 for the Inside Glass for the Oven Door. If you need help placing an order, customer service is open 7 days a week. Please feel free to give us a call. We look forward to hearing from you!

Was this helpful?
Thank you for voting!
  • 1
You May Also Need ?
Model Cross Reference
This part works with the following models:
PartSelect Number: PS11742862
Manufacturer Part Number: WP5700M600-60
Brand
Model Number
Description
Kenmore
20133
Range - Kenmore Range/Stove/Oven Model 20133(1988) Parts
Jenn-Air
20135
Range
Kenmore
20214
Range - Electric Range
Kenmore
20234
Range - Kenmore Range/Stove/Oven Model 20234(1988) Parts
Jenn-Air
20236
Range
Jenn-Air
20237
Range
Jenn-Air
20239
Range
Jenn-Air
21138
Wall Oven - ELECTRIC WALL OVEN
Kenmore
21237
Range - Kenmore Range/Stove/Oven Model 21237(1988) Parts
Jenn-Air
21238
Wall Oven - Built-in, Electric
Jenn-Air
21239
Wall Oven - Built-in, Electric
Kenmore
21241
Range - Kenmore Range/Stove/Oven Model 21241(1988) Parts
Kenmore
21243
Range - Kenmore Range/Stove/Oven Model 21243(1988) Parts
Kenmore
21244
Range - Kenmore Range/Stove/Oven Model 21244(1988) Parts
Kenmore
21245
Range - Kenmore Range/Stove/Oven Model 21245(1988) Parts
Kenmore
21246
Range - Kenmore Range/Stove/Oven Model 21246(1988) Parts
Kenmore
21334
Microwave Oven Combo - Kenmore Oven/Microwave Combo Model 213.34 (21334, 213 34) Parts
Kenmore
21335
Microwave Oven Combo - Kenmore Oven/Microwave Combo Model 21335(1988) Parts
Jenn-Air
21336
Microwave Oven Combo
Kenmore
62920236
Range - Kenmore Range/Stove/Oven Model 629.20236 (62920236, 629 20236) Parts
Kenmore
62920237
Range - Kenmore Range/Stove/Oven Model 629.20237 (62920237, 629 20237) Parts
Kenmore
62920245
Range
Kenmore
62921138
Wall Oven - Wall, Electric
Kenmore
62921238
Wall Oven
Kenmore
62921239
Wall Oven
Kenmore
62921336
Wall Oven
Kenmore
62942019
Wall Oven
Kenmore
62946965
Range
Kenmore
62946969
Range
Hardwick
BEV7110
Wall Oven - Wall, Electric
Customer Service Representative

Get in touch, we're here to help!

Daily 8am - 9pm EST

Contact Customer Service