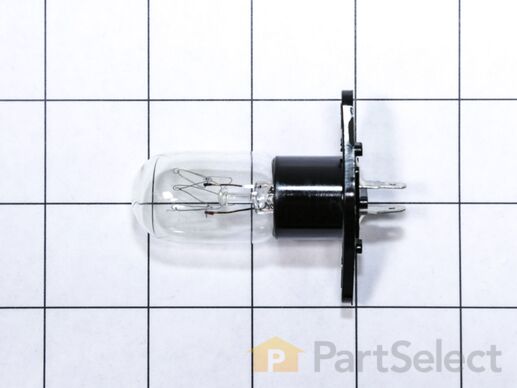
Part Location Diagram of WB36X10194 GE LAMP-INCANDESCENT
See part 280 in the diagram
( Grid squares measure 1x1 inch )
Customer Service Representative

Get in touch, we're here to help!

Daily 8am - 9pm EST

customerservice@partselect.com

LAMP-INCANDESCENT WB36X10194

 Fits your JE940WV03!

Rated by 1 customer 

Easy 

30 - 60 mins 

Ratings submitted by customers like you who bought this part.

$ 46.41
  In Stock
Get FREE EconoShip on orders over $100! T&C apply

Get this part fast! Average delivery time for in-stock parts via standard shipping: 1.8 days.

 Fits your JE940WV03!
PartSelect Number PS247394
Manufacturer Part Number WB36X10194
Manufactured by GE
Troubleshooting
This part works with the following products:
Microwave Oven Combo, Microwave, Range.
This part works with the following products:
General Electric, Kenmore.
Part# WB36X10194 replaces these:
AP3189812, 947111, WB08X10012, WB36X0904, WB36X0952, WB36X904, WB36X952, WB8X10012
Back to Top
Customer Repair Stories
 Average Repair Rating: 3.3 / 5.0, 1 reviews. What's this?
Sort by:
  • 1
Sorry, we couldn't find any existing installation instruction that matched.
Microwave no longer functional. Power and fuse check good.
1. Opened door to remove glass dish and plastic rotating wheel.
2. Turned breaker "off" to appliance at main electrical panel.
3. Removed two "star" screws located on side of front control panel.
4. Removed four screws (two top and bottom) from front bezel around the wall mount microwave unit.
5. With bezel removed; removed four screws (two top and bottom) from the frame seecuring the microwave above the conventional oven directly below.
6. Using an inverted laundry basket; slide the microwave unit out approx. 14-16 inches and balance the extended weight on the inverted laundry basket. I opened the oven door and placed the laundry basket on it.....was a good fit!
7. With the side sheet metal now exposed; remove four hex nut screws (black) from unit.
8. Also, swing front control panel open; notice two sheetmetal tabs securing side panel. bend each up to help release side panel.
9. NOTE: The sheet metal enclosure is a shield for the microwave unit. It interlocks around the side cover preventing accidental removal.
10. By removing the four hex screws, you will notice two philips screws toward the rear of the unit. Remove both of these screws and the side panel should come out exposing the magnatron.
11. Uplug the magnatron and light. The light is in a white plastic cover and the magnetron is the main device in the unit. There was a schematic in my unit that helps illustrate each of the locations.
12. NOTE: There are capacitors toward the lower rear of the unit that will remain charged although power is off. Safely dscharge these capacitors or don't service this unit on your own.
13. Remove the magnatron by removing the four philips screws attaching it to the side enclosure.
14. Remove the plastic cover encasing the light by removing three philips screws.
15. NOTE: The replacement magnetron does not include the thermal sensor secured to its case. You must remove this from the old unit or buy a new one. There are two small philips screws securing this in place.
16. Reverse order to install new units.
17. NOTE: there is a gasket on the magnetron (around the hole where the rotating head projects into the cooking chamber. Ensure gasket is properly installed to prevent microwave leakage.
18. Once everything is reinstalled; place glass of water in unit to test. Set controls properly and turn on. Water should be hot per setting.
Other Parts Used:
Magnetron Assembly LAMP-INCANDESCENT
  • Tim from Gilbert, AZ
  • Difficulty Level:
    Easy
  • Total Repair Time:
    30 - 60 mins
  • Tools:
    Screw drivers, Wrench (Adjustable), Wrench set
30 of 37 people found this instruction helpful.
Was this instruction helpful to you?
Thank you for voting!
  • 1
Questions and Answers

Ask our experts a question about this part and we'll get back to you as soon as possible!

1 question answered by our experts.
Sort by:
  • 1
Sorry, we couldn't find any existing answers that matched.Try using some different or simpler keywords, or submit your new question by using the "Ask a Question" button above!
Gerald
January 13, 2018
How do you change the lamp?
For model number PEM31SM3SS
PartSelect logo
Hello Gerald, Thanks for your question. Due to the high voltage that the microwave interior parts can contain even with the microwave unplugged, we would highly advise having a licensed service technician install this part, since the model's manual does not contain instructions on installing this part without a technician. I hope this helps.

3 people found this helpful.

Was this helpful?
Thank you for voting!
  • 1
Model Cross Reference
This part works with the following models:
PartSelect Number: PS247394
Manufacturer Part Number: WB36X10194
Brand
Model Number
Description
Kenmore
91141485890
Microwave Oven Combo
Kenmore
91141485991
Microwave Oven Combo
Kenmore
91141485992
Microwave Oven Combo
Kenmore
91141485993
Microwave Oven Combo
Kenmore
91141485994
Microwave Oven Combo
Kenmore
91141485995
Microwave Oven Combo
Kenmore
91141485996
Microwave Oven Combo
Kenmore
91141489890
Microwave Oven Combo
Kenmore
91141489991
Microwave Oven Combo
Kenmore
91141489992
Microwave Oven Combo
Kenmore
91141489993
Microwave Oven Combo
Kenmore
91141489994
Microwave Oven Combo
Kenmore
91141489995
Microwave Oven Combo
Kenmore
91141489996
Microwave Oven Combo
Kenmore
91147692100
Microwave Oven Combo
Kenmore
91147699100
Microwave - 27" ELECTRIC BUILT-IN OVEN
Kenmore
91147792200
Microwave Oven Combo
Kenmore
91147792201
Microwave Oven Combo
Kenmore
91147792202
Microwave Oven Combo
Kenmore
91147793200
Microwave Oven Combo
Kenmore
91147793201
Microwave Oven Combo
Kenmore
91147793202
Microwave Oven Combo
Kenmore
91147794200
Microwave Oven Combo
Kenmore
91147794201
Microwave Oven Combo
Kenmore
91147794202
Microwave Oven Combo
Kenmore
91147799200
Microwave Oven Combo
Kenmore
91147799201
Microwave Oven Combo
Kenmore
91147799202
Microwave Oven Combo
Kenmore
91147812200
Microwave Oven Combo
Kenmore
91147812201
Microwave Oven Combo
Customer Service Representative

Get in touch, we're here to help!

Daily 8am - 9pm EST

Contact Customer Service