This comes with a metallic hub clamp to hold it firmly in place. The blower wheel with clamp is part of your dryer assembly. You will find this part attached to the drive motor shaft, which disperses air through the drum and out of the exhaust vent. This part might need to be replaced if you notice your dryer is taking too long to dry clothing, it is not tumbling, or is making any unusually loud noises. The blower wheel measures about 7.5 inches in diameter by 3-3/8 wide. The blower wheel can be accessed by removing the front panel of your appliance.
How Buying OEM Parts Can Save You Time and Money
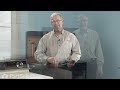
Part Videos
Replacing your Maytag Dryer Blower Wheel with Clamp
Keep searches simple. Use keywords, e.g. "leaking", "pump", "broken" or "fit".
Sorry, we couldn't find any existing reviews that matched. Try using some different or simpler keywords.
★★★★★
★★★★★
Monte M - January 29, 2024
Verified Purchase
Part fit perfectly and was easy to install
I was very happy with my blower wheel part for my Maytag Dryer. My only complaint was that the shipping didn't arrive when promised. However, overall I was very satisfied with the service!
★★★★★
★★★★★
Sandra P - October 26, 2023
Verified Purchase
Fit perfectly!
The parts worked great and now so does my dryer.
★★★★★
★★★★★
JOSEPH M - August 4, 2023
Verified Purchase
Blower Wheel with Clamp for a clothes dryer.
Everything went well! My plumber had given me the Maytag part number. Folrtunately, your representative gave me the reivised part number. which was helpful!. The plumber, after various tests on the dryer, identified the part which wasn't available locally, therefore, the part was initiated through Amazon, then your company.
Thank you!
★★★★★
★★★★★
Matthew V - July 21, 2023
Verified Purchase
Exactly what i needed
Install instructions were perfect. I've had to install 2 of these in two years in the same dryer so I've gotten good at it. The second time, i found that the internal snap ring closest to the belt drive was out of its grove which was causing the premature failure. So i hope this one will least s good long time now.
★★★★★
★★★★★
Russell O - June 17, 2023
Verified Purchase
No problems!
Part fit perfectly.
★★★★★
★★★★★
Rodney P - June 15, 2023
Verified Purchase
Easy fix-part worked as expected!
Blower wheel and clamp for Maytag dryer
★★★★★
★★★★★
Jonathan D - June 7, 2023
Verified Purchase
Why?!?
Part fits and it works. Why did I need to review this.
★★★★★
★★★★★
Roger W - May 22, 2023
Verified Purchase
Blower wheel repair,
The part came in three days, had the dryer up and running in a couple hours.
★★★★★
★★★★★
Keith W - May 14, 2023
Verified Purchase
Easy fix
Right part, when right in.
★★★★★
★★★★★
Fernando G - April 7, 2023
Verified Purchase
Works great
Thanks for showing videos on how to do, it really helps a lot. 34 year old dryer is working great again ????
< Prev
1
2
3
Next >
Customer Repair Stories
Average Repair Rating: 3.1 / 5.0, 158 reviews.
What's this?
Sort by:
< Prev
1
2
3
Next >
Search filter:
Clear Filter
Your search term must have 3 or more characters.
Keep searches simple. Use keywords, e.g. "leaking", "pump", "broken" or "fit".
Sorry, we couldn't find any existing installation instruction that matched.
My Blower wheel had broken at the center where it attached to the axle. It made a rattling sound and no air was being blown into the drum to dry the clothes. There was also a loud skidding sound that turned out to be due to a worn felt seal.
I took off the front of the dryer with the screws at the bottom. I removed what wires would easily come off and took a picture to remember where they go. Then I took of the front panel and had to take off the cover for the blower wheel. Some screws were difficult to reach because they were in a very tight space. I used a combination of ne
... Read moreedle nose pliers and a hex screw bit to loose hared to reach hex screws. For the felt seal on the front panel, I used a flathead screwdriver to remove the old seal and replace the new seal. The most tricky thing was making sure the seal was laying right along the drum when putting the front panel back on. Once back together, the skidding sound disappeared. Replacing the blower wheel is pretty easy once I got past the difficult screws holding the cover down. I used snap ring pliers to remove the snap ring then put the new blower wheel on and put it all back together. I found that the tip diameter of the snap ring pliers needed to be less than 0.05'' to fit into the snap ring holes of both the snap rings for the roller wheels and the blower wheel.
When this dryer was given to me, I was told the door switch was going bad. It was originally purchased in 1996 as a REAL MAYTAG, so fixing it was no brainer, but the switch did not fix the problem. I pulled the small panel off the back to expose the motor and struggled to spin it by hand, so I assumed the motor was seizing up.
... Read morer />I entered the model number into this website and found a motor that would work and also decided to go with a belt and a fan. There was an installation video provided when I added the motor to my cart. The dryer was older than mine, but obviously identical on the interior. The only difference was that older dryer didn't have a little deflector shield that I have and I still can't remember where that goes. My dryer appears to be working just fine without it though.
Like the video stated: Remove two screws at the bottom of the front panel to remove the panel while disconnecting the door switch wires. Since I had an old switch, I took the three wires and plugged them into that so I would remember where each one went .
I believe after that was the fan housing with a few bolts, then the drum. I reached through the small back panel to loosen the belt by moving the tensioner back, then removing the drum. The fan was secured by a snap ring and a spring loaded hose clamp that required a small set of pliers.
There were two bolts that held the motor in; once removed, the motor slid out with the bracket. The tough part was using the screwdriver to get the clamps off that hold the motor to the bracket, but the video helped with that.
The new motor did not come with instructions on how to wire it, so I had to go to this site and find somebody who had asked the question. The video did not do all that great a job in showing me where the wires go and since the motor was different than my REAL MAYTAG motor, I had no idea where the wires went, but I found someone who asked the question and he got the answer, so I was able to figure it out.
It had been over a month since I had taken the dryer apart so I went back to that video which, except for the wiring and that tiny little deflector plate, provided excellent detail of how to install everything. I had trouble deciding where I wanted the wires to make sure the drum didn't rub on them, so after it was all back together, I watched the drum rotate with the dryer running from that little panel in the back.
One thing that saved me was every time I took something off, I kept the bolts with that item. It only became a problem when my friend came over and saw the dryer in pieces. He just had to give me his own lecture about fixing dryers and when he talks he has touch everything, so all my bolts are going flying! I was like, "What are you doing? Are you gonna put this back together for me after you lose all my bolts?"
Noisy Dryer operation and eventually no air movement through dryer
Every two to three years, the blower wheel gets chewed out in the center where it attaches to the motor shaft. I have learned the sound of it starting to rattle so I know to order a new blower before the air stops moving altogether. Replacing it is very easy if you have tiny sockets or nut drivers and a pair of snap ring pliers.
... Read morer />When working on this dryer, be aware that the heater wires are always "hot", even when the dryer is not running. You are only likely to touch one at a time so the worst you will feel is 120 volts. The shock probably won't hurt you but you may cut yourself jerking your arm out of the dryer. Best to unplug the dryer or open the circuit breaker before sticking your arm in there!
Read less
Russell from ELK GROVE, CA
Difficulty Level:
Easy
Total Repair Time:
30 - 60 mins
3 of 3 peoplefound this instruction helpful.
Was this instruction helpful to you?
Thank you for voting!
Drum would not turn, drive motor humming loudly and unable to turn drum/blower wheel
The repair video is terrific and many others here have thoroughly described the steps involved to replace the drive motor.
The biggest hurdle for me was that the motor came with a new switch that required a different wiring configuration. No wiring diagram was included. Several others had posted questions about wiring in the
... Read moreQ&A and unfortunately PartSelect kept copy/pasting the same confusing and incomplete answer over and over:
"The Yellow goes to T6, Red to T5 Black to T2, blue to T1 and the white you will remove the blue jumper lead between the switch terminal 4 and 1/4" protector tab, connect the grey harness lead to the 1/4" protector tab."
Reading that doesn't tell me what to do with the white wire, doesn't address that my blue and white wires were crimped into the same connector from the factory, doesn't address that I had 2 black wires crimped into the same connector from the factory, and doesn't address a factory ground wire that connected the frame of the OEM motor to the bracket that the motor sits in.
With all the other excellent info supplied by PartSelect, this was surprising and frustrating. The sales dept ignored an emailed question from me, and the Q&A section didn't allow me to post a question.
Searching the internet, I found a wiring diagram on aceappliancesd dot com that addressed my dryer's OEM wiring configuration. Here's what I ended up with:
TI - Blue and white, crimped together into a single connector T2 - Black & black, crimped together into a single connector (the wiring diagram I found said this should be black & brown, but they both look black to me) T5 - Red T6 - Yellow 1/4" Thermal protector tab - Grey (from the harness)
The new motor switch had a grounding tab with nothing connected to it. I removed the screw holding that tab into the switch and connected the (also grey) OEM short ground wire from the motor frame to the mounting bracket.
I had to cut 2 of the pieces of tape holding the OEM wiring harness together in order to get enough slack for all the connections to reach. If you do this too, make sure all the wires are still clear of the moving parts and the hot bits. You may need to retape the wires together at a different location to keep things tidy.
I also laid the belt over the drum and put 2 pieces of tape over it to hold it in place while I got the drum positioned, then I reached through the back access panel to loop the belt around the motor pulley and idler. Once that's done, just reach over the top of the drum and peel the tape off. I found that much easier than trying to loop the belt by reaching through and past the drum.
I followed all of the instructional videos and things went very smoothly. Easy to follow. I replaced several other parts to avoid having to do other repairs later. I hope this should get us another 20+ years from this dryer.
Opened your replacement part and found a broken fin on the blower wheel. no way I was going to return it and wait another week for another part. Perhaps you folks need to inspect what you send out. 1 blower wheel with a broken fin and 2 clamps. Replacement was easy and quickly accomplished. Having replaced drum rollers and the belt this d
... Read moreryer is almost new. Thanks
Read less
Rodney from FAYETTEVILLE, GA
Difficulty Level:
Really Easy
Total Repair Time:
30 - 60 mins
Tools:
Nutdriver, Pliers, Screw drivers, Socket set
2 of 2 peoplefound this instruction helpful.
Was this instruction helpful to you?
Thank you for voting!
Very noisy and not drying properly
Took two screws out on the front and used snap ring pliers to remove clamp. Very easy job.
Rod from PARKERSBURG, WV
Difficulty Level:
Very Easy
Total Repair Time:
15 - 30 mins
Tools:
Pliers, Screw drivers
1 personfound this instruction helpful.
Was this instruction helpful to you?
Thank you for voting!
blower fan central stem broke off. was making a bad noise.
We had trouble getting the front of the dryer off; we tried to pry the top off. It works better if you remove the screws at the bottom of the front panel ;) Once we had the front off, we used a 1/4" ratchet wrench to take the front off the fan housing. We took off the compression clamp off easily with a pair of priers. Removing the retain
... Read moreer clip was harder; we ddn't have the right tool. We removed the broken fan. We ordered the part, easy peasy, from this website. Had to buy a $9 tool to put the retainer washer back on. We reassembled the fan housing and put the fron back on. It worked! Total cost: ~$30.00. Actual time (excluding waiting for parts and buying tools): 2 hours.
Read less
David from EASTPOINTE, MI
Difficulty Level:
A Bit Difficult
Total Repair Time:
1- 2 hours
Tools:
Socket set
2 of 2 peoplefound this instruction helpful.
Was this instruction helpful to you?
Thank you for voting!
Noisy and clothes not drying.
After removing dryer front, remove several metal shields(ouch sharp!). Remove clamp and keeper ring and blower wheel. Then remember where all those screws came from. If I did it again I would put a spacer washer behind the blower wheel which is not in the original design. This might prevent this happening again.
David from BRANCH, MI
Difficulty Level:
A Bit Difficult
Total Repair Time:
1- 2 hours
Tools:
Pliers, Screw drivers
1 personfound this instruction helpful.
Was this instruction helpful to you?
Thank you for voting!
< Prev
1
2
3
Next >
Questions and Answers
Ask our experts a question about this part and we'll get back to you as soon as possible!
10 questions answered by our experts.
Sort by:
< Prev
1
Next >
Search filter:
Clear Filter
Your search term must have 3 or more characters.
Keep searches simple. Use keywords, e.g. "leaking", "pump", "broken" or "fit".
Sorry, we couldn't find any existing answers that matched.Try using some different or simpler keywords, or submit your new question by using the "Ask a Question" button above!
William
December 12, 2017
How do i tell if the blower wheel needs to be replaced? I took the front off the Maytag dryer and when i turn the blower wheel the drum does not turn. Does this mean the blower wheel needs to be replaced? The dryer is 25 years old. Thanks.
For model number LDG9824AAE
Hi William,
Thank you for your question. The blower wheel is mostly responsible for blowing the heat into the dryer cavity. If the dryer is not tumbling, then there are some parts that you will need to check to see which one is causing the issue. You will need to check the tumbler and motor belt, the drum support rollers, the idler pulley wheel and arm, the idler shaft retaining ring, the front glides, the roller shafts and the drive motor. I hope this helps. Thank you and have a great day!
8 people found this helpful.
Was this helpful?
Thank you for voting!
Josh
February 11, 2018
I believe this is the problem with my dryer, but i can't figure out how to remove the lint trap assembly to be able to take off the cover to get to the blower wheel assembly. Any hints or ideas?
For model number LSE7800ACW
Hi Josh,
Thank you for your question. It looks like we have an installation video for this part: https://youtu.be/i7D5NZ9GPxw . Good luck with your repair.
4 people found this helpful.
Was this helpful?
Thank you for voting!
Ron
September 8, 2017
This is a gas fired unit and the blower wheel is stripped from the motor shaft. My unit has sealed blower housing that appears to be glued together. How do I remove this from the drive motor
For model number 41791122310
Hi Ron,
Thank you for your inquiry. You spin the wheel counter clock wise and that will unscrew the shaft of the motor from the housing. Good luck with your repair.
2 people found this helpful.
Was this helpful?
Thank you for voting!
Suzy
April 7, 2018
When i turn the dryer on there is a loud sound as if the drum needs help starting. But once it starts there is full heat full rotation and minimal sound although still a light sound as if the drum belt is not fully on. Someone suggested that it would be the blower wheel and clamp but it seems more drum related. Any thoughts?!
For model number LDG7400AAW
Hello Suzy, Thank you for your inquiry. We would also recommend checking the belt, idler pulley, and idler pulley arm. Hope this helps!
1 person found this helpful.
Was this helpful?
Thank you for voting!
Freddie Nash
January 25, 2019
Is this part for a gas or electric dryer?
For model number DE308
Hello Freddie, thank you for your question. This blower wheel is specifically made for the DE308 model. Both gas and electric dryers use blower wheels, but this one is specific to the model you provided. I hope this helps!
1 person found this helpful.
Was this helpful?
Thank you for voting!
Dwain
November 6, 2019
The blower wheel has gotten extremely hot. It warped the blower wheel and rubbed hard against the housing grinding off the edge of the blower wheel and grinding out part of the housing. What would cause the blower wheel to become so hot ?
For model number LDG 9304AAE
Hello Dwain, thank you for your question. A defective cycling thermostat, Dryer Cycling Thermostat
Part Number: WP3387134, or fuse Thermal Fuse (Limit: 183) Part Number: WP306604 could cause that issue. I hope this helps!
1 person found this helpful.
Was this helpful?
Thank you for voting!
Dave
January 24, 2022
Blower wheel Y303836 part fits snug on drive shaft, but the three tabs that the clamp squeeze in break after a couple years. When replacing my current part the tabs broke before even running the dryer. Is this the correct part for my dryer? Is yes, what can I do to stop the tabs from breaking?
For model number LDE4000ADL
Hi Dave,
Thank you for your question. Yes, this would be the correct blower wheel with clamp for your dryer. If you would like to place an order for it, customer service is open 7 days a week and anyone will be happy to assist you. Please feel free to give us a call. We look forward to hearing from you!
Was this helpful?
Thank you for voting!
Suzette
August 18, 2022
My dryer has ceased to circulate hot air through the lint filter and out of the discharge hose. We have checked the exhaust pathway and it is clean. The top of the dryer is hot, and the clothes are not dry. There are no noises and the drum continues to rotate. Is the blower wheel and clamp the only part I need to order? Thanks!
For model number MEDB400VQ0
Hello Suzette, thanks for your query. The most obvious reason behind blocked airflow through lint filter and exhaust is a clogged exhaust part and damaged lint filter but as you have checked and cleaned it then we are all good there. However, these problems may also happen because of damaged or jammed blower wheels, covers of a dryer vent that are stuck, and also clogs within the dryer unit. Look for some venting hose clogs and hidden inner dryer clogs. If no vent hose and inner clogs are found then the blower wheel is most probably faulty or damaged. In this case the blower wheel compatible with model number MEDB400VQ0 has part number PS11746331. If you have any other follow-up queries please feel free to reach out again.
I'm checking to see if this Blower Wheel, made for a Whirlpool Dryer will fit as a replacement for my Maytag dryer, model LDG7500ABL which has a damaged blower wheel.
For model number Maytag LDG7500ABL
Hello Rob, Thank you for your inquiry. We show this part as compatible to your model. We hope this helps.
Was this helpful?
Thank you for voting!
Edgar
March 24, 2020
Would this blower wheel work on my model?
For model number Kenmore 600 series W10680138E
Hello Edgar,
Thank you for your question. We apologize, but we do not have a parts list available for your model, thus we cannot find any parts compatible to your machine. We suggest getting in contact with the manufacturer to see if they can provide a part number for the part you are looking for. If they provide a part number, feel free to come back to our website to see if we can sell you the part at a lower price. We hope this helps.
Was this helpful?
Thank you for voting!
< Prev
1
Next >
✖
Ask a Question
Ask our experts a question on this part and we'll respond as soon as we can.