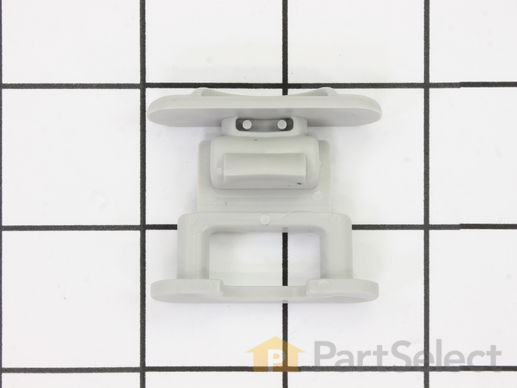
Part Location Diagram of WP99002135 Whirlpool Dishrack Guide Rail Stop - gray
See part 8 in the diagram
Replacing your Maytag Dishwasher Dishrack Guide Rail Stop - gray
( Grid squares measure 1x1 inch )
Customer Service Representative

Get in touch, we're here to help!

Daily 8am - 9pm EST

customerservice@partselect.com

Dishrack Guide Rail Stop - gray WP99002135

★★★★★
★★★★★
5 Reviews

Rated by 29 customers 

Really Easy 

Less than 15 mins 

Ratings submitted by customers like you who bought this part.

$ 10.98
  In Stock
Get FREE EconoShip on orders over $100! T&C apply

Get this part fast! Average delivery time for in-stock parts via standard shipping: 1.8 days.

PartSelect Number PS11747648
Manufacturer Part Number WP99002135
Manufactured by Whirlpool
Product Description

Dishrack Guide Rail Stop - gray Specifications

This is a rail stop for your dishwasher. No tools are required for this repair. it simply pops on and off the end of your slide rail when pressing the locking tab. This part is sold individually, so it is recommended to check the opposite rail stop on your dishwasher in case it needs to be replaced as well. The rail stop is located at the end of the upper slide rails which hold the upper dishrack in place. The rail stop prevents the upper rack from sliding completely off the slide rails. This part is gray in color and approximately 1.5 inches wide.
How Buying OEM Parts Can Save You Time and Money

How Buying OEM Parts Can Save You Time and Money

Part Videos

Replacing your Maytag Dishwasher Dishrack Guide Rail Stop - gray

Replacing your Maytag Dishwasher Dishrack Guide Rail Stop - gray
Troubleshooting
This part fixes the following symptoms:
Door latch failure
This part works with the following products:
Dishwasher.
This part works with the following products:
Maytag, Jenn-Air, Amana.
Part# WP99002135 replaces these:
AP6014409, 9-12546, 912546, 99002135
Back to Top
Customer Reviews
Average Rating:
★★★★★
★★★★★
5 Reviews
3.4
Filter By Rating:
  • 5 Stars
    1
  • 4 Stars
    0
  • 3 Stars
    4
  • 2 Stars
    0
  • 1 Star
    0
Sort by:
  • 1
Sorry, we couldn't find any existing reviews that matched. Try using some different or simpler keywords.
  • 1
Customer Repair Stories
 Average Repair Rating: 4.6 / 5.0, 29 reviews. What's this?
Sort by:
  • 1
  • 2
  • 3
Sorry, we couldn't find any existing installation instruction that matched.
upper rack wheels broke
The hardest part was the roller had to inserted into shaft/mount one roller broke off replaced all 4 used part select for washing machine and dyer quick delivery and good parts. will use again
Other Parts Used:
Rear Bowl Tine Dishrack Guide Rail Stop - gray White Dishrack Roller Front Bowl Tine with Sleeves
  • mike from MCCULLOM LAKE, IL
  • Difficulty Level:
    Very Easy
  • Total Repair Time:
    Less than 15 mins
1 person found this instruction helpful.
Was this instruction helpful to you?
Thank you for voting!
No problem
I just followed the instructions and all went well
Other Parts Used:
Dishrack Guide Rail Stop - gray Silverware Basket - Gray Upper Dishrack with Wheels Lower Dishrack with Wheels
  • Maureen from Peabody, MA
  • Difficulty Level:
    Really Easy
  • Total Repair Time:
    Less than 15 mins
  • Tools:
    Screw drivers
2 of 2 people found this instruction helpful.
Was this instruction helpful to you?
Thank you for voting!
Old dishrack was rusting apart
First you must understand that the end cap is not a solid piece. The plastic facing you is wrapped over the piece behind it. The separation may be obscured by age. Wedge thin bladed screwdriver into the outside edge of end cap at the bid point, a sturdy hunting knife will probably work better. When you hit the seam, pry it apart and fold it back. Unwrap the part and repeat on other side. The dishracks will easily slide out and in.
Other Parts Used:
Dishrack Guide Rail Stop - gray Upper Dishrack with Wheels
  • Barry from OCEAN, NJ
  • Difficulty Level:
    Really Easy
  • Total Repair Time:
    Less than 15 mins
  • Tools:
    Pliers, Screw drivers
2 of 3 people found this instruction helpful.
Was this instruction helpful to you?
Thank you for voting!
Top tray had broken wheels
removed old rail replaced wheels and was good to go
Other Parts Used:
Dishrack Guide Rail Stop - gray Mounting Strip Wheel Wheel Mounting Strip Only - NO Wheels
  • John from Roy, UT
  • Difficulty Level:
    Really Easy
  • Total Repair Time:
    15 - 30 mins
0 of 3 people found this instruction helpful.
Was this instruction helpful to you?
Thank you for voting!
Broken Tray Stop
Went Great! Easy!
  • Randal from BURLINGAME, CA
  • Difficulty Level:
    Really Easy
  • Total Repair Time:
    Less than 15 mins
1 of 2 people found this instruction helpful.
Was this instruction helpful to you?
Thank you for voting!
Top rack would not slide out easily and looked ready to fall down.
We followed the video instructions for removing the guide rail stops. That allowed us to pull out the top rack. We then followed the video instructions for removing the old mounting strip, put the new wheels on the new strip, and put the new strip in place. Then we re-installed the top rack and put the guide rail stops back. We ordered new rails stops just in case the old ones were brittle and broke when we removed them, but we didn't have any difficulties. Total cost - just the parts. Much more convenient and less expensive than requesting a non-warranty service call, waiting for someone to show up, and then paying the price for the call and the marked-up parts.
Other Parts Used:
Dishrack Guide Rail Stop - gray Mounting Strip Wheel Wheel Mounting Strip Only - NO Wheels
  • Laura from Kensington, MD
  • Difficulty Level:
    Really Easy
  • Total Repair Time:
    Less than 15 mins
0 of 2 people found this instruction helpful.
Was this instruction helpful to you?
Thank you for voting!
Racks fall off when pulled out too fast.
Clipped the new rail stop on where an old one fell off. Removed the old wheels with broken clips and clipped the new ones. Took less than 5 minutes from USPS delivery to completed job.
Other Parts Used:
Lower Wheel Assembly Dishrack Guide Rail Stop - gray
  • Eric from Bremerton, WA
  • Difficulty Level:
    Really Easy
  • Total Repair Time:
    Less than 15 mins
0 of 1 people found this instruction helpful.
Was this instruction helpful to you?
Thank you for voting!
Not Cleaning
Pulled both dish racks out then the spray arms. From there took everything else out down to the top of the motor. Replaced both spray arms and anything that a filter or a screen in it. Got everthing back together and ran the unit full of dishes with no issues at all.
Other Parts Used:
Upper Spray Arm Dishrack Guide Rail Stop - gray Filter Support - White Secondary Filter Plate Lower Spray Arm Pump Housing Filter
  • MICHAEL from MT. MORRIS, NY
  • Difficulty Level:
    Easy
  • Total Repair Time:
    30 - 60 mins
  • Tools:
    Nutdriver, Screw drivers
0 of 2 people found this instruction helpful.
Was this instruction helpful to you?
Thank you for voting!
Dishwasher made a grinding sound - very loud. Did a poor job cleaning.
I took the lower pump assembly apart to find the problem. The biggest challenge was figuring out how to remove the cover. In the center, the assembly is held together with a round plastic nut about 1.5 inches in diameter - simply rotate it counter-clockwise to remove. I then removed the pump housing and found the impeller broken in two and the disk that was supposed to be attached to the top of the pump housing broken off. This was causing the noise and greatly reduced efficiency of the pump. I replaced the impeller and upper pump housing (bought the gasket too since it is hard to remove the old one) and put everything back together using the diagrams provided on the site. While many rate this repair as "easy" - it is only after you figure everything out! If you knew exactly what you were doing, the project could be done in 10 minutes. I had to study the diagram and it took me some time to disassemble, figure out what was wrong, read posts, order parts and reassemble. I also replaced the handle which had broken on one side which was simple. Part select is outstanding - I've used this site for my fridge, oven and now dishwasher and have avoided expensive service calls. If you are technically inclined and patient, you can repair your own appliances.
Other Parts Used:
Latch Handle Dishrack Guide Rail Stop - gray Impeller Assembly Filter Guard
  • Brian from Elkridge, MD
  • Difficulty Level:
    A Bit Difficult
  • Total Repair Time:
    30 - 60 mins
  • Tools:
    Nutdriver, Screw drivers
12 of 14 people found this instruction helpful.
Was this instruction helpful to you?
Thank you for voting!
Figuring out how to remove the rail stop
The lower dishrack was easy. I read some of the comments on line and figured out you had to gently rotate the tower on the lower dishrack. Removing the rail stop on the upper rack was simple once you figured out how to do it. I had to read several comments. I used a screwdriver to help push the stop in the direction of the arrow! Other comments had said a thumb push was OK. I thought directions came with the product but I contacted the help email which referred me to the "installation instructions online" which were customer comments. I spent most of the time, a good 15 minutes trying to figure out how to remove the stop rack and about a second to remove it once I knew what to do. The rest was very quick. Installing new dishracks is really very easy.
Other Parts Used:
Dishrack Guide Rail Stop - gray Upper Dishrack with Wheels Lower Dishrack with Wheels
  • Maria from Austin, TX
  • Difficulty Level:
    Easy
  • Total Repair Time:
    15 - 30 mins
  • Tools:
    Screw drivers
1 of 3 people found this instruction helpful.
Was this instruction helpful to you?
Thank you for voting!
  • 1
  • 2
  • 3
Questions and Answers

Ask our experts a question about this part and we'll get back to you as soon as possible!

1 question answered by our experts.
Sort by:
  • 1
Sorry, we couldn't find any existing answers that matched.Try using some different or simpler keywords, or submit your new question by using the "Ask a Question" button above!
Philip
February 24, 2020
Nothing happens when door closed and locked when machine turned on.A/c power to unit is normal any trouble shooting suggestions? thanks
For model number JDB 6510 AWP
PartSelect logo
Hello, Thank you for your question. You will need to check into your Float switch, your timer and the door latch. Those are the main parts that cause that issue. We hope this helps.

1 person found this helpful.

Was this helpful?
Thank you for voting!
  • 1
You May Also Need ?
Model Cross Reference
This part works with the following models:
PartSelect Number: PS11747648
Manufacturer Part Number: WP99002135
Brand
Model Number
Description
Amana
ADW662EAB
Dishwasher
Amana
ADW662EAB-PADW662EAB0
Dishwasher - Amana Dishwasher Model ADW662EAB-PADW662EAB0 (ADW662EABPADW662EAB0, ADW662EAB PADW662EAB0) Parts
Amana
ADW662EAC
Dishwasher
Amana
ADW662EAC-PADW662EAC0
Dishwasher - Amana Dishwasher Model ADW662EAC-PADW662EAC0 (ADW662EACPADW662EAC0, ADW662EAC PADW662EAC0) Parts
Amana
ADW662EAS
Dishwasher
Amana
ADW662EAW
Dishwasher
Amana
ADW662EAW-PADW662EAW0
Dishwasher - Amana Dishwasher Model ADW662EAW-PADW662EAW0 (ADW662EAWPADW662EAW0, ADW662EAW PADW662EAW0) Parts
Amana
ADW862EAB
Dishwasher
Amana
ADW862EAC
Dishwasher
Amana
ADW862EAS
Dishwasher
Amana
ADW862EAW
Dishwasher
Amana
DDW2470AWP
Dishwasher - Undercounter
Jenn-Air
DW960UQB
Dishwasher
Jenn-Air
DW960UQW
Dishwasher
Maytag
DWC4910AAW
Dishwasher
Maytag
DWC6402AAE
Dishwasher
Maytag
DWC6402ABE
Dishwasher
Maytag
DWC7302AAB
Dishwasher
Maytag
DWC7302ABB
Dishwasher
Maytag
DWC7400AAW
Dishwasher
Maytag
DWC7400ABW
Dishwasher
Maytag
DWC7602AAB
Dishwasher
Maytag
DWC7602AAE
Dishwasher
Maytag
DWC7602ABB
Dishwasher
Maytag
DWC7602ABE
Dishwasher
Maytag
DWC8240AAW
Dishwasher
Maytag
DWC8240ABW
Dishwasher
Maytag
DWC8330AAW
Dishwasher
Maytag
DWU4910AAX
Dishwasher
Maytag
DWU4910BAX
Dishwasher
Customer Service Representative

Get in touch, we're here to help!

Daily 8am - 9pm EST

Contact Customer Service