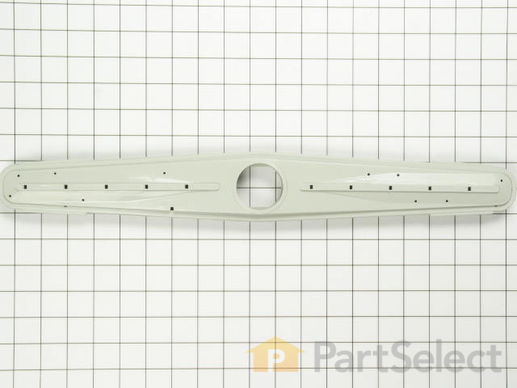
Part Location Diagram of WP99001788 Whirlpool Lower Spray Arm
See part 2 in the diagram
( Grid squares measure 1x1 inch )
Customer Service Representative

Get in touch, we're here to help!

Daily 8am - 9pm EST

customerservice@partselect.com

Lower Spray Arm WP99001788

★★★★★
★★★★★
2 Reviews

Rated by 25 customers 

Easy 

30 - 60 mins 

Ratings submitted by customers like you who bought this part.

$ 83.76
  In Stock
Get FREE EconoShip on orders over $100! T&C apply

Get this part fast! Average delivery time for in-stock parts via standard shipping: 1.8 days.

PartSelect Number PS11747617
Manufacturer Part Number WP99001788
Manufactured by Whirlpool
Product Description

Lower Spray Arm Specifications

This lower dishwasher spray arm is just about twenty inches in length and three inches wide in the center. Also, this spray arm is gray in color.
How Buying OEM Parts Can Save You Time and Money

How Buying OEM Parts Can Save You Time and Money

Troubleshooting
This part fixes the following symptoms:
Not cleaning dishes properly | Leaking
This part works with the following products:
Dishwasher.
This part works with the following products:
Maytag, Jenn-Air, Amana.
Part# WP99001788 replaces these:
99001427, 99001747, 99001788
Back to Top
Customer Reviews
Average Rating:
★★★★★
★★★★★
2 Reviews
5.0
Filter By Rating:
  • 5 Stars
    2
  • 4 Stars
    0
  • 3 Stars
    0
  • 2 Stars
    0
  • 1 Star
    0
Sort by:
  • 1
Sorry, we couldn't find any existing reviews that matched. Try using some different or simpler keywords.
  • 1
Customer Repair Stories
 Average Repair Rating: 3.8 / 5.0, 25 reviews. What's this?
Sort by:
  • 1
  • 2
  • 3
Sorry, we couldn't find any existing installation instruction that matched.
Bottom arm separated, low pressure
unscrewed the nut on the top of the spray arm and removed the arm. Took the heat shields off the old and put on the new arm and replace the arm and the nut. This is the 3 arm that i have put on. PartSelect has been great at replacing them but the sides keep splitting open after about 3 washes causing low pressure out of the wholes on the spray arm. The original reason i replace it is because there was a lot of sediment in the arm that i couldn't get out.
  • Brian from Shepherdsville, KY
  • Difficulty Level:
    Really Easy
  • Total Repair Time:
    Less than 15 mins
  • Tools:
    Screw drivers
0 of 1 people found this instruction helpful.
Was this instruction helpful to you?
Thank you for voting!
the spray arm had cracked
just changed the spray arm
  • Julie from Xenia, OH
  • Difficulty Level:
    Really Easy
  • Total Repair Time:
    Less than 15 mins
0 of 1 people found this instruction helpful.
Was this instruction helpful to you?
Thank you for voting!
Dishes not coming clean
Replaced the clogged filters and the spray arms and everything worked great. Remove the spray arms using your hand to turn the large plastic nuts. Remove the bottom spray arm, ant the pop up nozzle and then using the Torx bit remove the secondary filter plate. Ten remove the pump housing filter and put back together with all the replacement parts.
Other Parts Used:
Upper Spray Arm Lower Spray Arm
  • Brian from Shepherdsville, KY
  • Difficulty Level:
    Easy
  • Total Repair Time:
    30 - 60 mins
2 of 4 people found this instruction helpful.
Was this instruction helpful to you?
Thank you for voting!
dishwasher stoped spinning dishes were dirty
unsrewed the plastic hub in the middle of the lower spray arm, removed the spray arm, took the screws out of the filter cover, removed and replaced the filter, put the cover and screws back and the lower spray arm and then the hub. the only thing I have a queston about is the proper location for the two plastic seals.
Other Parts Used:
Lower Spray Arm Pump Housing Filter
  • peter from ottawa, KS
  • Difficulty Level:
    Easy
  • Total Repair Time:
    30 - 60 mins
  • Tools:
    Screw drivers
0 of 1 people found this instruction helpful.
Was this instruction helpful to you?
Thank you for voting!
Water Leaking from Door
The lower spray arm of this model has a chronic problem with the plastic seams splitting and the horizontal blast causing door leaks. This was the third spray arm replaced on this unit. Rather than simply replacing the spray arm with the OEM device purchased, I used a solder gun to reweld the seam on the spray arm. I expect that the additional welding will provide many more years of service than the OEM replacement part. They should really improve the quality of the replacement part to prevent splitting. A metal replacement would be worth $50 and provide a better repair than the plastic arm.
Other Parts Used:
Bottom Door Seal Door Seal Lower Spray Arm
  • Kurt from Renton, WA
  • Difficulty Level:
    Really Easy
  • Total Repair Time:
    15 - 30 mins
11 of 27 people found this instruction helpful.
Was this instruction helpful to you?
Thank you for voting!
upper arm fell off, dishes were not getting clean, dishwasher leaked
My husband offered a new dishwasher, (portable $500-$600), but I thought that was unecessary. So he handed me the job. I figured out the parts, easy since the arm fell off, and the notes on your website recommended doing also the lower arm and filter. (Great notes and recommendations by the way)
I ordered the parts at noon one day and they arrived at 11.00 a.m. the next day!! Incredible!!
My son looked at the instructions and had it done in less than an hour, for LESS than $50!
It works better than ever and does not leak any more(can't figure out why!)
Other Parts Used:
Lower Spray Arm Upper Spray Arm with Retainer Pump Housing Filter
  • Marsha from Pasadena, CA
  • Difficulty Level:
    Really Easy
  • Total Repair Time:
    30 - 60 mins
  • Tools:
    Screw drivers
2 of 3 people found this instruction helpful.
Was this instruction helpful to you?
Thank you for voting!
Not Cleaning
Pulled both dish racks out then the spray arms. From there took everything else out down to the top of the motor. Replaced both spray arms and anything that a filter or a screen in it. Got everthing back together and ran the unit full of dishes with no issues at all.
Other Parts Used:
Upper Spray Arm Dishrack Guide Rail Stop - gray Filter Support - White Secondary Filter Plate Lower Spray Arm Pump Housing Filter
  • MICHAEL from MT. MORRIS, NY
  • Difficulty Level:
    Easy
  • Total Repair Time:
    30 - 60 mins
  • Tools:
    Nutdriver, Screw drivers
0 of 2 people found this instruction helpful.
Was this instruction helpful to you?
Thank you for voting!
Replace upper and lower spray arms, clean filters
The upper arm was a two second fix by putting the snap in the arm and attaching it to the dishwasher, top side. The Bottom was a different story. The arm itself is easy enough to replace, once the nut is off, and you separate it from the pump cover. I had to completely clean parts 4, 6 and 7 so things would work properly again. The pump cover/filter part that is $80+ will come apart in two halves allowing you to clean the filter screens in it if it is caked solid. I used a thin screw driver to un-snap it. The screws you take out will hold it in place again when you have the screen etc. cleaned or replaced. Careful not to force stuff, but gentle scrubbing can get build up scrapped up.
Other Parts Used:
Lower Spray Arm Upper Spray Arm with Retainer
  • Russell from Provo, UT
  • Difficulty Level:
    Really Easy
  • Total Repair Time:
    Less than 15 mins
  • Tools:
    Screw drivers
2 of 4 people found this instruction helpful.
Was this instruction helpful to you?
Thank you for voting!
Grinding noise/dishes not washing properly. Soap not dissolving.
Other parts used:
Discharge Housing Assembly (#11)
Impeller Assembly (Wash Impeller) (#14)
O-Ring (#37)
Upper Discharge Housing Gasket (#38)

Removed upper and lower washing baskets.

Pulled off Upper Spray Arm (#33). It pulls off easily by hand. No tools required. Replaced with new Upper Spray Arm (#33) and Snap Spray Retainer (#31).

Removed Large Spray Arm Cap(#34,)which has a right hand thread. This allowed me to take the Lower Spray Arm(#2)off.
Removed Filter Guard (#36).

Next I removed the 6 screws from the Pump Cover & Secondary Filter Assembly (#4) with a Torx screwdriver. Removed Lower Spray Arm Seal(#3), Pump House Filter (#6)(which I cleaned), Assembly, Rinse Arm (#7) Jump Up Nozzle (#1). Unscrewed Discharge Housing Nut(#8) by hand. Removed Support, Wash Arm (#9). This allowed me to remove the three screws holding the Discharge Housing Assembly(#11)with a 5/16th nut driver. Next I removed the Impeller Screw (#12) with a 5/16th nut driver. You must hold the Impeller Assembly (#14) firmly while loosening the nut. Removed Impeller Assembly (#12) and Plate, Suction (#15). Cleaned out area of debris,lint, etc. Put back old Plate, Suction (#15) and replaced Impeller Assembly (#14) with new part. Replaced Upper Housing Gasket and Discharge Housing Assembly with new parts. Put back all parts in the reverse order I removed them replacing the O-Ring (#37) with a new part. This O-Ring goes in the Pump Cover & Secondary Filter Assembly (#4).

After completely assembled it ran as good as new!
Other Parts Used:
Upper Spray Arm Lower Spray Arm Spray Arm Snap Retainer
  • Eric from Gualala, CA
  • Difficulty Level:
    Easy
  • Total Repair Time:
    15 - 30 mins
  • Tools:
    Nutdriver, Screw drivers
7 of 9 people found this instruction helpful.
Was this instruction helpful to you?
Thank you for voting!
leaking
Unscrew the lower spray arm cap. Remove the spray arm. Install the new spray arm and tighten in place with the spray arm cap.
Other Parts Used:
Lower Spray Arm Cap Lower Spray Arm
  • sohail from South Bend, IN
  • Difficulty Level:
    Easy
  • Total Repair Time:
    30 - 60 mins
  • Tools:
    Wrench (Adjustable)
2 of 7 people found this instruction helpful.
Was this instruction helpful to you?
Thank you for voting!
  • 1
  • 2
  • 3
Questions and Answers

Ask our experts a question about this part and we'll get back to you as soon as possible!

1 question answered by our experts.
Sort by:
  • 1
Sorry, we couldn't find any existing answers that matched.Try using some different or simpler keywords, or submit your new question by using the "Ask a Question" button above!
Eugene
July 29, 2021
How do you remove the lower spray arm cap if it is frozen in place with debris or soap residue
For model number DWU8912AAE
PartSelect logo
Hello Eugene, Thank you for your question. We suggest using hot water and baking soda or you may choose a cleaning agent like CLR which can be found at any hardware store. A firm twist counter clockwise should do the trick.

Was this helpful?
Thank you for voting!
  • 1
You May Also Need ?
Model Cross Reference
This part works with the following models:
PartSelect Number: PS11747617
Manufacturer Part Number: WP99001788
Brand
Model Number
Description
Amana
ADW662EAB
Dishwasher
Amana
ADW662EAB-PADW662EAB0
Dishwasher - Amana Dishwasher Model ADW662EAB-PADW662EAB0 (ADW662EABPADW662EAB0, ADW662EAB PADW662EAB0) Parts
Amana
ADW662EAC
Dishwasher
Amana
ADW662EAC-PADW662EAC0
Dishwasher - Amana Dishwasher Model ADW662EAC-PADW662EAC0 (ADW662EACPADW662EAC0, ADW662EAC PADW662EAC0) Parts
Amana
ADW662EAS
Dishwasher
Amana
ADW662EAW
Dishwasher
Amana
ADW662EAW-PADW662EAW0
Dishwasher - Amana Dishwasher Model ADW662EAW-PADW662EAW0 (ADW662EAWPADW662EAW0, ADW662EAW PADW662EAW0) Parts
Amana
ADW862EAB
Dishwasher
Amana
ADW862EAC
Dishwasher
Amana
ADW862EAS
Dishwasher
Amana
ADW862EAW
Dishwasher
Amana
DDW2470AWP
Dishwasher - Undercounter
Maytag
DWC6402AAE
Dishwasher
Maytag
DWC6402ABE
Dishwasher
Maytag
DWC7302AAB
Dishwasher
Maytag
DWC7302ABB
Dishwasher
Maytag
DWC7602AAB
Dishwasher
Maytag
DWC7602AAE
Dishwasher
Maytag
DWC7602ABB
Dishwasher
Maytag
DWC7602ABE
Dishwasher
Maytag
DWU4912AAB
Dishwasher
Maytag
DWU4912AAE
Dishwasher
Maytag
DWU5902AAB
Dishwasher
Maytag
DWU5902AAE
Dishwasher
Maytag
DWU5902AAM
Dishwasher
Maytag
DWU5912AAB
Dishwasher
Maytag
DWU5912AAE
Dishwasher
Maytag
DWU6202AAB
Dishwasher
Maytag
DWU6202AAE
Dishwasher
Maytag
DWU6402AAB
Dishwasher
Customer Service Representative

Get in touch, we're here to help!

Daily 8am - 9pm EST

Contact Customer Service