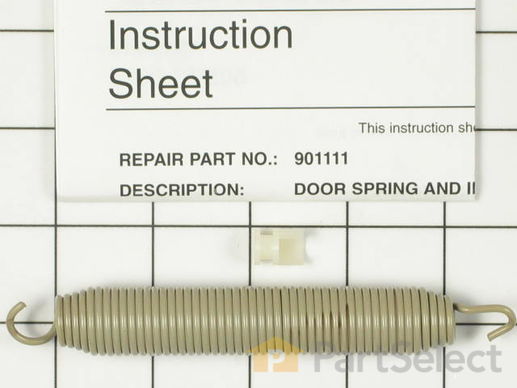
Part Location Diagram of 901111 Whirlpool Door Spring Kit
See part 22 in the diagram
( Grid squares measure 1x1 inch )
Customer Service Representative

Get in touch, we're here to help!

Daily 8am - 9pm EST

customerservice@partselect.com

Door Spring Kit 901111

 Fits your WC504!
★★★★★
★★★★★
2 Reviews

Rated by 13 customers 

Easy 

30 - 60 mins 

Ratings submitted by customers like you who bought this part.

$ 43.13
  In Stock
Get FREE EconoShip on orders over $100! T&C apply

Get this part fast! Average delivery time for in-stock parts via standard shipping: 1.8 days.

 Fits your WC504!
PartSelect Number PS2097003
Manufacturer Part Number 901111
Manufactured by Whirlpool
Product Description

Door Spring Kit Specifications

Sold individually.
How Buying OEM Parts Can Save You Time and Money

How Buying OEM Parts Can Save You Time and Money

Troubleshooting
This part fixes the following symptoms:
Door latch failure | Door won’t close
This part works with the following products:
Dishwasher.
This part works with the following products:
Maytag, Jenn-Air, Kenmore.
Part# 901111 replaces these:
AP4110653, 1397, 7-57016, 757016, 9-1111, 901111, K35-604, Y757016
Back to Top
Customer Reviews
Average Rating:
★★★★★
★★★★★
2 Reviews
5.0
Filter By Rating:
  • 5 Stars
    2
  • 4 Stars
    0
  • 3 Stars
    0
  • 2 Stars
    0
  • 1 Star
    0
Sort by:
  • 1
Sorry, we couldn't find any existing reviews that matched. Try using some different or simpler keywords.
  • 1
Customer Repair Stories
 Average Repair Rating: 3.8 / 5.0, 13 reviews. What's this?
Sort by:
  • 1
  • 2
Sorry, we couldn't find any existing installation instruction that matched.
The door got heavy upon lowering, spring was stretched.
Unscrewed the diswasher from the counter, pulled it out to access the right main door spring and took out the old spring.I installed the plastic washer then slipped the spring throught it and pulled the spring donw with the needle nose vicegrips and inserted the bottom of the spring into the lower hole. I pushed the dishwasher back andrefastened it to the counter.
  • Dennis from Benicia, CA
  • Difficulty Level:
    Really Easy
  • Total Repair Time:
    Less than 15 mins
  • Tools:
    Nutdriver
3 of 4 people found this instruction helpful.
Was this instruction helpful to you?
Thank you for voting!
Dishwasher door spring broke.
This dishwasher is over 20 years old and still works well. The door springs broke and the skematic shows 2 springs on each side. The spring kit only includes one spring for each side which is the primary spring. Removed the bottom access panel, shut off the water line and removed the water line. Removed the top screws which lock the dishwasher in the cabinet and pulled forward about 6 inches to fully expose the springs. Replaced the two big springs, one on each side and adjusted for maximum pull of door. The second small springs were not necessary. Pushed unit back into the cabinet, connected the water line and tested for water leaks. Cleaned and replaced access panel and the door is light as a feather.
  • Anson from Valencia, CA
  • Difficulty Level:
    Easy
  • Total Repair Time:
    1- 2 hours
  • Tools:
    Pliers, Screw drivers, Socket set, Wrench (Adjustable), Wrench set
0 of 1 people found this instruction helpful.
Was this instruction helpful to you?
Thank you for voting!
Broken main door spring
Remove lower cover plate below door. Remove broken spring with needle nose pliers. Place plastic insert into upper spring loop and loop into hole on right spring hinge. Grab lower spring loop with needle nose pliers and insert through hole in lower frame base. Reinstall lower cover plate.
  • James from Orland Park, IL
  • Difficulty Level:
    Easy
  • Total Repair Time:
    15 - 30 mins
  • Tools:
    Nutdriver, Pliers
0 of 1 people found this instruction helpful.
Was this instruction helpful to you?
Thank you for voting!
Both Rt. door springs snapted
On my maytag portable dishwasher I had to remove three side screws on right lower panel,and two lower screws to free up panel. I had to pry the panel away from the body to get axes to the springs. Replaced springs as instructed reinstalled all hardware, finished.
  • robert from bellerose, NY
  • Difficulty Level:
    Easy
  • Total Repair Time:
    30 - 60 mins
  • Tools:
    Pliers, Screw drivers, Socket set
4 of 4 people found this instruction helpful.
Was this instruction helpful to you?
Thank you for voting!
Broken door spring
Changed springs on both sides as long as I was at it. Did this without having to pull out built in washer. Lock the door closed to give the least tension on the springs. Remove kick plate at bottom of washer. Remove small access panels on each side. If you have small enough paws you can reach thru the access holes and strectch the spring with your fingers to remove and install new springs or use needle nose pliers if you have to. Don't forget the nylon bushings that come with the springs or the metal on metal contact will eventually nick the springs hook and make them break . Hook top end of spring first (rounded hook) and then stretch spring by grasping between thumb and index finger and hook into bottom hole. Hardest part is having to lay on your stomach to do it. Reassemble and count the money you've saved.
  • John H from Grand Ledge, MI
  • Difficulty Level:
    Easy
  • Total Repair Time:
    15 - 30 mins
  • Tools:
    Nutdriver, Screw drivers
0 of 1 people found this instruction helpful.
Was this instruction helpful to you?
Thank you for voting!
Door spring broken
Put spring in plastic bushing, snapped into door arm and hooked opposite end of spring in first hole. Repeated process on opposite side of door. Did the above without moving the dishwasher from installed position.
  • Wayne from Fort Collins, CO
  • Difficulty Level:
    Easy
  • Total Repair Time:
    30 - 60 mins
  • Tools:
    Pliers, Screw drivers
4 of 4 people found this instruction helpful.
Was this instruction helpful to you?
Thank you for voting!
Pump didn't run. Door dropped too fast.
I replaced the belt and door spring. Now it works perfectly, and the door doesn't drop with a bang.
Other Parts Used:
Clear Belt Door Spring Kit
  • Cory from North Palm Beach, FL
  • Difficulty Level:
    Easy
  • Total Repair Time:
    15 - 30 mins
  • Tools:
    Pliers, Screw drivers, Wrench set
2 of 3 people found this instruction helpful.
Was this instruction helpful to you?
Thank you for voting!
Left side Door Spring broken
First, I removed the 4 screws & Toe plate assembly below the door, exposing the undercarriage. The springs for both the right and left side are visible. Secondly, to help gain access to the springs (and for ease in reattaching the new sping to the appropriate tension bracket), I opened the dishwasher door and unscrewed the two small screws (located above the door) that secure the counter-top attach brackets to the underside of the counter. This would normally allow you the opportunity to simply pull the diswasher out a few inches from the counter for easy access. In my case, the lip of the counter did not allow me to pull the diswasher out very far, but I was able to angle it just enough to make access easier. Thirdly, I referred to the diagram that accompanied my replacement spring to make sure that I had the spring positioned properly. There appeared to be a slight difference between tension bracket spring angle for attaching the spring to the door vs side bracket. Fourth, I attached the vinly piece provided to the top spring connection and simply pulled down on the spring to create enough tension to attach the spring to the lower side bracket. Finally, test the door to make sure you have the proper resistance. Push the diswasher back into it's original position, realigning the top bracket holes and reattach the screws that secure the counter top attach brackets. Put away your tools, pack your patience and you are done. It's easy!
  • Jeff from Kenmore, WA
  • Difficulty Level:
    Really Easy
  • Total Repair Time:
    15 - 30 mins
  • Tools:
    Screw drivers, Socket set
8 of 8 people found this instruction helpful.
Was this instruction helpful to you?
Thank you for voting!
Door Spring broke
Removed under-door front panel. Removed broken spring from right side. Hold door half open, insert spring with plastic bearing into hole in door hinge. Pull down to seat bearing in hinge. With needle nose pliers insert spring into hole at base of washer. ( You do not need to pull washer out of position)
  • Logan from Cincinnati, OH
  • Difficulty Level:
    Really Easy
  • Total Repair Time:
    Less than 15 mins
  • Tools:
    Pliers
12 of 12 people found this instruction helpful.
Was this instruction helpful to you?
Thank you for voting!
Right Side Door Springs Broken
With the dishwasher door open remove the 3 srews connecting the top of the dishwasher to the bottom of the kitchen counter top. Remove the lower access panel from the dishwasher and lower the dishwasher about 1/4 inch in the front and back of the dishwasher). Once you have lowered the dishwasher enough slide the dishwasher out about 6 inches (enough to gain access to the door springs on the left and right side). Remove all broken spring parts and replace using new springs. The left side of the door contained a single heavy duty spring and the right side of the door contained a heavy duty and light duty 'helper' spring. I replaced only the right side springs since the left side spring was in excellent condition. When the springs are installed slide the dishwasher back into its original position and raise the dishwasher back up to its original height using the front and back adjustment screws. Replace the 3 screws holding the top of the dishwasher secure to the bottom of the countertop. Ensure that the door opens, closes and latches smoothly and then replace the lower access panel. Job done.
Other Parts Used:
Door Spring Kit Door Spring Kit
  • Rock from Freeport, ME
  • Difficulty Level:
    Easy
  • Total Repair Time:
    15 - 30 mins
  • Tools:
    Screw drivers, Wrench (Adjustable)
25 of 29 people found this instruction helpful.
Was this instruction helpful to you?
Thank you for voting!
  • 1
  • 2
Questions and Answers

Ask our experts a question about this part and we'll get back to you as soon as possible!

1 question answered by our experts.
Sort by:
  • 1
Sorry, we couldn't find any existing answers that matched.Try using some different or simpler keywords, or submit your new question by using the "Ask a Question" button above!
David
November 20, 2018
Does this include both main springs? Or do i need to order 2 to replace springs on both sides?
For model number WU202
PartSelect logo
Hi David, thank you for your question. This kit has a singular spring in it. If you need both sides then you would have to order two of these kits. I hope that helps. Good luck with your repair.

5 people found this helpful.

Was this helpful?
Thank you for voting!
  • 1
You May Also Need ?
Model Cross Reference
This part works with the following models:
PartSelect Number: PS2097003
Manufacturer Part Number: 901111
Brand
Model Number
Description
Kenmore
19495
Dishwasher - Kenmore Dishwasher Model 19495(1988) Parts
Kenmore
19595
Dishwasher - Kenmore Dishwasher Model 19595(1988) Parts
Kenmore
19885
Dishwasher - Kenmore Dishwasher Model 19885(1988) Parts
Kenmore
19995
Dishwasher - Kenmore Dishwasher Model 19995(1988) Parts
Jenn-Air
DP450
Dishwasher
Jenn-Air
DP450-C
Dishwasher
Jenn-Air
DP451
Dishwasher
Jenn-Air
DP470
Dishwasher
Jenn-Air
DP476
Dishwasher
Jenn-Air
DU401
Dishwasher
Jenn-Air
DU450
Dishwasher
Jenn-Air
DU450-C
Dishwasher
Jenn-Air
DU451
Dishwasher
Jenn-Air
DU470
Dishwasher
Jenn-Air
DU470-C
Dishwasher
Jenn-Air
DU476
Dishwasher
Jenn-Air
DU486
Dishwasher
Jenn-Air
DU490
Dishwasher
Jenn-Air
DU490-C
Dishwasher
Jenn-Air
DU491
Dishwasher
Jenn-Air
DU496
Dishwasher
Jenn-Air
DU588
Dishwasher
Jenn-Air
DU588W
Dishwasher
Jenn-Air
DU598
Dishwasher - DISHWASHER
Jenn-Air
DU599B
Dishwasher
Jenn-Air
DU599W
Dishwasher
Maytag
EWU1005
Dishwasher
Maytag
EWU304
Dishwasher
Maytag
EWU384
Dishwasher
Maytag
WC201
Dishwasher
Customer Service Representative

Get in touch, we're here to help!

Daily 8am - 9pm EST

Contact Customer Service