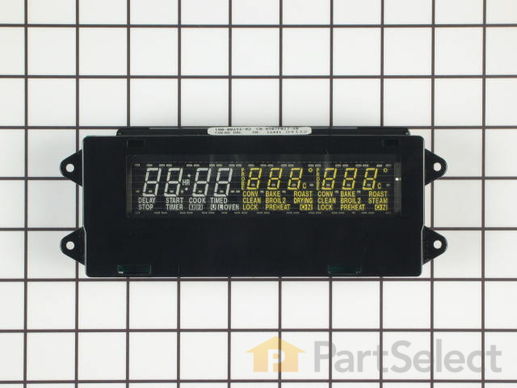
Part Location Diagram of WP71003401 Whirlpool Electronic Clock Control Board
See part 3 in the diagram
( Grid squares measure 1x1 inch )
Customer Service Representative

Get in touch, we're here to help!

Daily 8am - 9pm EST

customerservice@partselect.com

Electronic Clock Control Board WP71003401

 Fits your JJW9627AAB!
★★★★★
★★★★★
1 Review

Rated by 31 customers 

Really Easy 

Less than 15 mins 

Ratings submitted by customers like you who bought this part.

$ 610.09
  In Stock
Get FREE EconoShip on orders over $100! T&C apply

Get this part fast! Average delivery time for in-stock parts via standard shipping: 1.8 days.

$60Recycling Rebate
 Fits your JJW9627AAB!
PartSelect Number PS11743899
Manufacturer Part Number WP71003401
Manufactured by Whirlpool
Product Description

Electronic Clock Control Board Specifications

This electronic clock assembly is seven and a half inches long. It is three inches wide and is intended for use with a range's control panel.
How Buying OEM Parts Can Save You Time and Money

How Buying OEM Parts Can Save You Time and Money

Troubleshooting
This part works with the following products:
Wall Oven.
This part works with the following products:
Jenn-Air.
Part# WP71003401 replaces these:
AP6010715, 71003401, 71003401R
Back to Top
Customer Reviews
Average Rating:
★★★★★
★★★★★
1 Review
5.0
Filter By Rating:
  • 5 Stars
    1
  • 4 Stars
    0
  • 3 Stars
    0
  • 2 Stars
    0
  • 1 Star
    0
Sort by:
  • 1
Sorry, we couldn't find any existing reviews that matched. Try using some different or simpler keywords.
  • 1
Customer Repair Stories
 Average Repair Rating: 4.8 / 5.0, 31 reviews. What's this?
Sort by:
  • 1
  • 2
  • 3
Sorry, we couldn't find any existing installation instruction that matched.
Lights so dim, could not read
This is the simplest repair in the world! A lot of money for the part but worth every penny! Looks like a new oven. Far better than spending $4000.00 on a new double oven
  • Peter from SEBASTOPOL, CA
  • Difficulty Level:
    Very Easy
  • Total Repair Time:
    15 - 30 mins
  • Tools:
    Nutdriver, Screw drivers
1 person found this instruction helpful.
Was this instruction helpful to you?
Thank you for voting!
the led read out was not readable
(turn off the breaker to the oven.)take the eight screws that hold the oven in the wall out. then cut a piece of wood about 3/4" square 29 3/4" long to hold the oven out away from the wall while changing the control panel. there is four screws below the control panel to remove. lift the panel towards you and raise it up . disconnect the wires carefully. set the panel on a counter and remove the four screws that hold it in place. change the control board and reverse the process. turn the breaker back on and you are done. very simple job,
  • stanley from aberdeen, WA
  • Difficulty Level:
    Really Easy
  • Total Repair Time:
    15 - 30 mins
  • Tools:
    Screw drivers
0 of 1 people found this instruction helpful.
Was this instruction helpful to you?
Thank you for voting!
LED Readout became very dim
Turned off power at breader box. Removed the glass face of the control panel. It was secured with 4 screws. The electronic clock was attached by four hex screws which were removed with a socket wrench. There are 4 electrical connections which must be removed and reattached to the new circuit board. They are keyed so you can't attach incorrectly. Reverse the order, turn the power back on and the LED's glow bright again. Unfortunately, the first part that was sent did not work. However, on the warranty placement a new part was sent right away. The turn around time was excellent, and the new part worked just fine.
  • Tom from Montgomery, TX
  • Difficulty Level:
    Really Easy
  • Total Repair Time:
    15 - 30 mins
  • Tools:
    Screw drivers, Socket set
1 of 2 people found this instruction helpful.
Was this instruction helpful to you?
Thank you for voting!
The clock was't working.
The diagram on your website really showed me the part I needed. I had may part the next day and my son who is an IT man changed the part in under ten minutes.. I was very happy, because I thought I was going to have to get a new oven. I rely alot on timed usage.
  • Ardyce from Gilroy, CA
  • Difficulty Level:
    Really Easy
  • Total Repair Time:
    Less than 15 mins
  • Tools:
    Screw drivers
1 of 2 people found this instruction helpful.
Was this instruction helpful to you?
Thank you for voting!
LEC Display
Removed 4 screws, lifted panel off, disconnected old board replaced with new.
  • Marilyn from Scottsdale, AZ
  • Difficulty Level:
    Really Easy
  • Total Repair Time:
    Less than 15 mins
  • Tools:
    Screw drivers
1 person found this instruction helpful.
Was this instruction helpful to you?
Thank you for voting!
Display became dim and hard to read
Turned power off to the unit at the breaker. Opened oven door and removed ( 4 ) Phillips Head screws. Carefully lifted control panel and unplugged 3 flat cables carefully. Placed unit on a soft cloth and removed ( 4 ) 1/4" screws with nut driver. Install new unit and repeat the process in reverse.

Very easy if you take your time.
  • Steven from Kingston, WA
  • Difficulty Level:
    Really Easy
  • Total Repair Time:
    15 - 30 mins
  • Tools:
    Nutdriver, Screw drivers
0 of 2 people found this instruction helpful.
Was this instruction helpful to you?
Thank you for voting!
The Electrical Panel Went Dark
First I opened the door to the oven so that when I turned off the circuit breaker I got the right one. I then removed the four screws holding the panel on, disconnected the wires, removed the screws holding the assembly in place, put in the new assembly in place, put the screws back in, re-attached the wires, and screwed the panel back on, ran down and hit the circuit breaker, and voila' we have light.
  • Debra from Des Plaines, IL
  • Difficulty Level:
    Really Easy
  • Total Repair Time:
    15 - 30 mins
  • Tools:
    Screw drivers
0 of 1 people found this instruction helpful.
Was this instruction helpful to you?
Thank you for voting!
could not see the digital read out
removed the four philips screw on the oen cover plate. slid the plate off and disconnected the serial wires. removed the four 1/4 hex nuts holding the control panel on. replaced with the new control panel and replaced the four screw nuts. re-assembled the serial wires, placed the coveer plate and replaced the four set screws. that easy.
  • charles from peoria, AZ
  • Difficulty Level:
    Really Easy
  • Total Repair Time:
    Less than 15 mins
  • Tools:
    Screw drivers, Socket set
0 of 1 people found this instruction helpful.
Was this instruction helpful to you?
Thank you for voting!
digital display went out
Removed 4 screws thathold the diplay panel on, unplugged three electrical connectors and removed for screws holding the display on. Easy!
  • Keith from Las Vegas, NV
  • Difficulty Level:
    Really Easy
  • Total Repair Time:
    Less than 15 mins
  • Tools:
    Nutdriver, Screw drivers
0 of 1 people found this instruction helpful.
Was this instruction helpful to you?
Thank you for voting!
Display was not readable anymore - numbers faded away
Switched off power !
Removed the control panel by removing four philips screws under the panel. marked all the connectors with a permanent markers (socket & cable) to be able to identify the right direction. Removed the old clock assembly by removing 4 hex screws.
Then assembled new unit and reversed steps...
Clock and oven temperature is again readable and very bright!
initially I got a replacement part that showed the same error as the original part, but this unit was replaced within one (!) day under the Partselect warranty plan. Good job!
  • Bernd from Westford, MA
  • Difficulty Level:
    Really Easy
  • Total Repair Time:
    Less than 15 mins
  • Tools:
    Nutdriver, Screw drivers
1 person found this instruction helpful.
Was this instruction helpful to you?
Thank you for voting!
  • 1
  • 2
  • 3
Questions and Answers

Ask our experts a question about this part and we'll get back to you as soon as possible!

7 questions answered by our experts.
Sort by:
  • 1
Sorry, we couldn't find any existing answers that matched.Try using some different or simpler keywords, or submit your new question by using the "Ask a Question" button above!
Dave
November 11, 2017
Neither broiler, or oven elements work in either oven. The digital display does not show any error code.
For model number jjw8630baw
PartSelect logo
Hi Dave, Thank you for your question. I would suggest just testing your broil element, bake element, and your temperature sensor with a multi meter to check to see if they are all working correctly. If they are, you may have to replace your electronic control board. I hope that helps. Good luck with your repair.

4 people found this helpful.

Was this helpful?
Thank you for voting!
Richard
December 13, 2019
Top oven will not turn off. Bake and broil elements do work.
For model number JJW9627BAW
PartSelect logo
Hi Richard, this could be a faulty control board or control thermostat. Thank you for your question and good luck with your repair!

1 person found this helpful.

Was this helpful?
Thank you for voting!
Rollo
February 4, 2020
The lower oven stopped working. When the door was closed during broiling cycle there was a bright flash, also the display does not work. Do I need a new control board
For model number JJW9630AAW
PartSelect logo
Hello Rollo, Thank you for the question. Sounds like the Board was shorted out and needs to be replaced. We also suggest you test the bake and broil element and the Long Oven Sensor as they could have been effected as well. We hope this helps.

1 person found this helpful.

Was this helpful?
Thank you for voting!
Related Parts:
Darcy
July 4, 2023
I have a double oven and the top oven has had an F2 code (I think that was the code) a couple times. It will overheat and not turn off when it has reached temperature. The only way to stop it is to turn off the power at the panel. It is not consistent. Sometimes it works just fine. Bottom oven has had no problems. Will a new control panel fix this issue? Oven is 21 years old but works well so I really don't want to replace the oven. If this is not the correct replacement part, what part should I get instead?
For model number JJW9630AAQ
PartSelect logo
Hello Darcy, thank you for the question. The F2 error code occurs if the measured temperature within the oven is too high. This does not necessarily mean that the actual temperature inside the oven is too high, but it could. The reason for that is that the control board, and the sensors measures the temperature. Check sensor, sensor harness, and the sensor harness connection at sensor and oven control. If this does not help, we recommend replacing the temperature sensor, part number PS1570174. We hope this information helps!

1 person found this helpful.

Was this helpful?
Thank you for voting!
Related Parts:
JACK
October 29, 2023
iput a new display in . it did not work.
For model number jjw8630aaw
PartSelect logo
Hi Jack, thank you for getting in touch. If you have replaced the touchpad, first, make sure all the connections are secure and that you have connected it correctly. If it is still not working, it is possible that the control board, part number PS11743899, is faulty. Glad to be of help!

Was this helpful?
Thank you for voting!
Fidel Acosta
December 7, 2017
I have a double wall oven and the top oven will not heat. The clock and led display work. No error is displayed. The bottom oven works just fine.
For model number JJW8630CAB
PartSelect logo
Hi Fidel, Thank you for your question. Based on what you described it sounds like an issue with the long oven sensor that detects the temperature in the oven. You will need to test it with a multimeter. Also check the wiring between the sensor and the electronic control board to see if that is not causing the issue as well. I hope this helps. Thank you and have a great day!

Was this helpful?
Thank you for voting!
Laura
November 26, 2018
I keep getting the f7 error message....at first i was just getting f1 message...i am ssuming its the circuit board...
For model number JJW9627CAW
PartSelect logo
Hello Laura, thank you for your question. The F7/F1 code for this unit is in reference to a stuck button on the touch pad. Unfortunately, the touch pad for your unit has been discontinued and is no longer available for purchase. We would recommend contacting the manufacturer to see if there are any other options. I hope this helps!

Was this helpful?
Thank you for voting!
  • 1
Model Cross Reference
This part works with the following models:
PartSelect Number: PS11743899
Manufacturer Part Number: WP71003401
Brand
Model Number
Description
Jenn-Air
JEW8627AAB
Wall Oven - Built-in, Electric, Wall
Jenn-Air
JEW8627AAW
Wall Oven - Built-in, Electric, Wall
Jenn-Air
JEW8630AAB
Wall Oven - Built-in, Electric, Wall
Jenn-Air
JEW8630AAW
Wall Oven - Built-in, Electric, Wall
Jenn-Air
JEW9627AAB
Wall Oven - Built-in, Electric, Wall
Jenn-Air
JEW9627AAS
Wall Oven - Built-in, Electric, Wall
Jenn-Air
JEW9627AAW
Wall Oven - Built-in, Electric, Wall
Jenn-Air
JEW9630AAB
Wall Oven - Built-in, Electric
Jenn-Air
JEW9630AAS
Wall Oven - Built-in, Electric
Jenn-Air
JEW9630AAW
Wall Oven - Built-in, Electric
Jenn-Air
JEW9630ACB
Wall Oven - Built-in, Electric
Jenn-Air
JEW9630ACW
Wall Oven - Built-in, Electric
Jenn-Air
JJW8627AAB
Wall Oven - Built-in, Electric, Wall
Jenn-Air
JJW8627AAW
Wall Oven - Built-in, Electric, Wall
Jenn-Air
JJW8627BAB
Wall Oven - Built-in, Electric
Jenn-Air
JJW8627BAW
Wall Oven - Built-in, Electric
Jenn-Air
JJW8627CAB
Wall Oven
Jenn-Air
JJW8627CAS
Wall Oven
Jenn-Air
JJW8627CAW
Wall Oven
Jenn-Air
JJW8630AAB
Wall Oven - Built-in, Electric, Wall
Jenn-Air
JJW8630AAW
Wall Oven - Built-in, Electric, Wall
Jenn-Air
JJW8630BAB
Wall Oven - Built-in, Electric
Jenn-Air
JJW8630BAW
Wall Oven - Built-in, Electric
Jenn-Air
JJW8630CAB
Wall Oven
Jenn-Air
JJW8630CAS
Wall Oven
Jenn-Air
JJW8630CAW
Wall Oven
Jenn-Air
JJW9627AAB
Wall Oven - Built-in, Electric
Jenn-Air
JJW9627AAQ
Wall Oven - Built-in, Electric
Jenn-Air
JJW9627AAS
Wall Oven - Built-in, Electric
Jenn-Air
JJW9627AAW
Wall Oven - Built-in, Electric
Customer Service Representative

Get in touch, we're here to help!

Daily 8am - 9pm EST

Contact Customer Service