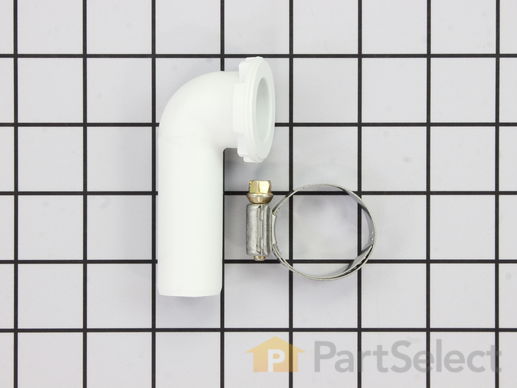
Part Location Diagram of 208847 Whirlpool Syphon Break Elbow Kit with Clamp
See part 40 in the diagram
Replacing your Maytag Washer Syphon Break Elbow Kit with Clamp
( Grid squares measure 1x1 inch )
Customer Service Representative

Get in touch, we're here to help!

Daily 8am - 9pm EST

customerservice@partselect.com

Syphon Break Elbow Kit with Clamp 208847

 Fits your GA382!
★★★★★
★★★★★
7 Reviews

Rated by 21 customers 

Easy 

30 - 60 mins 

Ratings submitted by customers like you who bought this part.

$ 26.53
  In Stock
Get FREE EconoShip on orders over $100! T&C apply

Get this part fast! Average delivery time for in-stock parts via standard shipping: 1.8 days.

 Fits your GA382!
PartSelect Number PS2017573
Manufacturer Part Number 208847
Manufactured by Whirlpool
Product Description

Syphon Break Elbow Kit with Clamp Specifications

For drain hose 7/8".
How Buying OEM Parts Can Save You Time and Money

How Buying OEM Parts Can Save You Time and Money

Part Videos

Replacing your Maytag Washer Syphon Break Elbow Kit with Clamp

Replacing your Maytag Washer Syphon Break Elbow Kit with Clamp
Troubleshooting
This part fixes the following symptoms:
Leaking | Will not drain
This part works with the following products:
Washer, Washer Dryer Combo.
This part works with the following products:
Maytag, Kenmore.
Part# 208847 replaces these:
AP4024083, 436287, 2-14764, 2-8847, 208847, 214764
Back to Top
Customer Reviews
Average Rating:
★★★★★
★★★★★
7 Reviews
4.6
Filter By Rating:
  • 5 Stars
    4
  • 4 Stars
    3
  • 3 Stars
    0
  • 2 Stars
    0
  • 1 Star
    0
Sort by:
  • 1
Sorry, we couldn't find any existing reviews that matched. Try using some different or simpler keywords.
  • 1
Customer Repair Stories
 Average Repair Rating: 3.5 / 5.0, 21 reviews. What's this?
Sort by:
  • 1
  • 2
  • 3
Sorry, we couldn't find any existing installation instruction that matched.
Part replacement and hookup
My wife got the washer for free but the elbow where the water is released got snapped off when it was removed from its previous location. I looked up the schematics online, ordered the part, and it came a day and a half later. The installation video on the PartSelect.com website was perfect. I followed it step-by-step and installed the part in just a few minutes. The hardest part was hooking up the washer without leaks. Everything went great and I will definitely use the service again when needed. Best part? My wife is happy.
  • George from RESEDA, CA
  • Difficulty Level:
    Really Easy
  • Total Repair Time:
    15 - 30 mins
  • Tools:
    Nutdriver, Pliers
2 of 2 people found this instruction helpful.
Was this instruction helpful to you?
Thank you for voting!
Siphon hose joint kit
You may want to use a lite silicone sealer to eliminate any water leaks at hose clamp but you can get away without it.
  • john from SACRAMENTO, CA
  • Difficulty Level:
    Really Easy
  • Total Repair Time:
    30 - 60 mins
  • Tools:
    Pliers, Screw drivers, Socket set
3 of 3 people found this instruction helpful.
Was this instruction helpful to you?
Thank you for voting!
broke the Syphon Break Elbow while fixing a leak on the drain hose
pulled the washer drain hose off and replace it with a new one. it was so stiff it would not flex properly. Probably 30 years old. I broke the Syphon Break elbow because of the stiff drain hose. unscrewed 4 sheet metal screws where the Syphon Break Elbow goes through back of washing machine. opened the access hole for my arm below - 1 screw. reached up and pulled broken part out from the inside approx 12- 16 inches above. Slid the new part into place. remounted the 4 screws hold connection together. recovered access hole and attached new Drain hose with a band clamp. The new hose had 3 different size ends that can be cut to fit. I had to cut down to the smallest diameter hose. (1 inch, 1.25, or 1.5 inch). Ten to 15 minutes tops
  • James from Arlington, TX
  • Difficulty Level:
    Really Easy
  • Total Repair Time:
    15 - 30 mins
  • Tools:
    Nutdriver, Screw drivers
0 of 1 people found this instruction helpful.
Was this instruction helpful to you?
Thank you for voting!
loud schreech in dryer
replaced drum rollers and shafts. Had to go back to your web site and watch the video for replacing the belt. After that it was easy. Thanks for the help. You saved me several hundred dollars
Other Parts Used:
Roller Shaft Syphon Break Elbow Kit with Clamp Drum Support Roller Kit
  • Johnny from Warr Acres, OK
  • Difficulty Level:
    Easy
  • Total Repair Time:
    30 - 60 mins
  • Tools:
    Nutdriver, Screw drivers, Socket set, Wrench set
4 of 5 people found this instruction helpful.
Was this instruction helpful to you?
Thank you for voting!
broken syphon elbow
no one in my town could identify this part, much less had it in stock. i didn't know what it was called. your online illustration gave me the information i needed to order the correct part, and replacing it was a breeze. replaced for less than the price of a service call! my 26 year old daughter did the work, supplying some much-needed validation of her girl-power!
Other Parts Used:
Syphon Break Gasket Syphon Break Elbow Kit with Clamp Hose Clamp
  • audrey from laurium, MI
  • Difficulty Level:
    Really Easy
  • Total Repair Time:
    15 - 30 mins
  • Tools:
    Nutdriver, Wrench (Adjustable)
1 of 3 people found this instruction helpful.
Was this instruction helpful to you?
Thank you for voting!
Rusty Hose Clamp Broke; Discovered I needed a Siphon Assembly
One of the drain hose clamp broke (on Halloween night). After cleaning up the flood in the house (talk about a house of horrors). I removed the front panel of the washer and also discovered a mouse living in the washer on a stockpile of cat food. I also discovered that the MAYTAG washer that I bought used from a local appliance vendor did not have the correct SIPHON assembly for the drain hose thanks to PARTS SELECT. I ordered the SIPHON CONNECTOR, SIPHON BREAK ELBOW and I needed a new lid HANDLE and I discovered the CYLINDER LIGHT BULB was out.

I could have gotten the CYLINDER LIGHT BULB at a local store much cheaper. The lid HANDLE was plastic and was way over priced - it looked like metal but it was plastic.

However, the Siphon Break Elbow Kit and Connector were easy to install. You remove the front enclosure panel by removing 4 self-tapping screws at the bottom. You remove 2 sheet metal screws that hold the top enclosure panel on (in rear) and lift that cover up about five inches (prop it open really). (Which is where I also found a mouse nest which I also removed.)

I clamped a hose to the SIPHON CONNECTOR from the inside. PUT THE RUBBER GASKET INTO THE SIPHON CONNECTOR. SEAT THE SIPHON ELBOW INTO THE SIPHON CONNECTOR. FEED THE ELBOW into a precut hole on the back panel (from the inside). Then use 4 self-tapping screws (purchased separately at the local hardware store) through the precut holes into the SIPHON CONNECTOR from the outside/back. Attach the additional hose (that goes to the drain) with the hose clamp.

It actually took me longer than an hour for the whole project because I had to clean up after the mouse. Oh! And I caught the mouse the next day with a mouse trap by the frig.

It'S like a brand new washer.
Other Parts Used:
Cylinder Light Bulb Syphon Break Elbow Kit with Clamp Washing Machine Handle Kit Siphon Break Connector Kit
  • Elizabeth from Augusta, ME
  • Difficulty Level:
    Really Easy
  • Total Repair Time:
    30 - 60 mins
  • Tools:
    Screw drivers
1 of 6 people found this instruction helpful.
Was this instruction helpful to you?
Thank you for voting!
drain hose broken off back of washer when moved
disconnected power turned off water supply pulled washwer out from wall for easy access to area removed round inspection plate with screw driver removed four screw retaining syphon elbow inside machine pulled hose down removed broken piece install new syphon break elbow secured with 4 screws installed drain hose and new supplied hose clamp very easy great service great web site easy to locate part needed. my wife sells about 18 - 20 houses a year so im involved as her personel fix it man so the web site will be addedd to our list and refered to others
  • KEITH from CORTE MADERA, CA
  • Difficulty Level:
    Really Easy
  • Total Repair Time:
    1- 2 hours
  • Tools:
    Nutdriver, Pliers, Screw drivers
0 of 1 people found this instruction helpful.
Was this instruction helpful to you?
Thank you for voting!
I broke the syphon break elbow pulling the washing machine out from the wall
First I removed the 4 screws holding the old elbow in place. Then I removed the screw holding the cover over the upper access hole on the below the syphon break elbow. I reached up through the access hole and removed the old elbow from the inside. I slid the new elbow up through the hole, aligned it with the housing plate and then screwed the screws back in to hold it in place. I had to cut about 3" off my old drain hose, because the outside diameter of the old syphon break elbow was about 1/16" larger and had stretched the end of the hose too much to fit tightly on the new elbow. I then attached the drain hose to the new elbow and tightened the hose clamp and reinserted the hose into the drain and pushed the washer back into place. (I used the old hose clamp rather than the one included with the new elbow because it still worked fine and looked sturdier than the enclosed one.)
  • JANET from CAMPBELL, CA
  • Difficulty Level:
    Easy
  • Total Repair Time:
    15 - 30 mins
  • Tools:
    Wrench set
2 of 3 people found this instruction helpful.
Was this instruction helpful to you?
Thank you for voting!
broke syphon elbow while moving machine
Performed repair through access cover in rear of machine. Removed screws with a nut driver and took out broken elbow. Pulled hose down to access hole to replace gasket then put back into position. installed elbow and reinstalled screws.
( this was tricky, have a helper to start the screws or place the screw in the nut driver with a piece of cloth to hold it in place), Make sure the screws are tightend evenly so the elbow sits completely against the gasket
Other Parts Used:
Syphon Break Gasket Syphon Break Elbow Kit with Clamp
  • Michael from White Plains, NY
  • Difficulty Level:
    A Bit Difficult
  • Total Repair Time:
    15 - 30 mins
  • Tools:
    Nutdriver, Screw drivers
0 of 1 people found this instruction helpful.
Was this instruction helpful to you?
Thank you for voting!
Broken drive belt and cracked elbow connector for water drainage
Unplugged the power chord, disconnect the water lines and the drainage hose connected to the elbow. Created and cleaned a space to work, opened the top cover and the front panel to be able access to the elbow area to replace it with a new part, placed back the top cover and front panel. Installing the new drive belt at the bottom was surprisingly easy.
Other Parts Used:
Belt Kit Syphon Break Elbow Kit with Clamp
  • Francisco from San Jose, CA
  • Difficulty Level:
    Easy
  • Total Repair Time:
    1- 2 hours
  • Tools:
    Screw drivers, Socket set, Wrench set
2 of 3 people found this instruction helpful.
Was this instruction helpful to you?
Thank you for voting!
  • 1
  • 2
  • 3
Questions and Answers

Ask our experts a question about this part and we'll get back to you as soon as possible!

4 questions answered by our experts.
Sort by:
  • 1
Sorry, we couldn't find any existing answers that matched.Try using some different or simpler keywords, or submit your new question by using the "Ask a Question" button above!
Carl
February 16, 2018
Water will not exit doing spin cycle, why is this happening?
For model number LA209
PartSelect logo
Hello Carl, Thank you for your inquiry. We would recommend checking the following parts to fix your issue: drain pump-check to see if it is clogged first, the drain hoses, the siphon break elbow for the drain hose, siphon break connector, the lid switch, the motor pulley and the drive motor-if it is not spinning fast enough, it may not drain. You can test the parts with a multimeter. Hope this helps!

5 people found this helpful.

Was this helpful?
Thank you for voting!
Doug
January 14, 2020
Looking for a siphon elbow - part no. 2-14764 and it seems to be replaced by part # 208847. The replacement part is for a 7/8 drain hose. The original part is for a 1 inch hose. Can you still get an elbow with a 1 inch discharge? Is there an adapter available? Or are you forced to use a 7/8 discharge hose?
For model number Maytag LA512 Series 4
PartSelect logo
Hello Doug and thank you for writing. There is no adapter available as the manufacturer made these changes and is telling us that this is the only available option for your model and elbow part number: PS2017573 is in the list of compatible items for your model. You might not have to change the hose as the included clamp might be able to be tight enough to avoid leaks. We hope this helps. Please contact us anytime.

5 people found this helpful.

Was this helpful?
Thank you for voting!
Jay Gupta
January 28, 2019
We broke the syphon break elbow. On our model, there is no access opening on the back of the cabinet. I need instruction on removing the cabinet to replace syphon break elbow. Is part #ps2017573 the correct syphon break elbow number for our model? Many thanks, jay gupta - jaykgupta@gmail.Com or cell 719-650-5700
For model number Maytag Washer A512 Series II Ser 115067 BM
PartSelect logo
Hello Jay, Thank you for your question. We do have an installation video for this part on our website. Simply enter in the part number PS2017573 on our website and scroll to the installation video below the information for the part. Should you need further assistance, I suggest to contact the manufacturer directly. I hope this helps! Have a nice day!

2 people found this helpful.

Was this helpful?
Thank you for voting!
Paulette
August 1, 2019
We replaced the water inlet valve as cold water entered the washer very slowly. Restarted, cold water flowed into the tub nicely. But we now have a leak. Some water came out at the rear left near the upper part of the drain hose. Did we screw something up with our repair, no leak before.
For model number Maytag LA 512
PartSelect logo
Hi Paulette, thank you for you question. I would suggest you check all of your connections to see if perhaps there is a connection that has come loose. You may also just want to check the parts to see if anything was accidentally damaged in the installation. I hope that helps. Good luck with your repair.

Was this helpful?
Thank you for voting!
  • 1
You May Also Need ?
Model Cross Reference
This part works with the following models:
PartSelect Number: PS2017573
Manufacturer Part Number: 208847
Brand
Model Number
Description
Kenmore
106T14FL
Refrigerator - COLDSPOT REFRIGERATORS
Maytag
A104
Washer - Top Loading
Maytag
A105
Washer - Top Loading
Maytag
A110
Washer - Top Loading
Maytag
A112
Washer - Top Loading
Maytag
A180
Washer - Top Loading
Maytag
A181
Washer - Top Loading
Maytag
A182
Washer - Top Loading
Maytag
A183
Washer - Top Loading
Maytag
A190
Washer - Top Loading
Maytag
A1910
Washer - Top Loading
Maytag
A209
Washer - Top Loading
Maytag
A209S
Washer - Top Loading
Maytag
A210
Washer - Top Loading
Maytag
A210S
Washer - Residential
Maytag
A211
Washer - Top Loading
Maytag
A211S
Washer - Top Loading
Maytag
A212
Washer - Top Loading
Maytag
A212S
Washer - Residential
Maytag
A282
Washer - Top Loading
Maytag
A283
Washer - Top Loading
Maytag
A284
Washer - Top Loading
Maytag
A305
Washer - Top Loading
Maytag
A310
Washer - Top Loading
Maytag
A310S
Washer - Residential
Maytag
A312
Washer - Top Loading
Maytag
A312S
Washer - Residential
Maytag
A382
Washer - Top Loading
Maytag
A390
Washer - Top Loading
Maytag
A3910
Washer - Top Loading
Customer Service Representative

Get in touch, we're here to help!

Daily 8am - 9pm EST

Contact Customer Service