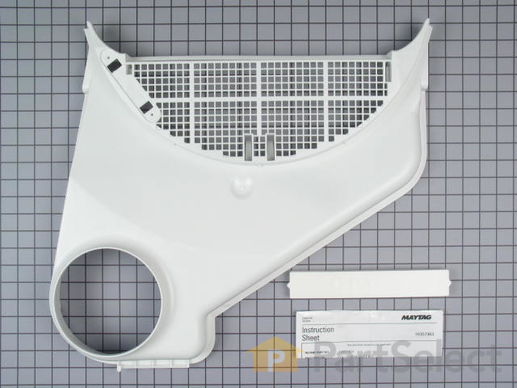
Part Location Diagram of 12001324 Whirlpool Lint Duct Housing
See part 14 in the diagram
( Grid squares measure 1x1 inch )
Customer Service Representative

Get in touch, we're here to help!

Daily 8am - 9pm EST

customerservice@partselect.com

Lint Duct Housing 12001324

 Fits your YE20FY4!
★★★★★
★★★★★
2 Reviews

Rated by 5 customers 

Easy 

30 - 60 mins 

Ratings submitted by customers like you who bought this part.

$ 126.29
  In Stock
Get FREE EconoShip on orders over $100! T&C apply

Get this part fast! Average delivery time for in-stock parts via standard shipping: 1.8 days.

 Fits your YE20FY4!
PartSelect Number PS2002970
Manufacturer Part Number 12001324
Manufactured by Whirlpool
Product Description

Lint Duct Housing Specifications

This genuine OEM lint duct housing is located inside your dryer, covering the lint filter. It secures and supports the lint screen within the exhaust system. If the housing is cracked or loose and cannot catch lint effectively, it needs replacement. A damaged housing reduces drying efficiency, resulting in longer drying times, increased energy consumption, and higher utility costs. To replace it, consult the included instruction sheet. Open the dryer door, pull out the lint filter, and remove the screws below the door opening. Close the door and take off the front panel, placing it face down on a padded surface. Remove the blower seal from the front panel. Carefully pry outward on the top corners of the collector duct to disconnect it from the front panel. Once the top is clear, pull out and lift to release the lower locking tab from the front panel slot. This will free the assembly. Note that this replacement part does not include the duct seal, the blower seal, or the lint screen itself, so consider this before purchasing.
How Buying OEM Parts Can Save You Time and Money

How Buying OEM Parts Can Save You Time and Money

Troubleshooting
This part works with the following products:
Dryer.
This part works with the following products:
Norge, Magic Chef, Crosley, Admiral.
Part# 12001324 replaces these:
AP4009389, 1569, 12001324, 31001279, 31001280, 31001502, 53-0100, 53-0203, 53-0917, 53-1299
Back to Top
Customer Reviews
Average Rating:
★★★★★
★★★★★
2 Reviews
5.0
Filter By Rating:
  • 5 Stars
    2
  • 4 Stars
    0
  • 3 Stars
    0
  • 2 Stars
    0
  • 1 Star
    0
Sort by:
  • 1
Sorry, we couldn't find any existing reviews that matched. Try using some different or simpler keywords.
  • 1
Customer Repair Stories
 Average Repair Rating: 3.2 / 5.0, 5 reviews. What's this?
Sort by:
  • 1
Sorry, we couldn't find any existing installation instruction that matched.
Broken Lint Duct tearing clothes and collecting large amounts of lint
After reading the comments of on-line customers, I realized the dryer opens like the hood of a car and then you pull the front of the dryer door off in order to get to the two screws holding the old lint duct housing unit. Putting the new part on was easier, but I would have appreciated a detailed picture along with the written instructions. Thank you for your quick delivery. Kathleen Yosso
  • Kathleen from Belmont, CA
  • Difficulty Level:
    A Bit Difficult
  • Total Repair Time:
    30 - 60 mins
  • Tools:
    Screw drivers
7 of 10 people found this instruction helpful.
Was this instruction helpful to you?
Thank you for voting!
Part cracked and clothes were getting caught
First I removed the screws that held the part in place, but this proved to be the hardest part for me. I had to find the right kind of screw driver . It was not a slotted or Phillips. It was more star shaped. Once I had the right tool, the rest was pretty easy.
I then opened the top of the dryer to be able to lay the front on the floor. There were wires connected to the front, however, so I had to remove the part that the wires were connected to by slipping it out of the bracket that held it in place. Once the front panel was on the floor, I simply lifted the old part out and placed the new part in. I closed the front, replacing the part with wires back into the bracket, locked the top down tight, replaced the screws, and I was finished.
  • Cathy from Dallastown, PA
  • Difficulty Level:
    Easy
  • Total Repair Time:
    30 - 60 mins
  • Tools:
    Screw drivers
6 of 7 people found this instruction helpful.
Was this instruction helpful to you?
Thank you for voting!
Lint screen assembly holder had broken
First I removed the 2 screws located on front panel securing dust collector in place, then I removed the two screws on the side of the dryer that secure the front panel. I also "popped" the top
of the dryer from the front panel. The front of the panel was then detached from the dryer. I thenpulled the gasket away from the collector, removed the old one and installed the new collector. Part of the kit also contained a new gasket to the exhaust duct, I merely removed the old gasket and installed the new one.. All this was notas hard asit sounds. The diagram from PartsSelect site helped
  • George from Vernon, CT
  • Difficulty Level:
    Easy
  • Total Repair Time:
    30 - 60 mins
  • Tools:
    Screw drivers
7 of 7 people found this instruction helpful.
Was this instruction helpful to you?
Thank you for voting!
pull out lint screen holder broke
used a flat blade screw driver to open top up(like a car hood) then removed two screws that held the front panel on. Two more screws held the lint colector part in place. The only problem that I had was that I had to use Elmers white glue to hold the gasket that ran around the lint colector in place.Just a little dab, not enough to soak it.When I took the part out there was about a volleyball's worth of lint in the fan blower. Ordered the part and 2 or three days later I had it. If I need another part I will be back...
  • steve from madison, WI
  • Difficulty Level:
    Easy
  • Total Repair Time:
    1- 2 hours
  • Tools:
    Screw drivers
8 of 9 people found this instruction helpful.
Was this instruction helpful to you?
Thank you for voting!
Other collector broke and was tearing clothing
Opened the top by popping the two fasteners holding it down. Did this with a screw driver. Took two screws out of the front holding collector in place and two screws out holding the front to the two other sides. Put front of dryer down on the floor. Removed old collector and used all other existing material from old collector to finish job. Wife could not believe how quick this was. Put back together was a snap too.
  • Michael from Bloomington, IL
  • Difficulty Level:
    Really Easy
  • Total Repair Time:
    15 - 30 mins
  • Tools:
    Screw drivers
19 of 24 people found this instruction helpful.
Was this instruction helpful to you?
Thank you for voting!
  • 1
Questions and Answers

Ask our experts a question about this part and we'll get back to you as soon as possible!

1 question answered by our experts.
Sort by:
  • 1
Sorry, we couldn't find any existing answers that matched.Try using some different or simpler keywords, or submit your new question by using the "Ask a Question" button above!
Sal
March 18, 2018
How can I clean out the lint? How do I open the front of the machine?
For model number PYG2300AWW
PartSelect logo
Hello Sal, Thanks for your question. The following video may be useful for both accessing the lint filter and on how to clean out the ducts: https://www.youtube.com/watch?v=UF2TbYiZxkI I hope this helps.

3 people found this helpful.

Was this helpful?
Thank you for voting!
Related Parts:
  • 1
You May Also Need ?
Model Cross Reference
This part works with the following models:
PartSelect Number: PS2002970
Manufacturer Part Number: 12001324
Brand
Model Number
Description
Norge
7002A
Dryer - DRYER
Norge
7215A
Dryer - ELECTRIC DRYER
Norge
7215A REV A
Dryer - Norge Dryer Model 7215A REV A (7215AREVA) Parts
Norge
7215A REV B
Dryer - Norge Dryer Model 7215A REV B (7215AREVB) Parts
Norge
7215A REV C
Dryer - Norge Dryer Model 7215A REV C (7215AREVC) Parts
Norge
7215A REV D
Dryer - Norge Dryer Model 7215A REV D (7215AREVD) Parts
Norge
7215A REV E
Dryer - Norge Dryer Model 7215A REV E (7215AREVE) Parts
Norge
7215A REV F
Dryer - Norge Dryer Model 7215A REV F (7215AREVF) Parts
Norge
7215A REV G
Dryer - Norge Dryer Model 7215A REV G (7215AREVG) Parts
Norge
7216A
Dryer - ELECTRIC DRYER
Norge
7216A REV A
Dryer - Norge Dryer Model 7216A REV A (7216AREVA) Parts
Norge
7216A REV B
Dryer - Norge Dryer Model 7216A REV B (7216AREVB) Parts
Norge
7216A REV D
Dryer - Norge Dryer Model 7216A REV D (7216AREVD) Parts
Norge
7216A REV E
Dryer - Norge Dryer Model 7216A REV E (7216AREVE) Parts
Norge
7216A REV F
Dryer - Norge Dryer Model 7216A REV F (7216AREVF) Parts
Norge
7368A
Dryer - ELECTRIC DRYER
Norge
7375A
Dryer - ELECTRIC DRYER
Norge
7375A REV A
Dryer - Norge Dryer Model 7375A REV A (7375AREVA) Parts
Norge
7375A REV B
Dryer - Norge Dryer Model 7375A REV B (7375AREVB) Parts
Norge
7375A REV C
Dryer - Norge Dryer Model 7375A REV C (7375AREVC) Parts
Norge
7375A REV D
Dryer - Norge Dryer Model 7375A REV D (7375AREVD) Parts
Norge
7375A REV E
Dryer - Norge Dryer Model 7375A REV E (7375AREVE) Parts
Norge
7375A REV F
Dryer - Norge Dryer Model 7375A REV F (7375AREVF) Parts
Norge
7430A
Dryer - ELECTRIC DRYER
Norge
7430A REV A
Dryer - Norge Dryer Model 7430A REV A (7430AREVA) Parts
Norge
7430A REV B
Dryer - Norge Dryer Model 7430A REV B (7430AREVB) Parts
Norge
7430A REV C
Dryer - Norge Dryer Model 7430A REV C (7430AREVC) Parts
Norge
7430A REV D
Dryer - Norge Dryer Model 7430A REV D (7430AREVD) Parts
Norge
7433A
Dryer - ELECTRIC DRYER
Norge
7433A REV A
Dryer - Norge Dryer Model 7433A REV A (7433AREVA) Parts
Customer Service Representative

Get in touch, we're here to help!

Daily 8am - 9pm EST

Contact Customer Service