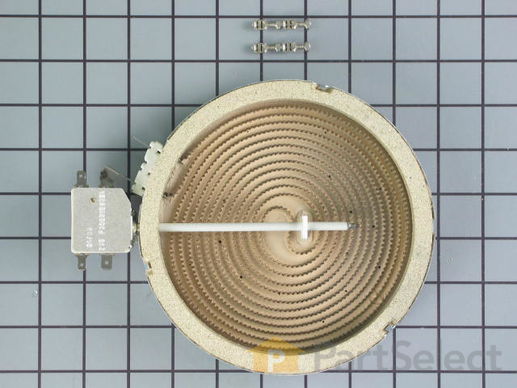
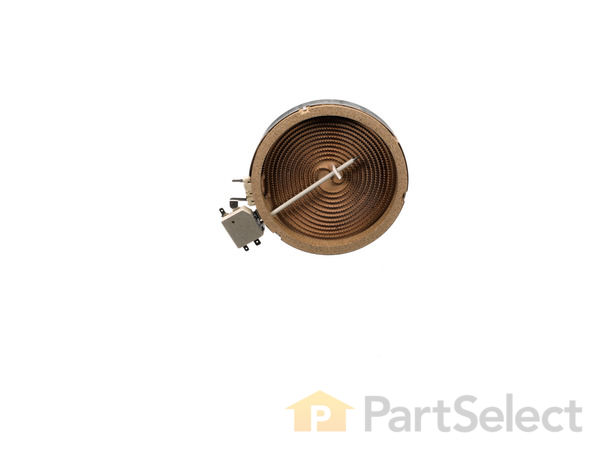
Part Location Diagram of W10823711 Whirlpool Element with Limiter 6 Inch - 1200W
See part 7 in the diagram
Replacing your Whirlpool Range Element with Limiter 6 Inch - 1200W
( Grid squares measure 1x1 inch )
Customer Service Representative

Get in touch, we're here to help!

Daily 8am - 9pm EST

customerservice@partselect.com

Element with Limiter 6 Inch - 1200W W10823711

 Fits your GJC3034HQ2!
★★★★★
★★★★★
14 Reviews

Rated by 21 customers 

Easy 

15 - 30 mins 

Ratings submitted by customers like you who bought this part.

$ 220.32
  In Stock
Get FREE EconoShip on orders over $100! T&C apply

Get this part fast! Average delivery time for in-stock parts via standard shipping: 1.8 days.

 Fits your GJC3034HQ2!
PartSelect Number PS11764915
Manufacturer Part Number W10823711
Manufactured by Whirlpool
Product Description

Element with Limiter 6 Inch - 1200W Specifications

This is a radiant surface element with limiter, and it works in conjunction with your range. The function of this part is to give heat to the surface directly above it, on cooking area stove top.This model is sold individually and is 1200 watts. The main reason for needing to replace this part is if your element will not heat. Before ordering, make sure to test your stove top radiant element for continuity to make sure it is the problem. To make this installation you will need a Phillips screwdriver, and a 14-inch nut driver.
How Buying OEM Parts Can Save You Time and Money

How Buying OEM Parts Can Save You Time and Money

Part Videos

Replacing your Whirlpool Range Element with Limiter 6 Inch - 1200W

Replacing your Whirlpool Range Element with Limiter 6 Inch - 1200W
Troubleshooting
This part fixes the following symptoms:
Element will not heat | Will Not Start
This part works with the following products:
Range, Cooktop, Microwave Oven Combo.
This part works with the following products:
Whirlpool, Maytag, KitchenAid, Jenn-Air.
Part# W10823711 replaces these:
AP6030329, 12002141, 12002146, 4381790, 74005476, 74007122, 74008568, 74008573, 7406P365-60, 7406P375-60, 8053621, 8272567, 8523698, WP8523698
Back to Top
Customer Reviews
Average Rating:
★★★★★
★★★★★
14 Reviews
4.3
Filter By Rating:
  • 5 Stars
    6
  • 4 Stars
    6
  • 3 Stars
    2
  • 2 Stars
    0
  • 1 Star
    0
Sort by:
  • 1
  • 2
Sorry, we couldn't find any existing reviews that matched. Try using some different or simpler keywords.
  • 1
  • 2
Customer Repair Stories
 Average Repair Rating: 4.0 / 5.0, 21 reviews. What's this?
Sort by:
  • 1
  • 2
  • 3
Sorry, we couldn't find any existing installation instruction that matched.
Coil shorted out.
Removed cooktop, wiring and coil. Marked where wires went on limiter
tabs. Ordered coil 1200 Watt, received a 1500 one. Sent back to PS with prepaid shipping label {great}. New one had a different limiter tab arrangement. The instructions included warned this but doesn't tell you where to put the wiring. Instructions say to remove the old limiter and put it on the new coil but this can not be physically be done plus who would want an old limiter on a new coil.
Found a YOU TUBE video on how to test and place wires on limiter switches which shows the number letter sequence on the ceramic part. Maybe PS will put that info in their instructions. Coil works great !!
  • James from HILTON, NY
  • Difficulty Level:
    A Bit Difficult
  • Total Repair Time:
    15 - 30 mins
  • Tools:
    Nutdriver, Pliers
1 person found this instruction helpful.
Was this instruction helpful to you?
Thank you for voting!
Element burn. Not working.
Element was sent by buyer, As they recommended, when model of stove given to them. It was upper right rear. When element came. First took off old element. ...Match both element , new element did not look exactly the same, small variation. It did not come on.. I moved old element from left side to right side . Old element worked on both side .. tried new element on left side also.. still didn't work.. so I called right away and explained.. new element did not work.. not defective, but, just wasn't the right one.. I had a specialist came and check it out also. I was told wrong element.
  • Marc from SUNRISE, FL
  • Difficulty Level:
    Really Easy
  • Total Repair Time:
    Less than 15 mins
  • Tools:
    Pliers, Screw drivers
1 person found this instruction helpful.
Was this instruction helpful to you?
Thank you for voting!
Burner did not heat up
Access to burner nothing like on-line videos:

1) Remove 4 screws under front control panel. (Oven door needs to be open.)
2) Remove 2 flat head screws on sides of control panel. This will loosen control panel. Capture control panel to keep from hanging from wires/connectors. I used hooks made from a wire hanger.
3) Remove 2 screws to remove two steel panels on either side of stove.
4) Remove rear screw of the 2 front screws now exposed and 2 rear screws near top of stove.
5) Carefully flip over glass top being careful not to pull on the wires.
6) Identify burner to be replaced. Note 2 numbers where two clamps are attached to burner.
7) Using 3/8” nut driver, remove screws to allow removal of burner. Remove wires per included instructions. Remove burner.
8) Place new burner under clamps and align to the holes by the two numbers noted in step 6 above.
9) Connect wires to new burner as per included instructions.
10) Reverse removal steps.
  • Sergio from JENSEN BEACH, FL
  • Difficulty Level:
    Easy
  • Total Repair Time:
    30 - 60 mins
  • Tools:
    Nutdriver, Pliers, Screw drivers
1 person found this instruction helpful.
Was this instruction helpful to you?
Thank you for voting!
Burned out burnrr
Went well. Husband, who has some appliance repair experience, did repair in less than a hour. Replacement burner was not an exact duplicate of original but he was able to adjust for that.
  • Rita from COOPERSBURG, PA
  • Difficulty Level:
    Easy
  • Total Repair Time:
    30 - 60 mins
  • Tools:
    Pliers, Screw drivers, Socket set, Wrench (Adjustable), Wrench set
1 person found this instruction helpful.
Was this instruction helpful to you?
Thank you for voting!
Back left burner went out
I found on youtube Also we marked each wire with masking tape 1A and 1B, 2A and 2B. The wires were the same color.
  • Jane from BRYAN, TX
  • Difficulty Level:
    Really Easy
  • Total Repair Time:
    30 - 60 mins
  • Tools:
    Socket set
1 person found this instruction helpful.
Was this instruction helpful to you?
Thank you for voting!
Element Burned out
looked for how to video on you tube. It saved me lots of money. Anyone could do it.
  • Buford from Sun City Center, FL
  • Difficulty Level:
    Really Easy
  • Total Repair Time:
    15 - 30 mins
  • Tools:
    Nutdriver, Pliers, Screw drivers
9 of 13 people found this instruction helpful.
Was this instruction helpful to you?
Thank you for voting!
Burned out stove top element
Unplugged the power cord first. Opened oven door and removed the two screws that held the stove top glass down. Lifted the glass top and removed the four wires connected to the element. I taped the wires to the lid in the pattern they were attached to the element. remove the element from the brackets. The new element was an exact match. reversed the sequence. Put a pot of water on and boiled a hot dog! Perfect! Great part and speedy delivery!!
  • rick from colorado springs, CO
  • Difficulty Level:
    Really Easy
  • Total Repair Time:
    Less than 15 mins
  • Tools:
    Nutdriver, Screw drivers
4 of 6 people found this instruction helpful.
Was this instruction helpful to you?
Thank you for voting!
Burner Element Replaced
My grandson, age 15 did the replacement. Now, how easy is that!
  • GLENA from CINCINNATI, OH
  • Difficulty Level:
    Really Easy
  • Total Repair Time:
    Less than 15 mins
  • Tools:
    Nutdriver, Screw drivers
4 of 5 people found this instruction helpful.
Was this instruction helpful to you?
Thank you for voting!
Faulty Element Thermostat
1)Turn off breaker to range
1.1)Disconnect the downdraft vent blower
2)Remove Range from Counter area (delicate procedure)
Caution do not stress (Lift with or pull on) the cook-top
3)Remove Ceramic cook-top from base (hidden fasteners-remove the vert trim at front of range - it hides two fasteners)
4)Remove old elements
5)Rebuild the supplied elements (multiple options, copy the old element layout before disassembling- tricky)
6)Swap-out replacement elements (replacement elements were assembled slightly differently in the new style elements so wiring was slightly different)
7)Re-assemble Ceramic cook-top
8)Re-mount to base (needs assistant to support ceramic while reconnecting cable harness connector)
8) Re-set range into counter (Ceramic cook-top is very delicate, so extreme care is required to prevent damage)
Other Parts Used:
Dual Radiant Element with Limiter Element with Limiter 6 Inch - 1200W
  • Steven from Sherwood, OR
  • Difficulty Level:
    Difficult
  • Total Repair Time:
    1- 2 hours
  • Tools:
    Nutdriver, Pliers, Screw drivers
12 of 21 people found this instruction helpful.
Was this instruction helpful to you?
Thank you for voting!
right rear burner was inop for last 4 years
1. tripped circuit breaker for stovetop
2. pulled the stove top out of its cabinet.
3. turned in over carefully due to the glass cooking surface.
4. used 1/4 inch nutdriver on cordless drill to remove all the screws holding the lower cover in place. lifted cover off without removing completely as power wires still attached.
5. did continuity test on burner and found it open circuit while all the other 3 burners had continuity.
6. removed defective burner by removing two more screws and saw element was fried on the cooking side.
7. wrote down all part numbers and put it all back together.
8. changed the burner out when new one arrived by repeating steps 1 thru 6. Pay attention to the correct wiring setup. Do one wire at a time to make sure you don't mess up. MAKE SURE THE CIRCUIT BREAKER IS TRIPPED BEFORE YOU KILL YOUR SELF.

Have a tall one to celebrate the savings of two repair man call out fee's of minimum $60 each time and paying list price for the element. You probably just saved yourself $150.
Tom in Steinhatchee
  • Thomas from Steinhatchee, FL
  • Difficulty Level:
    Easy
  • Total Repair Time:
    30 - 60 mins
  • Tools:
    Nutdriver
19 of 23 people found this instruction helpful.
Was this instruction helpful to you?
Thank you for voting!
  • 1
  • 2
  • 3
Questions and Answers

Ask our experts a question about this part and we'll get back to you as soon as possible!

40 questions answered by our experts.
Sort by:
  • 1
  • 2
  • 3
Sorry, we couldn't find any existing answers that matched.Try using some different or simpler keywords, or submit your new question by using the "Ask a Question" button above!
Darlene
January 30, 2018
Why can i not buy the large element? Has the parts been discontinued? If not where can i buy the larger stovetop element?
For model number CER3760ACQ -10593350YB
PartSelect logo
Hi Darlene, Thank you for your question. The part number for the large surface burner element listed under your model number is PS11759487. I hope this helps. Thank you and have a great day!

19 people found this helpful.

Was this helpful?
Thank you for voting!
Hilton
October 17, 2017
Heating element 15 heats up but cannot control the heat.
For model number MER6751AAS
PartSelect logo
Hi Hilton, Thank you for the question. I suggest replacing the Infinite Switch that controls the element you are having the issue with.The control switch turns the surface element on and off and determines the temperature of the element.Hope this helps!

6 people found this helpful.

Was this helpful?
Thank you for voting!
Delores
December 4, 2017
The front small heating element is not heating and I am looking to purchase one, what does it mean when it says there is an element limiter?
For model number MER5755QAW
PartSelect logo
Hello Delores, Thanks for your question. The element limiter is used for cutting off the temperature to the element at certain degrees - it involves the wiring of the element to ensure proper currents. We would also advise replacing the switch associated with the element, part number PS11744486, as that is more likely to be the cause of the element not heating. I hope this helps.

4 people found this helpful.

Was this helpful?
Thank you for voting!
Related Parts:
Marc
December 13, 2017
I got a cook top heating elements from you guys when i hooked them up they will not heat up different size connectors on one of the wires
PartSelect logo
Hi Marc, Thank you for contacting us. Maybe you could check how you had installed the part. Here is a video on the installation: https://youtu.be/eFP4oIZ_5Jo . If you still have issues with the part, I would suggest contacting our customer service with your order number so that we can help you with a warranty for a defective part. Good luck with your repair.

3 people found this helpful.

Was this helpful?
Thank you for voting!
Kenny
October 18, 2017
What is the ohm reading for the limiter on the 6 in element at room temperature 78 degrees
For model number RF378PXGB
PartSelect logo
Hi Kenny, Thank you for your question. The information I have is that your burner has a range of 0 ohms to 120 ohms. For your limiter, when testing, if your needle or meter does not change then the part is not working and would need to be replaced. I hope that helps. Good luck with your repair.

3 people found this helpful.

Was this helpful?
Thank you for voting!
Paul
February 21, 2019
My right side front element gets very hot and can not be regulated. It goes goes full blast and stays there.
For model number MER6769BAW
PartSelect logo
Hello Paul, Thank you for the question. The most common issue would be a defective switch that controls the element. Part Number: PS11744486. Hope this helps, good luck with this repair!

2 people found this helpful.

Was this helpful?
Thank you for voting!
Paul
February 21, 2019
I recently asked a question about a Maytag mer6769baw. I have a right front element that can not be regulated. The response was to change the infinite switch 6" part number ps11744486 but my element is the larger one. Is there another number for a switch that regulates the larger element?Thanks paul.
For model number MER6769BAW
PartSelect logo
Hello Paul, Thank you for contacting us. I have researched the model you have provided and have found the part you are looking for is Part Number: PS11744487. Thank you for your inquiry, good luck with this repair!

1 person found this helpful.

Was this helpful?
Thank you for voting!
Related Parts:
Jerome
January 15, 2019
The dual element on my Whirlpool electric stove top stays on high heat all the time. I took continuity on the element and it checks out good. I want to know if would be because of the switch or the limiter which is on the element. I cannot find the limiter by itself in your parts list. How does the switch work as far as controlling the amount of heat to each of the two elements? with the element not controlling and being on high all the time would it be the switch or the limiter on the element? If it is the limiter on the element can those be ordered separate from the element and if so what is the limiter part number? If not what is the element assembly part number? If it is the switch what is the correct part number for the dual element switch part number? thanks!
For model number GJC3034LB0
PartSelect logo
Hello Jerome, Thank you for the question. If the element tested good then the element and the limiter should be fine. Also if the element is still turning on they should be good. This is a more common issue with the switch that controls the element you are having the issue with. Part Number: PS11747252. Thank you for your inquiry, good luck with this repair!

1 person found this helpful.

Was this helpful?
Thank you for voting!
Related Parts:
Walt
22 days ago
What is the part number for the right rear radiant heating element of my Maytag range? It is a 6" or 6 1/2" element, I believe. Best I can find is Whirlpool part number W10823711.
For model number MER6872BAB
PartSelect logo
Hi Walt, thank you for reaching out. The right rear radiant surface element for your model is part number PS11764915. Glad to be of help!

1 person found this helpful.

Was this helpful?
Thank you for voting!
Ricardo
March 28, 2019
Hi, has 4 top heaters, after heated by a hurricane only the front right side heater works, would like to replace the bigger front left side heater...what is the correct number or code to be sure i can order the correct one... thanks a million!!!
For model number MER6755AAW
PartSelect logo
Hello Ricardo, thank you for inquiring. You are looking for Surface Element part PS11764917.

1 person found this helpful.

Was this helpful?
Thank you for voting!
  • 1
  • 2
  • 3
Model Cross Reference
This part works with the following models:
PartSelect Number: PS11764915
Manufacturer Part Number: W10823711
Brand
Model Number
Description
Kenmore
22-98002
Range - Kenmore Range/Stove/Oven Model 22-.98002 (2298002, 22 98002) Parts
Kenmore
22-98009
Range - Kenmore Range/Stove/Oven Model 22-.98009 (2298009, 22 98009) Parts
Kenmore
62260002600
Range
Kenmore
62260003600
Range
Kenmore
62260008600
Range
Kenmore
62260009600
Range
Kenmore
62945775
Range
Kenmore
62945776
Range
Kenmore
62945779
Range
Kenmore
62960002600
Range
Kenmore
62960002601
Range
Kenmore
62960002606
Range
Kenmore
62960003600
Range
Kenmore
62960008600
Range
Kenmore
62960008601
Range
Kenmore
62960008606
Range
Kenmore
62960009600
Range
Kenmore
62960009601
Range
Kenmore
62960009606
Range
Kenmore
66595775890
Range
Kenmore
66595775891
Range
Kenmore
66595776890
Range
Kenmore
66595776891
Range
Kenmore
66595779890
Range
Kenmore
66595779891
Range
Kenmore
66598002700
Range
Kenmore
66598002701
Range
Kenmore
66598003700
Range
Kenmore
66598003701
Range
Kenmore
66598009700
Range
Customer Service Representative

Get in touch, we're here to help!

Daily 8am - 9pm EST

Contact Customer Service