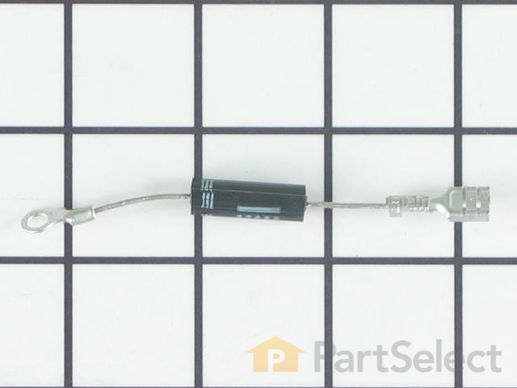
Part Location Diagram of W11256462 Whirlpool DIODE
See part 12 in the diagram
( Grid squares measure 1x1 inch )
Customer Service Representative

Get in touch, we're here to help!

Daily 8am - 9pm EST

customerservice@partselect.com

DIODE W11256462

 Fits your MH3184XPB6!
★★★★★
★★★★★
8 Reviews

Rated by 12 customers 

Easy 

30 - 60 mins 

Ratings submitted by customers like you who bought this part.

$ 29.52
  In Stock
Get FREE EconoShip on orders over $100! T&C apply

Get this part fast! Average delivery time for in-stock parts via standard shipping: 1.8 days.

 Fits your MH3184XPB6!
PartSelect Number PS12584264
Manufacturer Part Number W11256462
Manufactured by Whirlpool
Product Description

DIODE Specifications

This diode, or high voltage diode, is used in microwaves. It is an electrical current control device that ensures power flows in one direction and not the other way. If your microwave produces no heat, heats inconsistently, or gets noisy, replacing this part can be the solution. The tools needed for this replacement are a nutdriver, pliers, and screwdrivers. First remove the microwave cover, then remove the old part by disconnecting the small thermostat. Replace with the new diode. Remember to use the diagram provided by the manufacturer for more instructions.
How Buying OEM Parts Can Save You Time and Money

How Buying OEM Parts Can Save You Time and Money

Troubleshooting
This part fixes the following symptoms:
No heat | Noisy
This part works with the following products:
Microwave, Microwave Oven Combo, Washer.
This part works with the following products:
Whirlpool, Maytag, KitchenAid, Amana.
Part# W11256462 replaces these:
4393600, 461964697812, 8184664, 8205361, W10163432, W10245187, W10492276, W10492278, W10575765, W10886077, W11222648, WPW10492276, WPW10575765
Back to Top
Customer Reviews
Average Rating:
★★★★★
★★★★★
8 Reviews
4.5
Filter By Rating:
  • 5 Stars
    6
  • 4 Stars
    0
  • 3 Stars
    2
  • 2 Stars
    0
  • 1 Star
    0
Sort by:
  • 1
Sorry, we couldn't find any existing reviews that matched. Try using some different or simpler keywords.
  • 1
Customer Repair Stories
 Average Repair Rating: 3.3 / 5.0, 12 reviews. What's this?
Sort by:
  • 1
  • 2
Sorry, we couldn't find any existing installation instruction that matched.
Microwave worked perfectly but would no longer heat.
Looked up symptoms on parts select website. Ordered mag and diode. Very easy to take micro off the wall. Easily removed screws holding the skin on. Found diode. Really didn't need to replace it but since I had a new one (fairly cheap), just did so. Diode only installs one way. Can't botch it HOWEVER, MAKE SURE THE ONLY PART OF THE DIODE TO TOUCH THE GROUNDING POLE IS THE SCREW DOWN LEAD. IF THE OPPOSITE END LEAD, THAT WHICH IS THE PUSH ON TERMINAL, TOUCHES THE GROUNDING POLE, YOU'LL GET ARCHY SPARKY. The magnetron goes in very easy. Simply pay attention to how you removed it and reverse that process installing the new one. There are easy to use YouTube videos that show magnetron replacement. You can do this easily and save your microwave and $$ while doing so.
Other Parts Used:
DIODE Magnetron
  • Pat from Prior Lake, MN
  • Difficulty Level:
    Really Easy
  • Total Repair Time:
    30 - 60 mins
  • Tools:
    Screw drivers
1 person found this instruction helpful.
Was this instruction helpful to you?
Thank you for voting!
Not heating up
Remove “over the stove” unit. Remove unit shell case. Unscrew and disconnect diode. Replace diode. Re-assemble. Put unit back in place.
  • Michael from GLENDALE, CA
  • Difficulty Level:
    Really Easy
  • Total Repair Time:
    15 - 30 mins
  • Tools:
    Screw drivers, Socket set
4 of 5 people found this instruction helpful.
Was this instruction helpful to you?
Thank you for voting!
Diode had burnt out
Take off top facing over microwave using screwdriver also protection plate for diode and capaitor. Disconnect diode from frame, bracket to capacitor then remove, disconnect wires leaving diode on capacitor for right connection, replace, rewire done.
  • Benny from OZAN, AR
  • Difficulty Level:
    Really Easy
  • Total Repair Time:
    30 - 60 mins
  • Tools:
    Screw drivers
6 of 8 people found this instruction helpful.
Was this instruction helpful to you?
Thank you for voting!
Microwave would run but not heat up the food
Removed the microwave from above the oven by loosening the two screws above the microwave. As the unit tilted outward lifted up and the whole unit came out all the time feeding the power cord through the cutout for the power cord. After it was out removed the cover and identified the capacitor and made sure it was discharged and removed and replaced the diode. tested before reinstalling and it heated up just fine. Reversed order and reinstalled . Very easy job maybe a second hand to help fish the power cord when installing and removing.
  • Jerry from FORT WORTH, TX
  • Difficulty Level:
    Really Easy
  • Total Repair Time:
    30 - 60 mins
  • Tools:
    Pliers, Screw drivers
5 of 7 people found this instruction helpful.
Was this instruction helpful to you?
Thank you for voting!
On Turning on the Microwave, it was sparking, was not sure where the sparks are coming from, initially I thought mica at the end of megnatron duct could be the issue
when I opened the back cover of microwave, the diode was kind of blackish blown, since there was light bulb and fan were still working, i thought it could be problem with any one of the components like; magnatron or capacitor or diode, so first replaced the diode and mica at the end of the magnatron duct, there was problem with door switch as well. i fixed that too. Now it is working. It cooks bit faster, Wondering why?
Other Parts Used:
DIODE Charcoal Filter
  • RaviShankar from Artesia, CA
  • Difficulty Level:
    Easy
  • Total Repair Time:
    1- 2 hours
  • Tools:
    Pliers, Screw drivers
0 of 1 people found this instruction helpful.
Was this instruction helpful to you?
Thank you for voting!
Microwave turns on but did not heat
Loosened but did not remove screws that held up microwave over range,removed grill on top by loosening screws that held grill in place.removed small mesh grill on right side of microwave, this gave me access to capacitor ,diode is connected from one lead of capacitor to a metal plate ground,Disccarged capacitor to ground by shorting terminals to ground using a thick insulated screwdriver.Since the diode was screwed to the top of the metal plate I cut it out with a pair of side cutters .I then connected the new diode to the capacitor with my long nose pliers and groonded the other end to a more accessible part of the metal grounding plate.I then replaced all parts in reverse order.Works like a charm.
  • John from Port Saint Lucie, FL
  • Difficulty Level:
    A Bit Difficult
  • Total Repair Time:
    15 - 30 mins
  • Tools:
    Pliers, Screw drivers
2 of 3 people found this instruction helpful.
Was this instruction helpful to you?
Thank you for voting!
visible sparking inside top of MW unit
Remove the two screws to the plastic vent strip at the top of the unit. That exposes a metal cover (upper right) held in place by two more screws. (Found that removing the screw holding the key panel in place and moving that out of the way made for more work room) Remove the metal cover. The HV diode (visible) on one end is secured to the chassis by a screw. The other end is fitted to the HV capacitor. So unscrew one end and pull the HV diode off the capacitor. The replacement fits on like the old one came off. Very simple repair. But it would be safe to short the capacitor terminals to the chassis first. Noticed that it appeared the sparking was caused by the HV diode's outer casing being worn by the asbestos covered wire next to it and laying against it. I made sure the two were not touching, before putting the covers back on. Also, the problem started with an occasional spark when the MW started. It quickly deteriorated to a full, non-stop electrical sparking. You can hear it, smell it, and see it through the top vent. You don't need to remove unit to work on it.
  • Robert from Charleston, SC
  • Difficulty Level:
    Really Easy
  • Total Repair Time:
    15 - 30 mins
  • Tools:
    Screw drivers
2 of 3 people found this instruction helpful.
Was this instruction helpful to you?
Thank you for voting!
no heat
this problem started two months ago when my micro quit heating up, after all the research most agreed it was the magnetron. taking the micowave apart is not to difficult just make sure you bag all the screws accordingly. the high voltage area is on the right hand side behind a panel. caution there is a capacitor that will bite if your not careful, need to short the circuit between the two connectors with an insulated screw driver it will make a small pop or let it sit for awhile and it will discharge by itself. The magnetron worked for two days then quit, after more research i took it apart again and tightened up all the connections. Worked great on the bench but when i got it back up on the cabinet two dayslater kaput again. so again i take it down and replaced the two cheapest parts in the high voltage system, magnetron thermst fix, and h.v diode. benched tested it this time for 3 days cooking anything that i could think of, worked great. its been one week now afer installtion and it is still working.
Other Parts Used:
DIODE Thermal Fuse
  • kelvin from san diego, CA
  • Difficulty Level:
    Really Easy
  • Total Repair Time:
    1- 2 hours
  • Tools:
    Nutdriver, Pliers, Screw drivers
94 of 110 people found this instruction helpful.
Was this instruction helpful to you?
Thank you for voting!
Microwave made very loud noise while on. No heat.
Unless you have a very comfortable background with electronics and electricity, I don't necessarily recommend taking apart a microwave. If you are very handy and are going to be VERY cautious to follow the rules of discharging caps and testing voltages before moving forward, then go for it. That said, I took the microwave off and apart. Not knowing where to find the parts, I was fortunate that the installer put the instruction book for the microwave inside the front vent slot above the touchpad for reference. it details the location of every part and it tells you very clearly what each part you test should show specific to this microwave on your multimeter. Find this guide online if you don't have it. Turn on the microwave for 20 seconds with a glass of water to make sure it's not heating - that with the noise means it's eeither the magnetron, cap, or diode. Read the notes on this site for all of the basic things to look for with the magnetron, diode, and capacitor. Once comfortable with the guide, locations of those devices, and how to test, then take it down and apart. Unfortunately, I didn't do all those things in that order, and it only wasted a lot of time trying to find the parts. Once I found the parts and put all the screws and covers back for all the areas that didn't need to be accessed for the repair, testing went quickly. The diode was bad. Ordered a new one and had it in 3 days or so. That means your microwave will be apart and sitting somewhere for a little while until you get the part and have time to repair it. Putting the diode back isn't too bad. Reassemble the microwave and put it back up again. If i had to do it again, it would take me 20 to 30 minutes once the microwave was down and on a table. Also, I used some bricks with towels over them or you could use some sawhorses to keep the microwave elevated so you can plug it in and run it after installing the new component. Again, make sure you discharge the cap before touching anything again even if you didn't run it, but just plugged it in.
  • Sleiman from Miami, FL
  • Difficulty Level:
    Easy
  • Total Repair Time:
    More than 2 hours
  • Tools:
    Pliers, Screw drivers
38 of 51 people found this instruction helpful.
Was this instruction helpful to you?
Thank you for voting!
Humming sound, not heating.
I turn off the income electricity by shutting down the corresponding circuit breaker. Then, I removed the control panel from the microwave which gave me access to the capacitor and adjacent diode. After that i unscrewed the defective diode and replaced it with the new one and BINGO!
  • Fausto from Miramar, FL
  • Difficulty Level:
    Easy
  • Total Repair Time:
    15 - 30 mins
  • Tools:
    Nutdriver, Pliers, Screw drivers
34 of 47 people found this instruction helpful.
Was this instruction helpful to you?
Thank you for voting!
  • 1
  • 2
Questions and Answers

Ask our experts a question about this part and we'll get back to you as soon as possible!

4 questions answered by our experts.
Sort by:
  • 1
Sorry, we couldn't find any existing answers that matched.Try using some different or simpler keywords, or submit your new question by using the "Ask a Question" button above!
Rich
December 7, 2021
Maytag MMV 5219 DH1 microwave does not heat and makes loud grinding noise. turntable motor checks okay. I'm wondering If it could be the magnatron.
For model number W11256462
PartSelect logo
Hello Rich, thank you for your question. These symptoms can be caused by a defective diode, capacitor, or magnetron. Your microwave oven is capable of giving you a serious electrical shock, even when it is unplugged. We strongly suggest you seek the assistance of an appliance repair technician when conducting any microwave oven repair. We hope this helps.

7 people found this helpful.

Was this helpful?
Thank you for voting!
William
November 14, 2022
MW won't heat. all else works. replaced diode and fuse and still won't heat. tested old and new parts with voltmeter and they all tested as functioning. Is there a 2nd fuse or could it be the magnetron?
For model number UMV1160CB-3
PartSelect logo
Hello William, thank you for contacting us. We would recommend checking the magnetron thermostat, part number PS8691721, thermistor, part number PS2180211, and the high-limit thermostat, part number PS2361102. Please do a continuity test on these parts using a multimeter. If this does not help the issue is probably related to the magnetron, part number PS11757171. Customer service is always available to help you place an order if you are having trouble doing so. Good luck with your repair.

Was this helpful?
Thank you for voting!
Related Parts:
Laurie
November 17, 2022
Would replacing the diode on the mother board help troubleshoot the lights underneath from staying on?
For model number MMV4205DS4
PartSelect logo
Hello Laurie, thank you for the question. According to our research, the diode, part number PS12584264, is an electrical current control device that ensures power flows in one direction and not the other way. A faulty diode could be an issue but we would recommend also checking the door latch, part number PS11722531, and door switch, part number PS2361113. Please reach out to customer service if you need help placing an order. Glad to be of help!

Was this helpful?
Thank you for voting!
Related Parts:
Mike
April 23, 2023
Where is the diode located?
For model number AMV115VAW-4
PartSelect logo
Hi Mike, Thank you for your question. The diode will be found behind the control panel, near the capacitor and the magnetron. We hope this helps!

Was this helpful?
Thank you for voting!
  • 1
Model Cross Reference
This part works with the following models:
PartSelect Number: PS12584264
Manufacturer Part Number: W11256462
Brand
Model Number
Description
Kenmore
66560601000
Microwave
Kenmore
66560609000
Microwave
Kenmore
66560612000
Microwave
Kenmore
66560617000
Microwave
Kenmore
66560619000
Microwave
Kenmore
66560622000
Microwave
Kenmore
66560629000
Microwave
Kenmore
66560632000
Microwave
Kenmore
66560639000
Microwave
Kenmore
66560652000
Microwave
Kenmore
66560654000
Microwave
Kenmore
66560657000
Microwave
Kenmore
66560659000
Microwave
Kenmore
66560682000
Microwave
Kenmore
66560689000
Microwave
Kenmore
66561601100
Microwave
Kenmore
66561609100
Microwave
Kenmore
66561612100
Microwave
Kenmore
66561612101
Microwave
Kenmore
66561614100
Microwave
Kenmore
66561614101
Microwave
Kenmore
66561617100
Microwave
Kenmore
66561617101
Microwave
Kenmore
66561619100
Microwave
Kenmore
66561619101
Microwave
Kenmore
66561622100
Microwave
Kenmore
66561624100
Microwave
Kenmore
66561627100
Microwave
Kenmore
66561629100
Microwave
Kenmore
66561632100
Microwave
Customer Service Representative

Get in touch, we're here to help!

Daily 8am - 9pm EST

Contact Customer Service