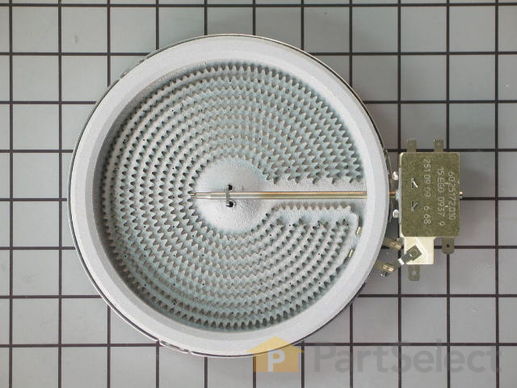
Part Location Diagram of W11171119 Whirlpool 6" Surface Element, 1200 W
See part 7 in the diagram
Replacing your Whirlpool Range 6" Surface Element, 1200 W
( Grid squares measure 1x1 inch )
Customer Service Representative

Get in touch, we're here to help!

Daily 8am - 9pm EST

customerservice@partselect.com

6" Surface Element, 1200 W W11171119

 Fits your GGE388LXB01!
★★★★★
★★★★★
11 Reviews

Rated by 9 customers 

Really Easy 

30 - 60 mins 

Ratings submitted by customers like you who bought this part.

$ 139.79
  In Stock
Get FREE EconoShip on orders over $100! T&C apply

Get this part fast! Average delivery time for in-stock parts via standard shipping: 1.8 days.

 Fits your GGE388LXB01!
PartSelect Number PS12348164
Manufacturer Part Number W11171119
Manufactured by Whirlpool
Product Description

6" Surface Element, 1200 W Specifications

Sold individually.
How Buying OEM Parts Can Save You Time and Money

How Buying OEM Parts Can Save You Time and Money

Part Videos

Replacing your Whirlpool Range 6" Surface Element, 1200 W

Replacing your Whirlpool Range 6" Surface Element, 1200 W
Troubleshooting
This part fixes the following symptoms:
Element will not heat
This part works with the following products:
Range, Cooktop.
This part works with the following products:
Whirlpool, Maytag, KitchenAid, Jenn-Air.
Part# W11171119 replaces these:
8273994, W10248261, WP8273994
Back to Top
Customer Reviews
Average Rating:
★★★★★
★★★★★
11 Reviews
4.7
Filter By Rating:
  • 5 Stars
    8
  • 4 Stars
    3
  • 3 Stars
    0
  • 2 Stars
    0
  • 1 Star
    0
Sort by:
  • 1
  • 2
Sorry, we couldn't find any existing reviews that matched. Try using some different or simpler keywords.
  • 1
  • 2
Customer Repair Stories
 Average Repair Rating: 3.6 / 5.0, 9 reviews. What's this?
Sort by:
  • 1
Sorry, we couldn't find any existing installation instruction that matched.
Electric burner element not working
Video said to remove screws and lift stove top off, remove contacts and ground. My stove top was hinged and required me to lift and pivot stovetop up. The burners were anchored to the stove base not the top. I secured the topso that it would not drop down and proceeded with repair
  • Ronald from The Villages, FL
  • Difficulty Level:
    A Bit Difficult
  • Total Repair Time:
    30 - 60 mins
  • Tools:
    Pliers, Screw drivers
1 person found this instruction helpful.
Was this instruction helpful to you?
Thank you for voting!
surface element not working
Ordered new element from PartSelect. It arrived shortly. It did not match the original. Guy at appliance store explained how I could connect the wires on the new one. It still did not fix the problem. A repair man tried for 2.5 hours to fix it with no success. Now I will return the replacement element in the return envelope provided.
  • bruce from PORTLAND, OR
  • Difficulty Level:
    Really Easy
  • Total Repair Time:
    More than 2 hours
  • Tools:
    Pliers, Screw drivers, Socket set
1 person found this instruction helpful.
Was this instruction helpful to you?
Thank you for voting!
lost two burners
repair was very easy 20 mins and it was done
Other Parts Used:
Surface Element - 3000/1400W 6" Surface Element, 1200 W
  • MELISSA from CHAPLIN, CT
  • Difficulty Level:
    Very Easy
  • Total Repair Time:
    15 - 30 mins
  • Tools:
    Screw drivers
7 of 7 people found this instruction helpful.
Was this instruction helpful to you?
Thank you for voting!
Burned out heating element.
I watched the video you provide and it answered all my questions. You estimate repair at 10 minutes. My wife said I waz done in under 10 minutes Watch the video, it explained every step and all the little tricks to the snap connections.
  • Kenneth from AUBURNDALE, FL
  • Difficulty Level:
    Very Easy
  • Total Repair Time:
    Less than 15 mins
  • Tools:
    Pliers, Screw drivers
3 of 3 people found this instruction helpful.
Was this instruction helpful to you?
Thank you for voting!
Burner went out
Two screws to remove glass top. 2 connectors to remove. Removed glass top and put it upside down. Remove 4 wires and 2 Phillips screws. Reverse steps.
  • Ronald from DEFIANCE, OH
  • Difficulty Level:
    Easy
  • Total Repair Time:
    30 - 60 mins
  • Tools:
    Pliers, Screw drivers
2 of 4 people found this instruction helpful.
Was this instruction helpful to you?
Thank you for voting!
Bad Element
Remove top by opening oven and taking out two screws in the front. Lift up top and unplug wire connectors on bad element, writing down where they are landed. Take out screw on element bracket and replace. That easy. Be sure to unplug appliance for your safety. :-) Also just wanted to add that PartSelect was great. Ordered it on saturday and was cooking with it on tuesday. Great job.
  • Dean from Farmington, NY
  • Difficulty Level:
    Easy
  • Total Repair Time:
    Less than 15 mins
  • Tools:
    Screw drivers
13 of 20 people found this instruction helpful.
Was this instruction helpful to you?
Thank you for voting!
Glass top stove element stopped working
really easy! Removed 2 screws under the glass top at the front, access from the open oven door, then removed the ground wire, removed the stove top, took the element holder off,( 2 screws)and replaced with new element, 30 minutes. I ordered the part and came within 18 hrs of ordering it, fantastic experience.
  • Robert from Fruitland Park, FL
  • Difficulty Level:
    Easy
  • Total Repair Time:
    15 - 30 mins
  • Tools:
    Screw drivers
19 of 27 people found this instruction helpful.
Was this instruction helpful to you?
Thank you for voting!
Bad element replacement
Took off top and pulled out old element and plugged in the new one
  • Thomas from Warren, CT
  • Difficulty Level:
    Easy
  • Total Repair Time:
    30 - 60 mins
  • Tools:
    Pliers, Screw drivers, Socket set
9 of 16 people found this instruction helpful.
Was this instruction helpful to you?
Thank you for voting!
Surface Element Out
Took 2 screws under front edge of smooth top. Unscrewed ground wire from back of smooth top unit. Unplugged 2 wire bundles, from back. Took bad element out , put in new one. Put back together. About 10 min's tops. Easy peasy.
  • Terry from Rockwall, TX
  • Difficulty Level:
    Really Easy
  • Total Repair Time:
    Less than 15 mins
  • Tools:
    Screw drivers
57 of 70 people found this instruction helpful.
Was this instruction helpful to you?
Thank you for voting!
  • 1
Questions and Answers

Ask our experts a question about this part and we'll get back to you as soon as possible!

3 questions answered by our experts.
Sort by:
  • 1
Sorry, we couldn't find any existing answers that matched.Try using some different or simpler keywords, or submit your new question by using the "Ask a Question" button above!
Anne
September 7, 2022
My 6” element goes straight to high and stays there no matter where I set the knob. How can we correct that?
For model number MES8880DS0
PartSelect logo
Hi Anne, thank you for your question. We have researched your model and found that the issue is probably with the Right Rear Burner Switch, part number PS11769788. If you require assistance to place an order, please contact customer service. We hope that helps!

1 person found this helpful.

Was this helpful?
Thank you for voting!
Related Parts:
Sara
November 7, 2022
My glass range top does not come off like I’m the video. Is there something that I’m missing? It will not slide towards me and up. It seems to be attached with a hinge.
For model number GFE461LVQ0
PartSelect logo
Hello Sara, thank you for your inquiry. According to our research, you need to unscrew the screws at the bottom of the range top which you can access by opening the oven door. After that, you need to unscrew the hinge from the range top. The hinge is located at the back of the range top. We hope this information helps!

1 person found this helpful.

Was this helpful?
Thank you for voting!
Kinting
September 14, 2023
What size is for right front element radiant How many inches
For model number WFE525SOJZO
PartSelect logo
Hi Kinting, thank you for getting in touch. We have found that the size of the right front surface element, part number PS11775308, is 10 inches. Glad to be of assistance!

Was this helpful?
Thank you for voting!
Related Parts:
  • 1
Model Cross Reference
This part works with the following models:
PartSelect Number: PS12348164
Manufacturer Part Number: W11171119
Brand
Model Number
Description
Amana
4KAER7685EW0
Range - ELECTRIC RANGE
Whirlpool
4KAER7685EW1
Maytag
4KMER7685ES0
Range - ELECTRIC RANGE
Maytag
4KMER7685ES1
Maytag
4KMER7685EW0
Range - ELECTRIC RANGE
Whirlpool
4KMER7685EW1
Whirlpool
4KWFE7685ES0
Range - ELECTRIC RANGE
Whirlpool
4KWFE7685ES1
Whirlpool
4KWFE7685EW0
Range - ELECTRIC RANGE
Whirlpool
4KWFE7685EW1
Kenmore
66495113610
Range - ELECTRIC RANGE
Kenmore
66495113611
Range - Electric Range
Kenmore
66495123610
Range - Electric Range
Kenmore
66495123612
Range - Electric Range
Kenmore
664C95113610
Range - ELECTRIC FREE STANDING
Kenmore
664C95123610
Range - ELECTRIC SLIDE
Kenmore
664C95123611
Range - Electric Range
Amana
AEC6540KFB00
Cooktop - COUNTER UNIT ELECTRIC
Maytag
AEC6540KFB01
Dryer
Amana
AER5822VAB0
Range - FREE STANDING - ELECTRIC
Amana
AER5822VAD0
Range - FREE STANDING - ELECTRIC
Amana
AER5822VAS0
Range - FREE STANDING - ELECTRIC
Amana
AER5822VAW0
Range - FREE STANDING - ELECTRIC
Amana
AER5822VCB0
Range - FREE STANDING - ELECTRIC
Amana
AER5822VCS0
Range - FREE STANDING - ELECTRIC
Amana
AER5822VCW0
Range - FREE STANDING - ELECTRIC
Amana
AER5830VAB0
Range - FREE STANDING - ELECTRIC
Amana
AER5830VAB1
Range - 30" ELECTRIC CERAN FREESTANDING RANGE
Amana
AER5830VAD0
Range - FREE STANDING - ELECTRIC
Amana
AER5830VAD1
Range - 30" ELECTRIC CERAN FREESTANDING RANGE
Customer Service Representative

Get in touch, we're here to help!

Daily 8am - 9pm EST

Contact Customer Service