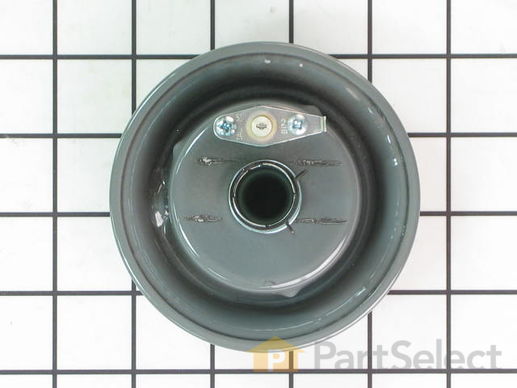
Part Location Diagram of WP3412D024-26 Whirlpool Sealed Burner Cap with Electrode
See part 1 in the diagram
Replacing your Maytag Range Sealed Burner Cap with Electrode
( Grid squares measure 1x1 inch )
Customer Service Representative

Get in touch, we're here to help!

Daily 8am - 9pm EST

customerservice@partselect.com

Sealed Burner Cap with Electrode WP3412D024-26

 Fits your 31213WAV!
★★★★★
★★★★★
6 Reviews

Rated by 27 customers 

Really Easy 

Less than 15 mins 

Ratings submitted by customers like you who bought this part.

$ 71.53
  In Stock
Get FREE EconoShip on orders over $100! T&C apply

Get this part fast! Average delivery time for in-stock parts via standard shipping: 1.8 days.

 Fits your 31213WAV!
PartSelect Number PS11741733
Manufacturer Part Number WP3412D024-26
Manufactured by Whirlpool
Product Description

Sealed Burner Cap with Electrode Specifications

This burner cap assembly is sold with the spark electrode igniter and has a 7-inch outer diameter. This manufacturer-approved surface burner is for gas ranges. The surface burner supplies the heat to a cooking area on the cooktop. You may need to replace your burner cap if the gas igniter glows but will ignite the flame, the range will not start, or if you can smell gas. Because a faulty burner cap could lead to a house fire, it is recommended that you replace this part as soon as you realize it is faulty. Remember to unplug the range, turn off the gas, and let the unit cool down before starting this installation. Note: this part has been redesigned and no longer requires a gasket, and is sold individually.
How Buying OEM Parts Can Save You Time and Money

How Buying OEM Parts Can Save You Time and Money

Part Videos

Replacing your Maytag Range Sealed Burner Cap with Electrode

Replacing your Maytag Range Sealed Burner Cap with Electrode
Troubleshooting
This part fixes the following symptoms:
Gas igniter glows | but will not light | Will Not Start | Element will not heat
This part works with the following products:
Range, Cooktop.
This part works with the following products:
Maytag, Magic Chef, Jenn-Air, Hardwick.
Part# WP3412D024-26 replaces these:
AP6008593, 12500051, 12500099, 3412D015-14, 3412D016-14, 3412D017-14, 3412D017-26, 3412D018-26, 3412D024-26, 3412D025-26, 74003965, 74007309, WP3412D024-26VP
Back to Top
Customer Reviews
Average Rating:
★★★★★
★★★★★
6 Reviews
5.0
Filter By Rating:
  • 5 Stars
    6
  • 4 Stars
    0
  • 3 Stars
    0
  • 2 Stars
    0
  • 1 Star
    0
Sort by:
  • 1
Sorry, we couldn't find any existing reviews that matched. Try using some different or simpler keywords.
  • 1
Customer Repair Stories
 Average Repair Rating: 4.6 / 5.0, 27 reviews. What's this?
Sort by:
  • 1
  • 2
  • 3
Sorry, we couldn't find any existing installation instruction that matched.
No spark, bad igniter
1. Grab the old burner and twist counter-clockwise. 2. Unplug the wire from the old igniter, simply pull off. 3. Take new burner/igniter (this new one comes all-in-one) and reattach the wire to the igniter underneath. 4. Place the burner so the 'nubs' line up with the stove top and then twist clockwise a short amount, it should turn slightly to lock in place. 5. Test. Mine sparked and started better than it has since i have had the stove
  • Tom from REDDING, CA
  • Difficulty Level:
    Really Easy
  • Total Repair Time:
    15 - 30 mins
1 person found this instruction helpful.
Was this instruction helpful to you?
Thank you for voting!
The old sealed burner cap had rusted out allowing gas flame around the base of the cap.
Note the position of the electrode on the side of the old burner cap. Turn the old burner cap one-eighth turn counter-clockwise to loosen and remove it. Raise the burner cap and disconnect the push-on connector wires from the ground and electrode. Clean the surface and connect the electrode and ground connector wires correctly to the new burner cap and place the burner cap back in the opening, positioning the electrode at the same orientation as it was with the old burner cap. Turn the cap one-eighth turn clockwise until the burner is snug. Turn on the burner control to test that the burner functions correctly. Make sure there is no smell of propane or gas when the burner is not in use which might indicate that the burner is not properly fitted snugly.
  • John from Stephentown, NY
  • Difficulty Level:
    Really Easy
  • Total Repair Time:
    Less than 15 mins
2 of 2 people found this instruction helpful.
Was this instruction helpful to you?
Thank you for voting!
Burner worn out
Turned burner about 1/16 turn to left. Lifted burner from stove. Disconnected two wire connectors. Connected same wires to new burner. Set burner in place and turned 1/16 turn to right. Tested burner. Lighter worked on first attempt and burned perfectly. Took about 3 1/2 minutes.
  • Robert from LORENA, TX
  • Difficulty Level:
    Very Easy
  • Total Repair Time:
    Less than 15 mins
1 person found this instruction helpful.
Was this instruction helpful to you?
Thank you for voting!
BURNER DID NOT IGNITE. HOLE ON SIDE OF BURNER HAD A HOLE, SO FLAME WAS UNEVEN.
USED CHANNELOCK PLIERS TO ROTATE BURNER COUNTER-CLOCKWISE. PULLED OFF THE CONNECTORS, APPLIED RUST TREATMENT TO THE REPLACEMENT PART, WHICH HAD ITSELF STARTED TO CORRODE. SPADE LUGS ON THE OLD PART HAD A SPADE ADAPTER, BUT THE CONNECTION SEEMED TO WORK REGARDLESS OF THE MISS-MATCH. PART WAS REPLACED, TURNING THE BURNER CLOCK-WISE. VERY QUICK AND EASY REPAIR.
  • Kenneth from WATSONVILLE, CA
  • Difficulty Level:
    Really Easy
  • Total Repair Time:
    Less than 15 mins
  • Tools:
    Pliers
1 person found this instruction helpful.
Was this instruction helpful to you?
Thank you for voting!
Missing gasket under burner caused gas to leak out
I followed the video and it was incredibly easy. I shut the breaker off (we live in an apartment, and pulling the plug on the stove wasn't possible). I lifter out the old burner (the gasket underneath was corroded, and I just threw it out, as the newer burners are self-sealing); removed both the igniter wire and the ground wire (I needed a pliers to tug the igniter wire off); attached the new burner; replaced the burner; turned on the power; and voila!
  • James from NEW YORK, NY
  • Difficulty Level:
    Really Easy
  • Total Repair Time:
    Less than 15 mins
  • Tools:
    Pliers
1 person found this instruction helpful.
Was this instruction helpful to you?
Thank you for voting!
Sealed burner was rusted out. Had a hole in it.
Unplugged two connectors and plugged into new burner. Couldn't have been easier! Also, I was so pleased that it matched the other three burners exactly!
  • Jeanne from ELMIRA, MI
  • Difficulty Level:
    Very Easy
  • Total Repair Time:
    Less than 15 mins
1 person found this instruction helpful.
Was this instruction helpful to you?
Thank you for voting!
corroded burners
Unscrew the burners an install new ones! Anyone could do this.
  • Daniel from Can Francisco, CA
  • Difficulty Level:
    Really Easy
  • Total Repair Time:
    Less than 15 mins
  • Tools:
    Wrench (Adjustable)
2 of 3 people found this instruction helpful.
Was this instruction helpful to you?
Thank you for voting!
Replaced burner
Went well
  • Ramiro from Bernalillo, NM
  • Difficulty Level:
    Easy
  • Total Repair Time:
    Less than 15 mins
  • Tools:
    Wrench set
2 of 3 people found this instruction helpful.
Was this instruction helpful to you?
Thank you for voting!
Burners would not ignite flame...Had to start with match.
Removed the old burners with a Plumbing Pipe Wrench by turning 1/4 turn counter clockwise. Disconnected (2) wires and replaced with new Sealed Burners. The simmer burner wires were slightly diffrent from the original but they do fit by opening the connector with screwdriver and then clamping once wire inserted.
  • Richard from Los Angeles, CA
  • Difficulty Level:
    Really Easy
  • Total Repair Time:
    15 - 30 mins
  • Tools:
    Screw drivers, Wrench (Adjustable)
6 of 7 people found this instruction helpful.
Was this instruction helpful to you?
Thank you for voting!
Original burner was eroded on the bottom and flame was coming from undernealth the burner
Very easy. I disconnected the original burner with one turn as well as the two wire connections for the electronic igniter. I then connected the wires to the same positions on the new burner and placed the new burner in place with one half turn to match the indented openings to secure the burner tightly in place.
  • Joe from Staten Island, NY
  • Difficulty Level:
    Really Easy
  • Total Repair Time:
    Less than 15 mins
1 of 2 people found this instruction helpful.
Was this instruction helpful to you?
Thank you for voting!
  • 1
  • 2
  • 3
Questions and Answers

Ask our experts a question about this part and we'll get back to you as soon as possible!

6 questions answered by our experts.
Sort by:
  • 1
Sorry, we couldn't find any existing answers that matched.Try using some different or simpler keywords, or submit your new question by using the "Ask a Question" button above!
William
August 21, 2017
Narrative for this part says 7"diameter. Grid is slightly under 4", which seems to be the correct figure for my part (range # prg5715bdw). Comment?
For model number PS11741733 (part #)
PartSelect logo
Hi William, Thank you for contacting us. Where this part is coming up under your model number it is designed to work for your appliance and it is the correct part. I hope this helps. Thank you and have a great day!

6 people found this helpful.

Was this helpful?
Thank you for voting!
Walt
October 1, 2017
Replacement igniter and gasket on under burner.
For model number CHG9800BAE
PartSelect logo
Hello Walt, thank you for contacting us. Yes, this is the correct part for your model. Good luck with the repair!

1 person found this helpful.

Was this helpful?
Thank you for voting!
Wallenstein
October 15, 2019
Hi, I require the complete set of four (4) burners for my Maytag gas cooktop model number csg7000cae. Can you confirm availability and cost.
For model number CSG7000CAE
PartSelect logo
Hello Wallenstein, thank you for inquiring. You will need four of these Sealed Burner Caps with Electrode, part number PS11741733 for your model. The price and availability is listed next to the "Add to Cart" button in the part description. To place an order, please feel free to contact customer service by phone or you may do so online. Thank you!

1 person found this helpful.

Was this helpful?
Thank you for voting!
David
January 3, 2020
There are two sets of burners, front right and rear left are higher btu's, are there different replacement parts and is the gasket no longer necessary ?
For model number 3468VVV
PartSelect logo
Hello David, Thank you for the question. The Gaskets have been discontinued and no longer needed when the Sealed Burner Cap are replaced. If you need a new gasket you will need to replace the Sealed Burner Cap. PartSelect Number PS11741733 is for both size burners. We hope this helps!

1 person found this helpful.

Was this helpful?
Thank you for voting!
Mickey
October 17, 2019
None of the stove top burners will ignite from the spark igniter. Is there a central module controlling these spark units or do i have to replace all four burners?
For model number FCG20510W
PartSelect logo
Hi Mickey, there is the Flat Style Oven Igniter Kit part number PS1573892. It is what provides the heat needed to open the gas valve, and it ignites fuel for the burner assembly. Thank you for your question and good luck with your repair!

Was this helpful?
Thank you for voting!
Rita
December 26, 2022
Two burners were easy to replace - twist off and twist on. But two are stuck on and won’t budge. Is there a tool that can wrench them off? Like a plumbers tool for stuck faucets?
For model number 31213
PartSelect logo
Hi Rita, thank you for contacting us. Mix water and baking soda to create a paste. Apply a thin layer of the paste to the burner heads and caps. Allow them 15-30 minutes. This may take repeated applications. Use a toothbrush or scrub brush to clean and attempt to remove it. We hope this information helps!

Was this helpful?
Thank you for voting!
  • 1
Model Cross Reference
This part works with the following models:
PartSelect Number: PS11741733
Manufacturer Part Number: WP3412D024-26
Brand
Model Number
Description
Magic Chef
24MA-7CKXWV8
Microwave Oven Combo - Gas
Magic Chef
24MN-7CKXWV8
Microwave Oven Combo - Gas
Magic Chef
3115PUV
Range - Gas
Magic Chef
31203PAV
Range - Freestanding, Gas
Magic Chef
31213WAV
Range - Gas
Magic Chef
3127WTV
Range - Freestanding, Gas
Magic Chef
31315VAV
Range - Gas
Magic Chef
31315VBV
Range - Gas
Magic Chef
31315WAV
Range - Gas
Magic Chef
3167VTV
Range - Freestanding, Gas
Magic Chef
3167VUV
Range
Magic Chef
3187VRV
Range - Gas
Magic Chef
3187VTV
Range - Gas
Magic Chef
3187VUV
Range - Gas
Magic Chef
32315VAV
Range - Gas
Magic Chef
3468VRV
Range - Gas
Magic Chef
3468VTV
Range - Gas
Magic Chef
3468VVV
Range - Gas
Magic Chef
3488VRV
Range - Gas
Magic Chef
3488VTV
Range - Gas
Magic Chef
3488VVS-N
Range - Gas
Magic Chef
3488VVV
Range - Freestanding, Gas
Magic Chef
34MA-3TKVW-EV
Range - Gas
Magic Chef
34MA-5TKVW-EV
Range - Gas
Magic Chef
34MN-3TKVW-EV
Range - Gas
Magic Chef
34MN-5TKVW-EV
Range - Gas
Magic Chef
6498VRV
Range - Freestanding, Gas
Magic Chef
6498VTV
Range - Freestanding, Gas
Magic Chef
6498VVV
Range - Freestanding, Gas
Magic Chef
68-2534-40
Range - GAS RANGE
Customer Service Representative

Get in touch, we're here to help!

Daily 8am - 9pm EST

Contact Customer Service