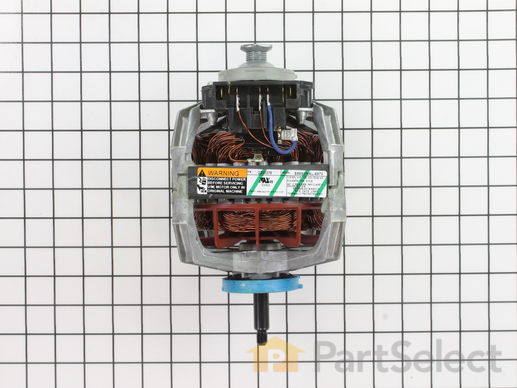
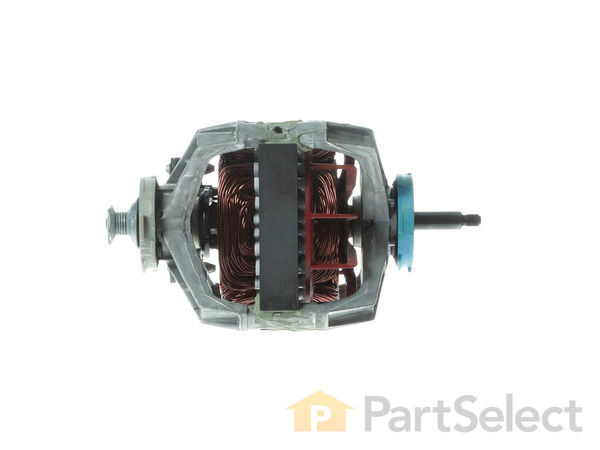
Part Location Diagram of WP2200376 Whirlpool Motor Assembly - Threaded Shaft
See part 7 in the diagram
( Grid squares measure 1x1 inch )
Customer Service Representative

Get in touch, we're here to help!

Daily 8am - 9pm EST

customerservice@partselect.com

Motor Assembly - Threaded Shaft WP2200376

 Fits your ADG7005AWW!
★★★★★
★★★★★
9 Reviews

Rated by 18 customers 

Easy 

1- 2 hours 

Ratings submitted by customers like you who bought this part.

$ 144.04
  In Stock
Get FREE EconoShip on orders over $100! T&C apply

Get this part fast! Average delivery time for in-stock parts via standard shipping: 1.8 days.

 Fits your ADG7005AWW!
PartSelect Number PS11739459
Manufacturer Part Number WP2200376
Manufactured by Whirlpool
Product Description

Motor Assembly - Threaded Shaft Specifications

This 1/4 horsepower gas or electric clothes dryer motor carries 120 volts, 60 Hz, and 5.5 amps. It also performs 1725 revolutions per minute. This motor is used for some gas and some electric clothes dryers.
How Buying OEM Parts Can Save You Time and Money

How Buying OEM Parts Can Save You Time and Money

Troubleshooting
This part fixes the following symptoms:
Noisy
This part works with the following products:
Dryer.
This part works with the following products:
Amana, Maytag, Speed Queen, Crosley.
Part# WP2200376 replaces these:
AP6006386, 2200376, 40048501, 40099801, 5-1211, 5-2368, 501211, 502368, 502368P, WP2200376VP
Back to Top
Customer Reviews
Average Rating:
★★★★★
★★★★★
9 Reviews
4.8
Filter By Rating:
  • 5 Stars
    8
  • 4 Stars
    0
  • 3 Stars
    1
  • 2 Stars
    0
  • 1 Star
    0
Sort by:
  • 1
Sorry, we couldn't find any existing reviews that matched. Try using some different or simpler keywords.
  • 1
Customer Repair Stories
 Average Repair Rating: 2.8 / 5.0, 18 reviews. What's this?
Sort by:
  • 1
  • 2
Sorry, we couldn't find any existing installation instruction that matched.
Stripped Pulley Shaft On Motor
After paying someone to "fix" my dryer's heating element, I ended up with a dryer with a stripped pulley shaft and nut on the motor. Rather than paying another ridiculous amount to "fix" the dryer again, I decided to try myself. I am not an expert, but did manage to replace the motor on my dryer.

Unfortunately, although PartSelect provides a video for just about every part they sell, they do not have a video for replacing the motor. However, they do provide a video for replacing the Dryer Idle Level which is attached to the motor, and I suggest watching this video to help remove the motor for replacement.

https://youtu.be/8AtOYoABVp0

Some tips while disassembling the dryer that will help with reassembly: Bring your cell phone. I watched the video in full, then watched step by step as I took the dryer apart. Take pictures of where wires are connected so you can reconnect them properly. A majority of the bolts you remove will use the same size socket, but are different. Be sure to separate them so you don't get them mixed up. I used a magnetic bowl and clumped them together. Have a vacuum handy for all the dust bunnies that have accumulated. Finally, while they may not be broken now, I ordered a new belt, drum wheels, and Idler, and replaced them while I had the dryer apart. Might as well replace these items that eventually fail while you are there since they are not that expensive. I ordered a kit that contained all 3 from another vendor, but you can find them here with videos for instillation.

Once you have the motor removed as shown in the video linked above, you will have to remove the metal shield covering the fan. Then using a socket wrench on the attachment of the fan itself, and another wrench to hold the pulley nut if it is attached, or vice grips on the shaft if it is stripped like mine, loosen the fan from the motor. It is a reverse screw pattern, so be sure to loosen in the direction that is indicated on the fan itself so not to break the fan which is plastic. Once the fan is removed, you will see two clamps holding the motor to the base, Use a flat head screw driver to push down on one side of the clamp, then leverage it off. After removing both clamps, squeeze the edges of the wiring harness and remove it. With a slight turn to of the motor it will come free of the base. Replace it with the new one insuring it is label side up, then reassemble in reverse. Wiring harness, clamps, fan, ect.

The video link above will give instructions for reassembling the dryer and attaching the belt. Good luck.
  • Scott from AIKEN, SC
  • Difficulty Level:
    A Bit Difficult
  • Total Repair Time:
    30 - 60 mins
  • Tools:
    Screw drivers, Socket set, Wrench (Adjustable)
1 person found this instruction helpful.
Was this instruction helpful to you?
Thank you for voting!
loud screeching noise, motor seized, long time to dry
disassembling took about ten minutes. found that lint needed to be cleaned out. idler lever pulley was locked up and the belt had worn the pulley down. guide felt pads were off the drum guides. motor seized up. studied videos and ordered parts for each problem. once parts arrived the total repair took a total of 45 minutes. saved $300-400, and did not have to buy a new dryer. dryer working better than it has in four or five years, heating up better and no noise. would recommend buying own parts and replacing. on a scale of 1-10, this is a 2. this is an electric dryer. hope this helps!
Other Parts Used:
Single Drum Glide Felt Pad Multi Rib Belt Drum Glide Dryer Idler Assembly Motor Assembly - Threaded Shaft
  • JAMES from SPRING, TX
  • Difficulty Level:
    Really Easy
  • Total Repair Time:
    30 - 60 mins
  • Tools:
    Nutdriver, Wrench (Adjustable)
1 person found this instruction helpful.
Was this instruction helpful to you?
Thank you for voting!
drum did not turn
very well had to take blower assy apart with no problem ownly problem I had was getting the belt lined back up but got it and it works great
  • steven from HOLMEN, WI
  • Difficulty Level:
    Easy
  • Total Repair Time:
    1- 2 hours
  • Tools:
    Nutdriver, Socket set
1 person found this instruction helpful.
Was this instruction helpful to you?
Thank you for voting!
Won't tumble with clothes & making loud noises
Dryer would only tumble for ~15 min then stop. During this time it would be really loud. Turns out to be a bad Motor. To replace 1) Removed bottom kick panel by removing 2 screws. 2) Then removed upper front cover by 2 additional screws. 3) Disconnected thermostat (marking location of wires on paper). 4) Removed blower housing (3 screws)undid the rib belt from the drum by pushing the pulley wheel up so the belt could be loosened and removed from motor. 5)Removed the front cover of the dryer opening by removing 2 screws. 6) Lifted up and then puled it out to expose the drum. 7) Removed the drum w/belt from the dryer exposing the motor. 8) Removed 2 screws from the motor and disconnected the plug from it. Slid it all the way out. 9) Need to remove (3 screws) the metal faceplate from motor to access the blower wheel (plastic). 10) Unscrewed the plastic wheel and removed 2 screws to remove the motor from the frame. reversed the process for reassembly. Sounds tougher than it really was - only took 30-45 min. Suggestion - write down on paper location of any wires you disconnect - makes reassembly very easy. Also recommend vacuuming any lint in the dryer while it is completely accessible.
Other Parts Used:
Multi Rib Belt Motor Assembly - Threaded Shaft
  • Michael from North Hampton, NH
  • Difficulty Level:
    Easy
  • Total Repair Time:
    30 - 60 mins
  • Tools:
    Pliers, Screw drivers, Socket set
8 of 12 people found this instruction helpful.
Was this instruction helpful to you?
Thank you for voting!
Noisy, squealing belt tightener
Changed, got in aimed wrong direction-best to take a digital photo before you disassemble. Overtightened bolt and nut in assembly, it seized. Attempted to drill/grind it off, should have removed motor. Drill skipped up into motor windings. Could have replaced dryer, decided not, fixed by ordering motor, mount, nut and bolt and new belt idler. Reassembly was a snap till the gremlins hit again and I lost one of the drum glides. After a trip across town, I reassembled and it was good to go. Disassembly, use a screw driver to pry up the top, use the nut driver to remove upper front left and right screws, lift front forward and off bottom hooks. You have to release the wiring harness, it has four connectors. Use a sharpy marker and write the wire colors next to the plug-ins connectors you pull gently off and set the door aside. The second wires are two wires for the inner assembly which again need to be marked for color and then pulled loose. Pull them through the plastic hold down so they're out of the way. Use nut driver to remove four screws from inner drum holder, pry gently off dryer blower. Reaching around both sides of the blower housing find the belt tensioner, pull it to the right, push the belt out of it. Lift the drum out, up slightly over the back rollers. Set aside. Use the nut driver to remove the screws into the base holding the motor mount down, now lift the motor/blower assembly forward and pull gently loose from the dryer vent pipe. Set it up where you can work on it. Using the nut driver, take the screws off the blower housing, use a vise grip to secure the motor and use a 7/8 inch turning counter clockwise to remove the turbine. Use the nut driver to remove the screws holding the turbine housing in place, pop the motor clips off. Pull the motor off and remove the nut and bolt of the belt idler assembly using a wrench on the back and a socket wrench on the other side. Reverse order to reassemble, when tightening the idler arm tighten it to where you feel it stop but not any further. Put the belt around the drum again, get it in the previous location on the drum, feel around the drum to make sure belt isn't twisted, bring belt in from the back between the idler wheel and the vent pipe in a loop (Make sure the belt is behind the tension spring rather than in front), Tip the idler arm upward, use the other hand to slide the belt loop up over the motor pulley. One final note is this being a Maytag you might write these direction on the inside of the front panel for next time.
Other Parts Used:
Hex Screw - 1/4-20 Dryer Idler Assembly Motor Assembly - Threaded Shaft Dryer Nut MOUNT- MOT
  • Randal from Centralia, WA
  • Difficulty Level:
    A Bit Difficult
  • Total Repair Time:
    More than 2 hours
  • Tools:
    Nutdriver, Pliers, Screw drivers, Socket set, Wrench set
6 of 12 people found this instruction helpful.
Was this instruction helpful to you?
Thank you for voting!
Squeaking motor, over heating, thermal switch kicking out.
Unpluged dryer from outlet, disconnected vent, positioned dryer on side, removed screws from bottom panel, pulled pannel away from dryer body to gain access to motor. Disconnected drum belt from motor pulley, disconnected wire harness from motor. Removed motor mounting bracket assembly and placed entire assembly on floor. Removed clamps and blower assembly from old motor, installed new motor and reassembled. Very easy project, hardest part requires some trouble shooting knowledge to determine the exact cause of problem.
  • Ernest from Ida, MI
  • Difficulty Level:
    Really Easy
  • Total Repair Time:
    1- 2 hours
  • Tools:
    Nutdriver, Pliers, Screw drivers, Wrench (Adjustable)
5 of 8 people found this instruction helpful.
Was this instruction helpful to you?
Thank you for voting!
Dryer squeaked while running
Replaced the recommended drum rollers, belt and tensioner, light bulb. Found repair manual online (bit of a hunt)made job easier still took 2.5 hrs. Then turned drum by hand no squeak. Turned it on and still squeaked. Isolated to motor. Replaced it (had to take dryer completely apart again but went quicker due to experience also had to disassemble the motor assy and rebuild. Took 1.5 hrs works like new now. The design of the dryer is not bad remove bottom front panel first, screws at very bottom of panel then two more screws are uncovered to remove front. It just lifts up and pulls out. then remove four bolts which hold front frame on (supports drum) all this has to be done to reach the replacement parts. drum wheels are held on by snap rings not the screws (real fun if you take them out) reverse to reassemble.
  • Robert from Kellogg, IA
  • Difficulty Level:
    A Bit Difficult
  • Total Repair Time:
    More than 2 hours
  • Tools:
    Nutdriver, Pliers, Screw drivers, Socket set, Wrench set
6 of 7 people found this instruction helpful.
Was this instruction helpful to you?
Thank you for voting!
The dryer started making terrible noises.
First I went to Maytag.com thinking it was best to go to the manufacturer for parts. Their search engine did not even recognize my part number. I tried every way I could think of. Then I just entered the model number in google and it sent me to the Partselect.com website. Diagrams came up and I chose parts from the pictures. The parts arrived in about 3 or 4 days and fit perfectly.
Other Parts Used:
Drum Support Roller Motor Assembly - Threaded Shaft
  • Caroline from Rockland, ME
  • Difficulty Level:
    A Bit Difficult
  • Total Repair Time:
    More than 2 hours
  • Tools:
    Screw drivers
7 of 10 people found this instruction helpful.
Was this instruction helpful to you?
Thank you for voting!
dryer only buzzed when started
This amana dryer didn't have the lower panel with screws. Instead, I removed the brackets in the back and found that the whole top would separate from the rest of the body (except for wiring, of course.) There seemed to be screws holding the top to the base in the front, but these are just guide posts. There are two spring clips in the front that you can pop loose with a putty knife.

Then there are two screws inside that fasten the front to the rest of the frame. Once I removed these, and the electrical connections to the door switch and the light bulb, the whole front came of just by tilting it forward and pulling the front panel up off of metal tabs on the base.

The rest of the repair went smoothly per other descriptions.
  • Gregory from Holland, MI
  • Difficulty Level:
    Easy
  • Total Repair Time:
    1- 2 hours
  • Tools:
    Nutdriver, Screw drivers, Socket set, Wrench (Adjustable)
3 of 6 people found this instruction helpful.
Was this instruction helpful to you?
Thank you for voting!
Dryer would start loud humming noise 20-30min into cycle-rear bearing going bad
Unplug Dryer. Remove 2 5/16in hex screws fm lower panel,3 51/6in hex screws to vent duct. Remove 2 1/4in hex screws to thermostat. Remove 7 1/4in hex screws to blower cover and 2 5/16in hex screws holding base footings.Use adj. wrench to hold rear nut on motor shaft, use7/8in socket to remove fan frm motor shaft. Remove 3 5/16in hex screws holding fan housing to motor mount. Lift-up on spring tensioned belt pulley to remove belt. Pull motor & mount out [wires are layed toward front allowing removal]. Use 6in flat tip screwdriver to unsnap both front/rear motor clamps.Pinch plastic end clamps and remove motor electrical connector.Motor installation is reverse. For belt removal,remove 2 5/16in hex screws to door panel [unhook 2 wires to upper RT rear to door switch].Remove 4 5/16in hex screws to front bulkhead panel.Allow drum to sag IN PLACE [removal not required to replace belt],note belt location and slide old belt off and new one on
Replace Bulheald and door panel [re-attach door switch wires].Complete install by lifting belt pulley and feeding new belt into place. Hand rotate drum to ensure proper belt allignment and tracking. Replace lower panel. Vacuum interior as necessary. Parts delivered in 3days and fit perfectly.
Other Parts Used:
Motor Assembly - Threaded Shaft Multi Rib Belt
  • Gregory from Virginia Beach, VA
  • Difficulty Level:
    Easy
  • Total Repair Time:
    30 - 60 mins
  • Tools:
    Nutdriver, Screw drivers, Socket set, Wrench (Adjustable)
3 of 6 people found this instruction helpful.
Was this instruction helpful to you?
Thank you for voting!
  • 1
  • 2
Questions and Answers

Ask our experts a question about this part and we'll get back to you as soon as possible!

20 questions answered by our experts.
Sort by:
  • 1
  • 2
Sorry, we couldn't find any existing answers that matched.Try using some different or simpler keywords, or submit your new question by using the "Ask a Question" button above!
Ron
July 31, 2017
Can the pulley be purchased separately or must you purchase the entire motor assembly?
For model number ade7005ayw
PartSelect logo
Hi Ron, Thank you for the great question.Unfortunately Admiral is not selling the pulley separate from the motor assembly part number PS11739459. Thank you for your question!

27 people found this helpful.

Was this helpful?
Thank you for voting!
James Story
February 23, 2018
Number on motor pulley is 754305. Is this a valid part number and if so do you carry this part. I do not want the whole motor...
For model number Amana NDE7800AYW
PartSelect logo
Hello James, thank you for your question. Unfortunately, that is not a valid part number. The pulley is only available by ordering with the drive motor. The drive motor part number you would want to order is Motor Assembly - Threaded Shaft part number WP2200376. Good luck with your repair!

15 people found this helpful.

Was this helpful?
Thank you for voting!
Brent
February 16, 2018
The primary cog that the belt wraps around at the motor is very loose. It free spins when i spin it by hand. Is this normal? Or should that be tight?
PartSelect logo
Hi Brent, Thank you for your question. Anything on the motor should not spin freely. You should not be able to spin it by hand. So that may mean that you need to replace your motor. I hope that helps. Good luck with your repair.

5 people found this helpful.

Was this helpful?
Thank you for voting!
Eddie
November 27, 2018
Drum was not turning, belt is fine, but i noticed the end of shaft where the belt loops, not the idler, looked like it had a broken nut and the belt is coming off. Is there a replacement nut or piece that screws on the shaft?
For model number MDET236AYW
PartSelect logo
Hello Eddie, thank you for your question. The shaft on the motor does not come separately. You would have to order the motor to fix the broken pulley and nut. I hope this helps!

5 people found this helpful.

Was this helpful?
Thank you for voting!
John
September 22, 2017
I see the motor pulley and i also see the motor where the pulley is built on, which 1 will work for my model?
For model number MDG3706AWW
PartSelect logo
Hi John, Thank you for your inquiry. In order to get the motor pulley you will need to get the motor. I hope this helps. Thank you and have a great day!

3 people found this helpful.

Was this helpful?
Thank you for voting!
Daniel
October 28, 2017
Hex nut broken where can i find a replacement
For model number MDE3706AYW
PartSelect logo
Hi Daniel, Thank you for your inquiry. The nut is not sold separately. It is sold with the motor. I hope this helps. Thank you and have a great day!

2 people found this helpful.

Was this helpful?
Thank you for voting!
Daniel
February 20, 2018
Although my motor is working, I believe the high-pitched chirping noise is the bearings in the motor. The part number on the motor is "2200219". I want to make sure I select the correct part. I cannot find the part listed as the replacement with any cross-reference material. Any help would be appreciated.
For model number MDET336AYW
PartSelect logo
Hello Daniel, Thank you for contacting us. I have researched the model you have provided and have found the part you’re looking for is PartSelect Number PS11739459. Hope this helps!

2 people found this helpful.

Was this helpful?
Thank you for voting!
Nicole
May 23, 2019
I need a new idler pully i believe it is called it is a little piece that the belt goes on the number on the piece that broke reads 754305 i think it is either the motor pulley or idler pully. It is a little metal pully thing that snapped in half and the belt is fine so is the motor. Is it possible to buy this little pully?
For model number MDE5806AZW
PartSelect logo
Hello Nicole, thank you for inquiring. The Idler Pulley comes on the Idler Lever part PS11741930 for your model.

2 people found this helpful.

Was this helpful?
Thank you for voting!
Efrain
February 13, 2020
I need the motor pulley for a Maytag dryer sdg4606aww does it sell seperate or you need to replace the whole motor. Motor works fine just need the pulley
For model number SDG4606aww
PartSelect logo
Hi Efrain, Thank you for your question. The pulley is not sold separately and it is only sold with the motor. We hope this helps. Thank you and have a great day.

2 people found this helpful.

Was this helpful?
Thank you for voting!
Michelle
February 26, 2020
I am looking to by the motor pulley that attached to the back of the motor for the belt. Motor is fine pulley needs replaced.
For model number MD65806AWW DRYER 2200219 MOTOR
PartSelect logo
Hi Michelle, Thank you for your question. The pulley is not sold separately and is only sold with the motor. The part number listed under your model number for the motor is PS11739459. To place an order for the part you may order it either online, by visiting our live chat sessions, Monday to Friday from 8AM to 4PM EST, or by calling our customer service line at 1-888-738-4871 and anyone will be happy to assist you. We hope this helps. Thank you and have a great day.

Was this helpful?
Thank you for voting!
  • 1
  • 2
You May Also Need ?
Model Cross Reference
This part works with the following models:
PartSelect Number: PS11739459
Manufacturer Part Number: WP2200376
Brand
Model Number
Description
Amana
7493-LEM437
Dryer - DRYER
Admiral
ADE7005AYW
Dryer - Residential
Admiral
ADG7005AWW
Dryer - Residential
Speed Queen
AEM197
Dryer - Residential, Automatic
Speed Queen
AEM377
Dryer - Residential, Automatic
Speed Queen
AEM397
Dryer - Residential, Automatic
Speed Queen
AEM407L
Dryer - Residential, Automatic
Amana
AEM407L2
Dryer
Speed Queen
AEM407L2-PAEM402L2
Dryer - Speed Queen Dryer Model AEM407L2-PAEM402L2 (AEM407L2PAEM402L2, AEM407L2 PAEM402L2) Parts
Speed Queen
AEM407W
Dryer - Residential, Automatic
Amana
AEM407W2
Dryer
Speed Queen
AEM407W2-PAEM402W2
Dryer - Speed Queen Dryer Model AEM407W2-PAEM402W2 (AEM407W2PAEM402W2, AEM407W2 PAEM402W2) Parts
Amana
AEM427L2
Dryer
Speed Queen
AEM427L2-PAEM427L2
Dryer - Speed Queen Dryer Model AEM427L2-PAEM427L2 (AEM427L2PAEM427L2, AEM427L2 PAEM427L2) Parts
Speed Queen
AEM427W
Dryer - Residential, Automatic
Amana
AEM427W2
Dryer
Speed Queen
AEM427W2-PAEM427W2
Dryer - Speed Queen Dryer Model AEM427W2-PAEM427W2 (AEM427W2PAEM427W2, AEM427W2 PAEM427W2) Parts
Amana
AEM477L2
Dryer
Speed Queen
AEM477L2-PAEM477L2
Dryer - Speed Queen Dryer Model AEM477L2-PAEM477L2 (AEM477L2PAEM477L2, AEM477L2 PAEM477L2) Parts
Speed Queen
AEM477W
Dryer - Residential, Automatic
Amana
AEM477W2
Dryer
Speed Queen
AEM477W2-PAEM477W2
Dryer - Speed Queen Dryer Model AEM477W2-PAEM477W2 (AEM477W2PAEM477W2, AEM477W2 PAEM477W2) Parts
Speed Queen
AEM497L
Dryer - Residential, Automatic
Amana
AEM497L2
Dryer
Speed Queen
AEM497L2-PAEM497L2
Dryer - Speed Queen Dryer Model AEM497L2-PAEM497L2 (AEM497L2PAEM497L2, AEM497L2 PAEM497L2) Parts
Speed Queen
AEM497W
Dryer - Residential, Automatic
Amana
AEM497W2
Dryer
Speed Queen
AEM497W2-PAEM497W2
Dryer - Speed Queen Dryer Model AEM497W2-PAEM497W2 (AEM497W2PAEM497W2, AEM497W2 PAEM497W2) Parts
Speed Queen
AEM677L2
Dryer
Speed Queen
AEM677L2 PAEM677L2
Dryer - Speed Queen Dryer Model AEM677L2 PAEM677L2 (AEM677L2PAEM677L2) Parts
Customer Service Representative

Get in touch, we're here to help!

Daily 8am - 9pm EST

Contact Customer Service