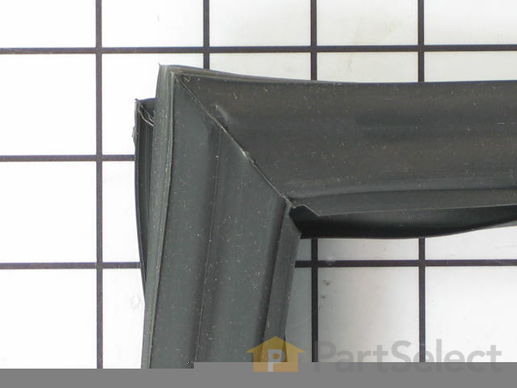
Part Location Diagram of WP12550101Q Whirlpool Freezer Door Gasket
See part 62 in the diagram
( Grid squares measure 1x1 inch )
Customer Service Representative

Get in touch, we're here to help!

Daily 8am - 9pm EST

customerservice@partselect.com

Freezer Door Gasket WP12550101Q

 Fits your KBRS22KGBL1!
★★★★★
★★★★★
5 Reviews

Rated by 7 customers 

Easy 

1- 2 hours 

Ratings submitted by customers like you who bought this part.

$ 117.82
  In Stock
Get FREE EconoShip on orders over $100! T&C apply

Get this part fast! Average delivery time for in-stock parts via standard shipping: 1.8 days.

 Fits your KBRS22KGBL1!
PartSelect Number PS11738515
Manufacturer Part Number WP12550101Q
Manufactured by Whirlpool
Product Description

Freezer Door Gasket Specifications

This door gasket is used to make an air-tight seal for the cabinet when the door is closed.
How Buying OEM Parts Can Save You Time and Money

How Buying OEM Parts Can Save You Time and Money

Troubleshooting
This part fixes the following symptoms:
Freezer section too warm | Door Sweating | Frost buildup
This part works with the following products:
Refrigerator.
This part works with the following products:
Amana, Whirlpool, KitchenAid, Kenmore.
Part# WP12550101Q replaces these:
AP6005466, 10456816, 10456816Q, 10456823, 10456823Q, 10456845, 12529001, 12550101, 12550101Q, 4344353, 8170397, 8170509, 8170634, 8170645
Back to Top
Customer Reviews
Average Rating:
★★★★★
★★★★★
5 Reviews
4.8
Filter By Rating:
  • 5 Stars
    4
  • 4 Stars
    1
  • 3 Stars
    0
  • 2 Stars
    0
  • 1 Star
    0
Sort by:
  • 1
Sorry, we couldn't find any existing reviews that matched. Try using some different or simpler keywords.
  • 1
Customer Repair Stories
 Average Repair Rating: 2.4 / 5.0, 7 reviews. What's this?
Sort by:
  • 1
Sorry, we couldn't find any existing installation instruction that matched.
Gaskets were damaged
Followed the video instruction and it was fairly easy to install. Let the gaskets sit for a day to reshape itself. Started by loosening the screws then removal of the gasket was done. The only hard part was to align the Gasket evenly. Not removing the doors made the install a little more difficult for alignment.
Other Parts Used:
Refrigerator Door Gasket Freezer Door Gasket
  • MARVIN from EL CERRITO, CA
  • Difficulty Level:
    Really Easy
  • Total Repair Time:
    1- 2 hours
  • Tools:
    Nutdriver
2 of 2 people found this instruction helpful.
Was this instruction helpful to you?
Thank you for voting!
Failed gasket
Easy but time consuming. I followed the excellent video instructions on this site and read through all the user comments before starting. I am a handy 65 year old woman who did this alone. I put the gasket in the dryer for 15 minutes then laid it flat for 24 hours before starting. I used a kitchen spatula to release the failed gasket and the plastic panel from the freezer door. The old freezer gasket allowed moisture into the insulation behind the plastic panel on the inside of the freezer door. The insulation inside was frozen solid and took several hours to defrost before I could continue, so prepare for down time by unloading your freezer. I used spray foam insulation after removing the old insulation and cleaning the plastic panel. The foam expands 2x so don't overfill the crevices or you will have to carve it out later like I did. It's really messy so wear gloves and protect surfaces. Putting it back together is easy. I used a heat gun to smooth out the kinks in the gasket and used the spatula to slide the gasket in place. I learned the hard way that there are 4 oval shaped openings on the plastic panel (one on each side) that should be screwed in first to align the panel correctly before screwing in the rest of the screws. My 25+ old fridge is running like new again! It's quieter and the blower isn't running as often. Very happy.
  • Janet from CARMEL, IN
  • Difficulty Level:
    Easy
  • Total Repair Time:
    More than 2 hours
  • Tools:
    Socket set
3 of 4 people found this instruction helpful.
Was this instruction helpful to you?
Thank you for voting!
door gasket failed
I replaced gasket
  • stirling from oaakland, ME
  • Difficulty Level:
    Easy
  • Total Repair Time:
    1- 2 hours
  • Tools:
    Nutdriver
5 of 16 people found this instruction helpful.
Was this instruction helpful to you?
Thank you for voting!
freezer door gasket not sealing well, frost build up inside freezer inside door
The ordering was easy, however the installing was very difficult. Screws all around door had to not only be loosened but most had to be removed in order to get gasket behind the lip. We (my 17 yr old daughter and I )unscrewed the top and half way down the the sides and did half and half. The job took us approx 4 hrs. In all fairness neither one of us has every done anything like this and we were very proud of ourselves for accomplishing the task. When the gasket was in place we used the blow drying to smooth the gasket. Probably not anything I would attempt again because of the time committment, however, I was trying to save some money.

Someone suggested removing the door, however, I couldn't figure out how to do that. On the up side, it did give me the confidence to replace a screen door myself. You tube helped me with that. ( I couldn't find a "how to" on how to install this gasket at least not for this type of appliance.
  • Brenda from Oro Valley, AZ
  • Difficulty Level:
    Very Difficult
  • Total Repair Time:
    More than 2 hours
  • Tools:
    Wrench set
23 of 26 people found this instruction helpful.
Was this instruction helpful to you?
Thank you for voting!
Replacement of torn gasket on freezer door
Last night, I replaced the gasket of the bottom freezer drawer on my Amana refrigerator. It took me about 2 hours.

When I took my new gasket out of the package that it was mailed in, it had been folded and was all twisted. There were wrinkles in the area where the actual magnetic seal occurs. I tried to use a hair dryer to smooth out the wrinkles but the hair dryer just wasn't getting hot enough. I decided to install the gasket anyway hoping that the wrinkles would just get stretched out.

First I had to remove the drawer which is explained in the Amana manual. I had to remove two screws on the side the the drawer slides and then lift out the hanger for the door. Pulling out the old gasket was really easy but when I tried to push the new gasket it just wouldn't go in under the lip and I was afraid that it would get torn if I pushed it in with a screwdriver.

So I had to remove all 20 or so screws that hold the white plastic retaining liner in and hold the lip of the gasket. Then I had to slide a flat head screw driver in to lift up the liner and break the gluing effect of the expanding foam insulation used during manufacturing. Once I could freely lift up the liner about 1/4 inch, I was able to push the new liner in. The wrinkles were still there, which would have prevented a good seal. Fortunately I had a heat gun which I tested first on the old gasket. This worked wonderfully after the gasket was fully installed and did not melt the white plastic liner.

Once the gasket was installed and all 20 screws were tightened, I discovered that the door had been twisted a little and the left side of the drawer would hit first leaving a gap on the right side. By pushing on the right side some time it would stay but often it wouldn't. So I loosened the screws that hold the door on to the metal hangers that attached to the glides and then twisted the door while I tightened those screws.

The final fix was to tighten the leveling screws so that the top of the fridge leans back. This is recommended in Amana's instructions but had not been done for our fridge. This causes gravity to pull the drawer closed.

I don't mean to scare anyone away from doing this repair but it ended up being harder than I thought.
  • Sudhanshu from Santa Clara, CA
  • Difficulty Level:
    A Bit Difficult
  • Total Repair Time:
    1- 2 hours
  • Tools:
    Nutdriver, Screw drivers, Socket set
19 of 23 people found this instruction helpful.
Was this instruction helpful to you?
Thank you for voting!
The freezer compartment was building up a substantial amount of frost/ice because of a leaky gasket.
After the backordered gasket arrived, I took it out of the box and placed it over the back of a kitchen chair and used the hair dryer to get the shipping kinks out of the gasket. After unloading the door of the Freezer compartment, I made a temporary door from a piece of styrofoam board. After removing all of the screws holding the gasket and inner panel to the door, I removed the inner panel and took it outside to melt the ice acumulated on the back and to install the new gasket. I removed the old gasket, and installed the new one over the edges of the panel carefully to avoid tearing the gasket and make sure it was evenly laid out on the panel. This installation went easily because I took the time to see how the old gasket was on the door before I removed it.
I then scewed the panel with the new gasket to the door of the freezer. Once back on the refridgerator, I used the hair dryer and a dull putty knife to get the edge of the gasket pressing firmly against the refridgerator frame. This last step was critical, because the gasket was distorted by the packing and storage of the gasket in the shipping box. I was not satisfied with the amount of magnetic pull from the new gasket and used Vasaline Jelly to create a better seal with the refridgerator.
  • Ed from Clarks Summit, PA
  • Difficulty Level:
    Easy
  • Total Repair Time:
    1- 2 hours
  • Tools:
    Nutdriver
29 of 32 people found this instruction helpful.
Was this instruction helpful to you?
Thank you for voting!
air leaking due to failed seals
First unload the doors, and remove each door from the fridge and freezer. I placed the doors on the counter island and removed all the screws from around the perimiter with the battery drill. Lots of screws. The freezer door had some Ice accumulated in the insulation inside the door. I salvaged as much of the dry fiberglass and tossed the wet stuff. I cut some strips of fiberglass from a roll of 3.5" I had to replace the tossed insulation. The door seal installation went smoothly and the door rehanging was easy also.
Other Parts Used:
Fresh Food Door Gasket Freezer Door Gasket
  • Gerard from Rutland, VT
  • Difficulty Level:
    Easy
  • Total Repair Time:
    1- 2 hours
14 of 18 people found this instruction helpful.
Was this instruction helpful to you?
Thank you for voting!
  • 1
Questions and Answers

Ask our experts a question about this part and we'll get back to you as soon as possible!

4 questions answered by our experts.
Sort by:
  • 1
Sorry, we couldn't find any existing answers that matched.Try using some different or simpler keywords, or submit your new question by using the "Ask a Question" button above!
Etnie
August 22, 2021
How to Install gasket
For model number 59679142990
PartSelect logo
Hello Etnie, Thank you for the question. You will need to remove the door from the appliance and lay it on the flat surface. Once the door is removed you can loosen the screws around the outer edge of the inner door panel enough to release the gasket. Once the screws are loose the gasket will just pull out of the channel between the inner and outer door panels. Line the new gasket up in the channel of the panels and tighten the screws. We hope this helps!

4 people found this helpful.

Was this helpful?
Thank you for voting!
Bruce
April 23, 2019
Will this gasket work on my Amana freezer door?
For model number Arb2117ab Amana
PartSelect logo
Hello Bruce, thank you for your question. Yes, this Freezer Door Gasket part PS11738515 is the correct replacement for your model.

2 people found this helpful.

Was this helpful?
Thank you for voting!
Rick
July 4, 2019
Does this part fit my amanda freezer door? Also, is it ome? If not, does it matter?Thank you.
For model number ARB2117BB
PartSelect logo
Hello Rick, thank you for your question. The gasket, PartSelect Number: PS11738515, is the correct replacement part for your unit. It is OEM and brand new! I hope this helps!

1 person found this helpful.

Was this helpful?
Thank you for voting!
Debbie
April 18, 2023
Will this gasket fit my Kenmore bottom mount freezer door?
For model number 59669359010
PartSelect logo
Hi Debbie, Thank you for writing. The grey freezer door gasket for this model is PartSelect Number PS3654793. We hope this helps!

Was this helpful?
Thank you for voting!
  • 1
You May Also Need ?
Model Cross Reference
This part works with the following models:
PartSelect Number: PS11738515
Manufacturer Part Number: WP12550101Q
Brand
Model Number
Description
Amana
59661102100
Refrigerator
Amana
59661102101
Refrigerator
Amana
59661103100
Refrigerator
Amana
59661103101
Refrigerator
Amana
59661104100
Refrigerator
Amana
59661104101
Refrigerator
Amana
59661109100
Refrigerator
Amana
59661109101
Refrigerator
Amana
59661272100
Refrigerator
Amana
59661272101
Refrigerator
Amana
59661273100
Refrigerator
Amana
59661273101
Refrigerator
Amana
59661274100
Refrigerator
Amana
59661274101
Refrigerator
Amana
59661279100
Refrigerator
Amana
59661279101
Refrigerator
Amana
59661282100
Refrigerator
Amana
59661282101
Refrigerator
Amana
59661284100
Refrigerator
Amana
59661284101
Refrigerator
Amana
59661289100
Refrigerator
Amana
59661289101
Refrigerator
Amana
59661292100
Refrigerator
Amana
59661292101
Refrigerator
Amana
59661294100
Refrigerator
Amana
59661294101
Refrigerator
Amana
59661299100
Refrigerator
Amana
59661299101
Refrigerator
Kenmore
59667275790
Refrigerator
Amana
59669272990
Refrigerator
Customer Service Representative

Get in touch, we're here to help!

Daily 8am - 9pm EST

Contact Customer Service