This drain hose is a genuine OEM replacement part supplied by LG for use in their washing machines. It is a light gray pipe with a diameter of 1.25 inches. The drain hose is connected to the drain pum...
This water-level pressure switch in your wash monitors and regulates the water levels throughout the fill, wash, and rinse cycles. You will usually find it inside the control panel or near the tub. It...
This part is the replacement switch assembly for your top-load washer. It contains the switch mechanism and the connecting wire that hooks the door latch to the electrical system of the washer. The li...
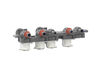
This inlet valve assembly in your washer controls the flow of hot and cold water into the machine, opening and closing as needed during the wash cycle to ensure the drum fills with water at the correc...
Ask our experts a question about this model and we'll get back to you as soon as possible!
1 question answered by our experts.
Sort by:
< Prev
1
Next >
Search filter:
Clear Filter
Your search term must have 3 or more characters.
Keep searches simple. Use keywords, e.g. "leaking", "pump", "broken" or "fit".
Sorry, we couldn't find any existing answers that matched.Try using some different or simpler keywords, or submit your new question by using the "Ask a Question" button above!
Theresa
January 22, 2024
The rear left leg broke. The leg on the website isn't the correct one.
For model number WT7405CW
Hi Theresa, thank you for writing in. Our research has found, part number PS8747659 that is listed under your model on our website is the correct Leveling Leg, direct from the manufacturer. We hope this helps.
raised the front of washer by hand (literally) and placed two 2x4 blocks under front lip for support. reached up inside washer cabinet and unscrewed the broken leg piece upwards into the cabinet. this was the only way I could get the broken piece out without some specialized tool to reach it from the underside. replacement with the new
... Read more leg was a breeze.
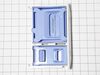
The old dispenser is removed by slightly raising the front as you pull it out of the housing slot. To install the new dispenser, keep the front slightly tilted up and insert the new dispenser into the housing alot


 LG Washer")