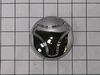
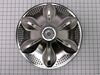
This part is known as a pulsator cap or washplate cap, and is designed for your LG washer. It fits over the washplate mounting bolt and prevents clothes from getting caught on the washplate during a w...
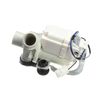
This drain pump is for washers. Drain pump removes water from the washer during the drain portion of the cycle. Unplug the washer before installing this part. Wear work gloves to protect your hands.
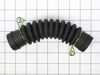
This is a drain hose assembly for top-load models of LG washing machines. This hose specifically is used to allow water to drain from the tub to the drain pump of the washer. This hose is made of plas...
This drain hose is a genuine OEM replacement part supplied by LG for use in their washing machines. It is a light gray pipe with a diameter of 1.25 inches. The drain hose is connected to the drain pum...
1-Take water off manually. 2- Take machine to back yard. 3- lay machine 45 degrees. 4- Located water bump, (rear left side). 5-removed drain black hoses with hand. 6-removed 3 screws from bump frame. 7-Taker off all unit and marked down cable position at plug. 8- installed new pump. 9- Reverse all steps. Note: I did not use new cable su
... Read morepplied with the new bump, I did not want to mess around on mother board connections, I kept old wire harness which are only two cables blue and gray. It took me less than 30 minutes.
Disconnect machine from power source. Then, disconnect any tubes from the back side (make sure you close any water valves before doing so). Then, lay the machine on its back to access the bottom of the machine. Then, locate the thermistor and replace it with the new one (the thermistor will have two screws holding it in place, simply remo
... Read moreve the screws and replace the thermistor, then screw it back in). After the new part is installed, stand the machine back up and make sure to connect any tubing to its proper place. Done.
Our Samsung HE washer started making a grinding noise and stopping at the end of the rinse/spin cycle. I had replaced the clutch and seal 2 years ago and it sounded like it was going out again, however we were not getting the gunk inside the tub like before (seal) and the machine was throwing the tE error code when it stopped which it di
... Read mored not do last time. According to the manual this meant a thermistor error and the solution was "Call for Service". The machine is 9 years old and way out of warranty so....uh No! I ordered the new thermistor for $15 plus shipping to correct the tE code before looking to replace the clutch again or get a new machine. The new thermistor arrived, leaned the machine on its back, unplug one connector, remove two screws and pull the old one out of it's hole, push the new one in, replace two screws and the connector and GO! Problem fixed! No tE code, no stopping, no grinding noise. As best I can tell, the old thermistor was faulting during the spin cycle and the machine went into emergency stop mode which made the grinding noise. It was not the clutch or bearing at all. Most of the repair time was moving the machine out and disconnecting lines so I could lean it onto its back. Note: If your machine is stopping before draining, it will have water inside the tub which will drain out of the hole where the thermistor goes when you pull the old one out. It has an o-ring to seal it, so just expect a little water to come out and be ready to catch all the water or put the new one in quickly.


 LG Washer")