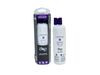
This is an OEM replacement ice and water filter for your refrigerator. In side-by-side refrigerators, it is found in the top right corner or the bottom left grille. In bottom-freezer refrigerators, th...
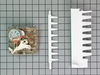
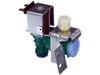
This ice maker (Complete Icemaker Assembly, Whirlpool Icemaker Kit, Ice Maker Assembly, Refrigerator Ice Maker, Icemaker) receives water from the water inlet valve, freezes it, and dispenses it into t...
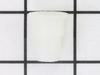
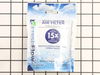
This Refrigerator Air Filter is a white 1.8x3.2" plastic filter which neutralizes odor and bacteria in the air. It should be replaced every six months at a minimum. Refer to your user manual and model...
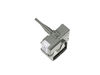
This capacitor (Refrigerator and Freezer Compressor Run Capacitor, Run Capacitor) provides the voltage or energy current required to start the compressor and keep it running. It allows the compressor ...
This light bulb is a 120 volt, 25 watt incandescent appliance light bulb with a small base screw-in that fits in a variety of appliances such as microwaves, refrigerators, freezers, cooktops, or stove...
The icemaker water fill tube provides water to the icemaker so it can produce ice and dispense water. If you notice that your ice maker is not making or dispensing ice, or is leaking, you may need to ...
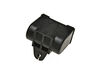
This evaporator fan motor is located in the back of the freezer, and circulates air over the refrigerator coils. These coils will convert the heat into cool air, which is then circulated.
Fresh Flow Produce Preserver is made for your refrigerator to help keep produce fresh for longer by absorbing the chemical, ethylene, that causes your fruits and vegetables to ripen quicker. Your prod...
This is the replacement water tube kit for your refrigerator. This tubing is made of plastic, is 1/4 inch in diameter, and comes with 2 inserts. This tube may be longer than the original tube, and may...
This touch-up paint can be used on a wide variety of household appliances. It is most often used on washers, dryer, refrigerators, dishwashers, ranges, freezers, trash compactors, or microwaves. It is...
$8.00
In Stock
Questions And Answers for WRT771RWYW01
We're sorry, but our Q&A experts are temporarily unavailable.
Please check back later if you still haven't found the answer you need.
2 questions answered by our experts.
Sort by:
< Prev
1
Next >
Search filter:
Clear Filter
Your search term must have 3 or more characters.
Keep searches simple. Use keywords, e.g. "leaking", "pump", "broken" or "fit".
Sorry, we couldn't find any existing answers that matched.Try using some different or simpler keywords, or submit your new question by using the "Ask a Question" button above!
Casey
March 27, 2023
The temperature indicator (snowflakes) shows only one at a time when you advance up (colder) until you get to four snowflakes......the coldest. Is it supposed to show one snowflake, then two snowflakes, then three, then four? I have had trouble with the freezer not being cold enough, and then again with things freezing in the refrigerator! Would appreciate any input. Thanks!
For model number WRT771RWYW01
Hi Casey, thank you for reaching out. The control box, part number PS3497239, indicates the temperature; a normal temperature is indicated by 3 snowflakes. If you increase the temperature, the temperature indicator shows the required snowflakes according to the required temperature. Check the temperature control settings; they might malfunction. Check the temperature sensor, part number PS11753996, and the control board, PS11753120. We hope this sorts out your problem!
Both the fridge and freezer are not as cold as they should be. The freezer is around 40 degrees (currently empty) and the refrigerator is around 52 degrees. I've used a multimeter to test both the Run Capacitor and the Start Relay on the compressor and both test as being okay. I've cleaned the coils under the refrigerator and both the condenser and evaporator fans are running. Not sure what else I can trouble shoot. Thank you for your help.
For model number WRT771RWYW01
Hello Robert, thank you for getting in touch. Based on our understanding of the issue, we would suggest checking the main control board, part number PS11754122, to solve the problem. We hope that helps!
I backed out the 2 top screws about a quarter inch and then removed bottem screw with a quater inch nut driver. I then lifted Ice Maker clear of the two top screws and lowered it enough to unclip the power connection with a small screwdriver. The new Ice Maker was wired correctley for my refrigeator so all I had to do wea reconnect the
... Read morepower connection and mount new Ice Maker on the two top screws and install the bottem screw. It took e while for the new Ice Maker to start it's cycle but after it did, it worked GREAT. Part Select service was OUTSTANDING, ordered part one day and received the next. THANKS!!!!
I knew the chances of all the freon leaking out was unlikely so I looked at the wiring to the compressor and there was a capacitor and a starter/overload so i figured I would start there. I went on line and found the parts at this site and they were less than the minimum service call charge for a service tech so I figured what the heck le
... Read moret's give her a shot so I did give it a shot. I ordered the parts and they were there in less time than a service tech could come out and i installed the parts and guess what for 90.00 in parts and 15 minutes in time I repaired my refrigerator. Thanks guys, It took less time to order the parts than it did to make the repair so thanks, your website rocks and is very well designed so my hat is off to you guys!
I am NOT a handyman, and my family laughed at me when I said I was going to fix the ice maker all by myself. I ordered a replacement ice maker. When it arrived, I opened the box and read the instructions. It seemed easy. I removed the old ice maker, with a socket set. I then took off the shut off lever from the old one and placed it
... Read moreon the new one, since the new one didn't come with it. I then put the new one in place. All the parts fit perfectly. The ice machine was making ice within an hour. My family was amazed... and I got the last laugh!