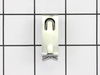
This replacement door catch is for your dryer door. If the catch is broken and the door will not stay shut, the dryer may not turn on. Use a putty knife to pop out the existing door catch by the locki...
$7.37
In Stock
Order within the next 9 hrs and your part ships today!
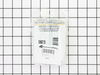
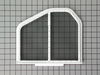
The filter collects lint during the drying cycle. This filter is 12 1/2 inches wide and 10 1/2 inches deep. Replacing the lint filter is an easy repair which requires no tools. When replacing the lint...
$61.46
In Stock
Order within the next 9 hrs and your part ships today!
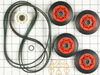
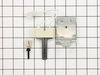
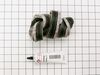
This dryer repair kit consists of five commonly replaced dryer parts: one multi-rib belt (part #661570V and measures 93 1/2 inches long), four drum support rollers, one idler assembly, nine tri-rings,...
$53.59
In Stock
Order within the next 9 hrs and your part ships today!
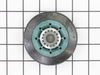
This drum support roller is sold individually. Most dryers require two. The tri-rings are included. This is a drum support roller for a dryer. It is a genuine replacement part. The part includes the d...
$22.69
In Stock
Order within the next 9 hrs and your part ships today!
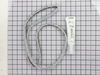
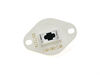
If your dryer will not heat, takes too long to dry, or does not provide enough heat, you might want to replace your igniter kit. This silicone carbide igniter with ceramic holder kit includes the 3-in...
$40.54
In Stock
Order within the next 9 hrs and your part ships today!
The internal-bias thermistor (Thermistor, Dryer Thermister, Dryer Thermistor) prevents the dryer from overheating by monitoring and controlling the temperature of the inside of the dryer drum. It is l...
$47.74
In Stock
Order within the next 9 hrs and your part ships today!
If you notice that your dryer is noisy or will not tumble, you may need to replace the tri ring. This part is triangular, and is less than an inch in size. Tri rings can be found both on the idler pul...
$13.42
In Stock
Order within the next 9 hrs and your part ships today!
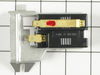
If your gas dryer is not heating up or igniting, then replacing the flame sensor, located in the burner assembly, could solve it. This part senses heat from the igniter to monitor if it is hot enough ...
$47.91
In Stock
Order within the next 9 hrs and your part ships today!
This is the moisture sensor for your dryer. It helps detect the amount of moisture in your clothes during the dryer cycle. If you notice your clothes are still wet after an automatic dryer cycle is do...
$10.72
In Stock
Order within the next 9 hrs and your part ships today!
Order within the next 9 hrs and your part ships today!
Questions And Answers for WGD8800YC2
Ask our experts a question about this model and we'll get back to you as soon as possible!
2 questions answered by our experts.
Sort by:
< Prev
1
Next >
Search filter:
Clear Filter
Your search term must have 3 or more characters.
Keep searches simple. Use keywords, e.g. "leaking", "pump", "broken" or "fit".
Sorry, we couldn't find any existing answers that matched.Try using some different or simpler keywords, or submit your new question by using the "Ask a Question" button above!
Bill
December 9, 2019
How do i remove the top?
For model number WGD8800YC2
Hello Bill and thanks for writing.
emoving a Dryer's Top
For some dryers, you'll need to remove screws at the top of the back panel. Remove the screws from beneath the lint trap. Push a stiff, thin putty knife between the top and one side, about 2 1/2 inches from the front corner. Use a putty knife to release the clips that secure the top. We hope this helps. Please contact us anytime.
Was this helpful?
Thank you for voting!
Dennis
March 8, 2023
Dryer flame goes out within 1 minute of ignition do I need to replace thermal coils
For model number WGD8800YC2
Hello Dennis, thank you for reaching out. According to our research, you may need to check the following parts to fix the issue: thermistor, part number PS11746740, moisture sensor, part number PS11741408, and flame sensor, part number PS11741429. We hope this sorts out your problem!
After a few years of slamming the dryer door (at least that is what my husband says), the catch on the dryer door broke. Using pliers (I used needle nose) squeeze the outer edges of the catch together (vertically). With it compressed, it should slide out easily. My husband had jacked with ours prior to the repair, so the broken piece i
... Read moren the door was actually sideways and would not fit through the hole. Using a screwdriver, I pushed that piece into the door (it lives in the door somewhere now). I was then able to slide out the rest of the old catch. Compress the new catch and insert it into the hole in the door. Push it in until it clicks into place. DONE! Happy Drying!
The issue was the idler pulley. First I began opening up the front panel based on a youtube video but soon realized the model was slightly different and required a lot more items to remove. I saw the pulley in the back with nothing in the way so I put the front panel crap back on and removed the rear panel. There it was, very simple to re
... Read moremove and replace. I'm not looking forward to drum rollers though. Hopefully they're aren't as difficult as they appear.


 Diagram and Parts List for Whirlpool Dryer")