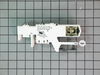
This pump helps expel water from the washing machine and is activated after the spin speed is maintained for a specific period of time. This part is used on front load models.
$160.49
In Stock
Order within the next 5 hrs and your part ships today!
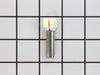
Sold individually. These shock absorbers keep the washer from vigorous shaking during its cycles. This shock absorber is for washers.
Shock absorber absorbs the vibrations and movements of the oute...
$57.18
In Stock
Order within the next 5 hrs and your part ships today!
This touch-up paint can be used on a wide variety of household appliances. It is most often used on washers, dryer, refrigerators, dishwashers, ranges, freezers, trash compactors, or microwaves. It is...
$8.00
In Stock
Order within the next 5 hrs and your part ships today!
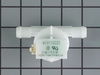
The hose clamp is used to hold the water hose in place which will prevent the hose from leaking water. Sometimes the clamp may lose its ability to latch on, causing a leaking washer. For the installat...
$11.10
In Stock
Order within the next 5 hrs and your part ships today!
This is the replacement bellow clamp for your washer. It approximately 16 inches in diameter and is sold individually. The bellow clamp goes around the bellow in your washer and holds it in place on t...
$32.26
In Stock
Order within the next 5 hrs and your part ships today!
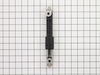
This drive belt is made to slip on the motor pulley to bring the basket up to the speed required and this makes the belt get wear and tear.
NOTE: Per Manufacture, belt measures 48.22" long uninstall...
$52.85
In Stock
Order within the next 5 hrs and your part ships today!
Questions And Answers for WFW9500TW01
We're sorry, but our Q&A experts are temporarily unavailable.
Please check back later if you still haven't found the answer you need.
6 questions answered by our experts.
Sort by:
< Prev
1
2
Next >
Search filter:
Clear Filter
Your search term must have 3 or more characters.
Keep searches simple. Use keywords, e.g. "leaking", "pump", "broken" or "fit".
Sorry, we couldn't find any existing answers that matched.Try using some different or simpler keywords, or submit your new question by using the "Ask a Question" button above!
Jerry
December 30, 2019
Yes my washer does most everything except on wash cycle it locks the door starts cycle starts running water then displays a f-20 code and shuts off.
For model number WFW9500TW01
Hello Jerry, thank you for your question. Whirlpool error code F20 appears when no water is detected entering the machine or if the pressure switch trip is not detected. The pressure switch is the part of the machine that monitors high water pressure. We would recommend testing the pressure switch, PartSelect Number: PS11754448, and hose PartSelect Number: PS11747972 and the water valve PartSelect Number: PS11749164. I hope this helps!
2 people found this helpful.
Was this helpful?
Thank you for voting!
Jerry
January 13, 2020
How do i reset and clear codes.
For model number WFW9500TW01
Hello Jerry, to reset unplug the washer for 30 seconds to attempt to reset the Duet washer control. I hope that helps!
1 person found this helpful.
Was this helpful?
Thank you for voting!
Jason
February 27, 2020
F35 error number appears, sometimes. What does this mean. It does not always appear. When it does I just unplug washer and recycle.
For model number WFW9500TW01
Hello Jason, Thank you for the question. The "F35" error code is indicating a problem with the water level pressure. There could be a blockage in the pressure switch hose or a defective Pressure Switch. If it is not happening all the time, we suggest removing the tube and checking it for a suds build up. We hope this helps.
Hi Iou, from what I could see in the manual it looks like it is a 2007 model. Thank you for your question and good luck with your repair!
1 person found this helpful.
Was this helpful?
Thank you for voting!
Tammy
March 10, 2022
Won’t wash:
The door locks, water starts going in, then it beeps and says F20. We changed water inlet valve, took water pressure hose off and cleaned and changed water pressure switch.
It won’t wash but you can change so it will drain.
For model number WFW9500TW01
Hi Tammy,
Thank you for your question. An F20 error code indicates that there is a water supply issue. Make sure that when you wash clothes, that both the hot and cold water taps are turned on. Check the inlet hoses to see if they are kinked. If they are reposition them. Make sure you are also using the correct detergent for your washer. Check your owner's manual to see what detergent is recommended for your washer. You can reset the washer by unplugging it for 1 minute and then plugging it back in. Then re-select the cycle and press start. If you have any questions, please let us know. We are open 7 days a week. We look forward to hearing from you!
The first step is to remove the retainer ring that holds the outside of the bellow in place. To do this, Open the washer door as far as you can to get it out of the way. look underneath of the front of the bellow on the outside of the washer where it meets the door. Put your head almost on the floor and look up. You will fin
... Read mored a spring streached about 3" connected to a small diameter wire (1mm.) that runs all the way around the outside portion of the bellow. Use a small screwdriver or other to pull and pry the spring away from the rubber bellow. Be careful not to damage the spring or ring. Once you have grip on it, pull it carefully toward you then up and off of the bellow.
The front portion of the bellow is now free and can be peeled off. Start at any point and pull the rubber bellow in toward the opening of the washer, it comes off easily. When you get to the detergent outlet on the upper left side, grab the plastic tube and carefully pull the bellow from around it. There is no adhesive or clamp holding this in place, just friction. Remove the rest of the front portion of the bellow. Push as much of the bellow into the washer as possible to get it out of the way.
Once this is off comes the slightly tricky part. Look up at the top right portion of the bellow that is still attached. You may need to feel with your hand but you should be able to see it. You are looking for the screw/nut end of a giant hose clamp. This hose clamp goes around the entire bellow and the secures it to the portion that holds the basket. This is where the stubby screw driver comes in handy. There is not nearly enough room for a standard one and a nut driver or wratchet are too big. The nut will be pointing down and will need to be replaced the same way. Loosen the hose clamp almost all of the way, not necessary to have the hose clamp come completely apart. You can now remove the entire hose clamp from around the bellow by pulling it forward. You will need to remove the hose clamp from the washer. To do this, squeeze it in from the sides about 6", don't kink it. Push it down toward the floor between the basket and the metal front panel. You will now be able to remove it from the top of the opening and be able to pull the bottom portion out. Pull the old bellow completely out, very easy to do.
Time to install the new bellow. Figure out which side goes in and which faces out. The big hint is that the water inlet is on the upper left side. You will notice at the top of the bellow on the portion that goes inside of the washer, you will find a small triangular shaped tab about 1/4" high. This is your centering mark. This will be at the very top. If you keep this at the top, everything will line up perfectly.
Slip the bellow over the edge of the portion that holds the basket where you removed the old one. I started at the top and worked left so I could install the detergent inlet tube. Pull this through the bellow carefully. It doesn't take a lot of force. As you are pressing the bellow on this lip, you will notice that there is a 1/2" high back stop all of the way around. This is great because as you press it on, there is a positive stop and you can't go further than necessary. Continue to press it in all of the way around.
Now it is time to install the Hose clamp. Un bend anything that might have bent on the clamp. With the nut at the top or top right with the nut facing down to the floor while holding it vertically, squish it slightly inward, put the bottom portion in first then the top portion. Orient is as it was when you took it off. Slide it around the bellow. You will feel a positive stop. Grab the stubby screwdriver and tighten down the hose clamp. I did about a medium force when tightening. It doesn't take a lot of force.
Now it is time to pull the remaining part of the bellow out of the basket and fit it into place. Press it around the outside portion of the opening so it hooks over the lip. This w
(1) First I unpluged the washer then I removed the water from the tube with a water vac.(2) Then I removed the three (3) screws that holds the front panel, using a Torx T-20 socket. ( this is a front load washer ). The panel is below the loading door. (3) I packed towels under the washer. (4) I slowly removed the cleanout i
... Read moren the front of the pump, using the water vac to catch the water as it leaked out. (5) I removed the wiring to the motor. (6) I removed the screw that holds the pump in place with a Torx T-20 socket. (7) I pulled the pump forward so the clamps that hold the drain hose and discharge hose could be removed using the hose clamp pliers. ( they come off much easier then they go back on ). (8) I tested the pump and found it would run but was making a lot of noise and running slow. (9) To reinstall start with number (7) and work backwards to number (1) skipping (3) and (4). Don Kramer Wichita, Kansas
I first removed the back panel held on by about 10 screws. I removed the drive belt from the pulley, then removed the lock nut securing the pulley to the drum & removed the pulley. Attached the new pulley to the drum, tightened on the lock nut, attached the new belt & ran a spin cycle. When that went OK I replaced the back panel & the
... Read morewasher was back in service.


 Diagram and Parts List for Whirlpool Washer")