


Models
>
WFE374LVS0
WFE374LVS0 Whirlpool Range - Overview
Sections of the WFE374LVS0
[Viewing 6 of 6]


Manuals & Care Guides for WFE374LVS0
Click to downloadInstall
Installation Instructions
(0.83MB)
Install
Installation Instructions
(1.25MB)
Manual
Owner's Manuals
(0.31MB)
Manual
Owner's Manuals
(1.98MB)
Keep searches simple, eg. "belt" or "pump".

Light Bulb - 40W
PartSelect #: PS884734
Manufacturer #: 8009
This an authentic OEM 40-Watt replacement light bulb, used in a number of household appliances. It is specially designed to withstand extreme temperatures, which is why these replacement bulbs are mos...
$11.73
In Stock

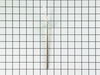
Oven Sensor
PartSelect #: PS11749737
Manufacturer #: WPW10181986
This oven temperature sensor, for ranges, works together with the oven control board to measure and regulate the oven temperature. The sensor detects the temperature in the oven cavity. If the followi...
$94.68
In Stock

Rear Drawer Glide
PartSelect #: PS890554
Manufacturer #: WP8053334
This OEM replacement rear drawer glide supports the storage drawer on your range, and allows the drawer to open and close with ease. If your storage drawer will not open or close, or catches and stick...
$11.10
In Stock

Oven Rack
PartSelect #: PS11751295
Manufacturer #: WPW10256908
This oven rack is a piece for your range. The oven rack is sold individually and is silver in color. The function of this part is to provide a balanced and flat surface for your cookware to sit inside...
$63.36
On Order

Screw
PartSelect #: PS12349731
Manufacturer #: W11233072
This is a multi-use and multi-appliance screw. It can be used on a microwave, refrigerator, range/oven, air conditioner, dehumidifier, washer, or dryer. The measurements of this screw are 8 x 1/2 inch...
$20.79
In Stock

Element with Limiter 6 Inch - 1200W
PartSelect #: PS11764915
Manufacturer #: W10823711
This is a radiant surface element with limiter, and it works in conjunction with your range. The function of this part is to give heat to the surface directly above it, on cooking area stove top.This ...
$220.32
In Stock

Touch-Up Paint - White
PartSelect #: PS385132
Manufacturer #: 72017
This touch-up paint can be used on a wide variety of household appliances. It is most often used on washers, dryer, refrigerators, dishwashers, ranges, freezers, trash compactors, or microwaves. It is...
$8.00
In Stock

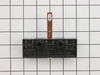
Terminal Block
PartSelect #: PS11747341
Manufacturer #: WP9761958
This is the terminal block for the power cord on an electric range.
$19.60
In Stock


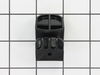
Infinite Control Switch, 6"
PartSelect #: PS11740785
Manufacturer #: WP3149404
This switch controls the stove top 6" surface burner.
$58.00
In Stock

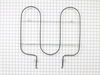
Broil Element
PartSelect #: PS11731333
Manufacturer #: W10856603
This broil element supplies heat for cooking purposes and is located in the roof of an oven. If you find there is little to no heat when cooking, a burned-out element, or food is taking too long to co...
$136.34
In Stock

Cooktop Cleaner
PartSelect #: PS3492527
Manufacturer #: W10355051
This bottle of non-abrasive cooktop cleaner breaks down and gets rid of the hardest baked-on stains and residue without causing any harm to your appliance. The bottle is 10 oz and does not require a l...
$17.76
In Stock
Questions And Answers for WFE374LVS0
We're sorry, but our Q&A experts are temporarily unavailable.
Please check back later if you still haven't found the answer you need.
Sort by:
- < Prev
- 1
- Next >
Search filter:
Clear Filter
Your search term must have 3 or more characters.
Keep searches simple. Use keywords, e.g. "leaking", "pump", "broken" or "fit".
Sorry, we couldn't find any existing answers that matched.Try using some different or simpler keywords, or submit your new question by using the "Ask a Question" button above!
Cindy
March 22, 2024
WHERE IS THE LIGHTBULB LOCATED IN THE OVEN?
For model number WFE374LVS0
Hello Cindy, thank you for reaching out. The light bulb is located on the back wall inside the oven. You may need to remove the glass bulb cover in order to access it. We hope this information helps!
1 person found this helpful.
Was this helpful?
Thank you for voting!
Ruth
September 5, 2023
I do not know how to set the clock on my stove. There is no manual available.
For model number WFE374LVS0
Hi Ruth, thank you for your question! The Clock uses a 12-hour cycle with a.m. and p.m. Check that the oven is off. Press CLOCK. Press TEMP/TIME “+” or “-” arrow pads to set the time of day, including a.m. or p.m. Press CLOCK or START. We hope this information helps!
Was this helpful?
Thank you for voting!
- < Prev
- 1
- Next >
Common Symptoms of the WFE374LVS0
[Viewing 8 of 8]Element will not heat
Fixed by
these parts
these parts


Show All
Little to no heat when baking
Fixed by
these parts
these parts


Show All
Oven is too hot
Fixed by
these parts
these parts
Show All
Oven not heating evenly
Fixed by
these parts
these parts
Show All
Will Not Start
Fixed by
these parts
these parts
Show All
Little to no heat when broiling
Fixed by
these parts
these parts
Show All
Door won’t close
Fixed by
these parts
these parts

Show All
Door won’t open after self cleaning cycle
Fixed by
these parts
these parts
Show All


")


Keep searches simple. Use keywords, e.g. "leaking", "pump", "broken" or "fit".
Right rear burner went bad
Turned the breaker off, I removed 2 screws securing the range top to the range, opened the top and secured it in the up position, Removed the 2 screws securing the element ,one at a time I swapped the quick connectors from the old element to the new and repeated the process in reverse. I save over $100.00 in labor, plus most companies get
... Read more
you for a trip charge. It was easy!!
Read less
Parts Used:
-
Mark from Loxahatchee, FL
-
Difficulty Level:Really Easy
-
Total Repair Time:15 - 30 mins
-
Tools:Nutdriver, Screw drivers
144 of 163 people
found this instruction helpful.
Was this instruction helpful to you?
Thank you for voting!
Hot Burner Light always on
Thermal switch is integral to element and can not be changed, must replace entire element.
Turn off power. Removed front two screws above oven door jamb and lifted the top. Removed the bracket that holds the element against the glass top and removed the element. Moved brackets from old element to new one, aligning to same numer ... Read more ical position and then moved wiring to new element. Slide new element under bracket and reinstalled single screw. Replaced top and screwed down. Turn on power and test .
Turn off power. Removed front two screws above oven door jamb and lifted the top. Removed the bracket that holds the element against the glass top and removed the element. Moved brackets from old element to new one, aligning to same numer ... Read more ical position and then moved wiring to new element. Slide new element under bracket and reinstalled single screw. Replaced top and screwed down. Turn on power and test .
Read less
Parts Used:
-
Gregory from Cary, NC
-
Difficulty Level:Really Easy
-
Total Repair Time:15 - 30 mins
-
Tools:Screw drivers
106 of 148 people
found this instruction helpful.
Was this instruction helpful to you?
Thank you for voting!
temperature not accurate after 3 1/2 years of happy usage
Opened up the back of the stove. Unpluged the sensor. Replaced the sensor. Replace the back of the stove.
The sensor that has been replaced is not what is expected. After reading all of the instructions for adjusting the temperatures, the only temp that stays steady is when we first turn on the oven to 350 degrees. That stays s ... Read more teady but when I turn it to 400 it slowly goes up to 425 degrees.
The sensor that has been replaced is not what is expected. After reading all of the instructions for adjusting the temperatures, the only temp that stays steady is when we first turn on the oven to 350 degrees. That stays s ... Read more teady but when I turn it to 400 it slowly goes up to 425 degrees.
Read less
Parts Used:

-
Ruth from Oregon, IL
-
Difficulty Level:Really Easy
-
Total Repair Time:15 - 30 mins
-
Tools:Screw drivers
136 of 244 people
found this instruction helpful.
Was this instruction helpful to you?
Thank you for voting!