


Models
>
TFF19DTB
TFF19DTB General Electric Refrigerator - Overview
Sections of the TFF19DTB
[Viewing 1 of 1]
Keep searches simple, eg. "belt" or "pump".

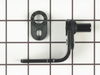
Bottom Hinge Assembly
PartSelect #: PS290199
Manufacturer #: WR13X10020
Comes with both cam risers. This hinge kit is suitable for the bottom of either the freezer door or the refrigerator door of some refrigerators.
$47.33
In Stock

Light Switch
PartSelect #: PS8758429
Manufacturer #: WR23X10725
The interior light of your refrigerator is controlled by a switch that is activated when the door is opened and closed. If your refrigerator light will not turn on, there could be an issue with the sw...
$8.56
In Stock

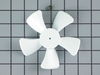
Evaporator Fan Blade Kit
PartSelect #: PS304684
Manufacturer #: WR60X114
This kit features a 5-blade plastic evaporator fan blade that rotates CCW and measures 4.5-inches in diameter and has a 3/8-inch-tall shaft. This kit also has a metal compression ring that secures the...
$26.55
In Stock

Condenser Fan Motor
PartSelect #: PS304722
Manufacturer #: WR60X177
This condenser fan motor operates in a clockwise fashion. The fan itself has two 1/4 inch spade terminals. It carries 2 watts and 115 volts. This motor NO longer comes with cover for terminals.
$198.31
In Stock

Defrost Thermostat
PartSelect #: PS303547
Manufacturer #: WR50X60
This refrigerator defrost thermostat will cut out at 60 degrees Fahrenheit and kick back in when the temperature drops to 40 degrees Fahrenheit. Use it for your GE brand refrigerator.
$22.09
In Stock

Defrost Timer
PartSelect #: PS310849
Manufacturer #: WR9X480
This refrigerator defrost timer will cycle for twenty-five minutes after every six hours of run time. The timer itself is made of plastic, but its terminals are bent and the leads are external.
$43.92
In Stock


Heater and Bracket Kit
PartSelect #: PS303264
Manufacturer #: WR49X391
NOTE: This it is just the heaters and the jumper wires between the two heaters.
No Longer Available


Evaporator Fan Motor
PartSelect #: PS304708
Manufacturer #: WR60X162
This evaporator fan motor operates in a counter clockwise fashion. This motor's stack is 3/8 of an inch, and the motor has two terminals: one on the right side, and one on the left side. Use this evap...
$75.49
In Stock

Single Water Valve
PartSelect #: PS304416
Manufacturer #: WR57X77
This single outlet valve comes with a gasket, and is intended for refrigerators that have ice makers which make round ice cubes. If the ice maker is still not working properly, the issue could be that...
No Longer Available

Ice Maker Seal Kit
PartSelect #: PS297351
Manufacturer #: WR29X144
This newly redesigned icemaker seal kit comes with a new shaft, seal and screw.
No Longer Available
Questions And Answers for TFF19DTB
We're sorry, but our Q&A experts are temporarily unavailable.
Please check back later if you still haven't found the answer you need.
Common Symptoms of the TFF19DTB
[Viewing 8 of 8]Light not working
Fixed by
these parts
these parts

Show All
Door won’t open or close
Fixed by
these parts
these parts
Show All
Noisy
Fixed by
these parts
these parts

Show All
Fridge too warm
Fixed by
these parts
these parts

Show All
Door Sweating
Fixed by
these parts
these parts
Show All
Clicking sound
Fixed by
these parts
these parts
Show All
Fridge runs too long
Fixed by
these parts
these parts
Show All
Freezer section too warm
Fixed by
these parts
these parts
Show All


Keep searches simple. Use keywords, e.g. "leaking", "pump", "broken" or "fit".
Sticking Light Switch
I applied some tips learned by reading other reviews. So before I started I grabbed my trusty vise grip pliers and a small screw driver. I locked onto the switch actuator, the part that the refrigerator door pushes in, with the vise grips and pulled on it just hard enough to get the screw driver inserted in the right side to push in the c
... Read more
atch clip so the switch could be pulled out further each time the catch clip was depressed to the next detent. Then I used the screw driver on the left site to encourage the switch past the detents on the left and very quickly the switch was out of the mount. The wires from the refrigerator pulled out with the old switch. I unplugged the old switch from the wires and plugged in the new switch and shoved the new switch back into the mount, wiggled it a couple of times to make sure it was secure and the job was done. Once I applied the vise gripes at first, the whole job took less than a minute.
Read less
Parts Used:
-
Jonathan from Lilburn, GA
-
Difficulty Level:Really Easy
-
Total Repair Time:Less than 15 mins
-
Tools:Pliers, Screw drivers
116 of 144 people
found this instruction helpful.
Was this instruction helpful to you?
Thank you for voting!
My wife said, "the refrigerator door won't close".
Our refrigerator is a double door unit with ice and water in the left door. The right door was the one with the problem. It was 5:15 AM when the problem occured. I could see that the door was out of alighnment and had dropped down - preventing it from closing. I lifted the door and closed it. I wrote down the model number and found a
... Read more
detailed drawing of the appliance on the web site "partselect.com". When the hing earrived I compared it to the broken one. I removed all the food stored on the door, put several pieces of wood under the door to shim it to the same height as the adjacent door. I then removed two bolts from the refrigerator with a 1/4" socket set. I put the shim from the old hing aside for later. I removed two bolts from the door with the same socket -Note a metal tab had to be bent silghtly so the wrench could go on the head of the bolt- I removed the plastic cam and made note of its orientation and that of the shim above it on the door. I put the shim and new cam in place on the door and installed the 2 bolts. I inserted the pin of the new hing into the hole in the cam (I had just mounted) on the door. I put the shim (the one put aside earlyer) behind the hing and replaced the two bolts. I held the shim and hing up against the door as I tightened the two bolts. When I was satisfied that the bolts were tight I removed the wooden blocks that were holding the door up so the door was supported by the new bottom hing assembly. The door now opperates perfectly and the refrigerator was not taken out of service for the repair. Total time including cleanup was a little over 15 minutes.
Read less
Parts Used:
-
Gregory from Zephyrhills, FL
-
Difficulty Level:Really Easy
-
Total Repair Time:15 - 30 mins
-
Tools:Socket set
54 of 58 people
found this instruction helpful.
Was this instruction helpful to you?
Thank you for voting!
Fridge door wouldn't close easily like it used to
This is a sibe-by-side refrigerator/freezer that needed a new lower hinge set for the fridge door.
First I removed everything from inside the fridge door, closed it, then loosened the top hinge bolts with an 8mm socket on a 1/4-inch ratchet. Using an 8mm nutdriver, I removed one bolt and loosed the other just far enough to be ... Read more able to lift the hinge and swing it out of the way. (These bolts are long. The nutdriver is faster than the ratchet but you need a ratchet or a wrench to first break them loose.) Then I just lifted the door off the bottom hinge and set it aside.
The plastic lower front grill was covering the lower hinge but that grill is just held at the ends by spring clamps -- popped off easily so I could get to the hinge bolts. Again, 8mm bolts, just remove & replace hinge. I also had to replace the upper half of the door closer cam, which is screwed to the bottom of the door, being careful that the holes lined up: cam, shim, door holes.
Now the tricky part was lifitng the door back on the lower hinge. (It helps to have an assistant at the bottom to locate the hole for you.) Once the door was up, I swung the top hinge over, ran the two bolts in finger tight with my nutdriver, checked & adjusted the spacing* of the fridge door and tightened the bolts. This was all very easy! (*^_^*)
*On a side-by-side, you'll want the door to be straight up & down with a consistent gap top to bottom with the freezer door. The hinge has some slack for adjustment by positioning the door, then tightening the bolts. You'll see what I mean.
Read less
Parts Used:
-
Christopher from Roseville, MN
-
Difficulty Level:Really Easy
-
Total Repair Time:Less than 15 mins
-
Tools:Nutdriver, Socket set
21 of 22 people
found this instruction helpful.
Was this instruction helpful to you?
Thank you for voting!