This genuine OEM washer has a 3/4 inch outside diameter. This thrust washer can be used on most makes and models of dryers. A complete list of compatible dryers is available below. The washer is found...
$7.95
In Stock
Order within the next 10 mins and your part ships today!
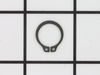
The metal retaining ring, which is under an inch long, holds the rear wheels on the axels of the dryer. The main reason why it would need to replaced is if the retaining ring has sprung out of place o...
$13.58
In Stock
Order within the next 10 mins and your part ships today!
This hose clamp is used in a wide variety of household appliances. Most often it is found in washers, dishwashers, refrigerators, freezers, dehumidifiers, garbage disposals, or air conditioners. This ...
$11.80
In Stock
Order within the next 10 mins and your part ships today!
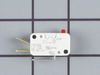
This lid switch check is used in washers to detect if the washer lid is open or closed. This prevents a cycle from spinning when the lid is still open and is also used to start your washer once a cert...
$48.41
In Stock
Order within the next 10 mins and your part ships today!
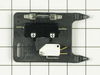
This black lid switch assembly comes complete with a bracket, two switches, and a fuse. An open fuse might indicate that the lid switch is bad. The point of the lid switch is for the tub to stop spin...
$42.42
In Stock
Order within the next 10 mins and your part ships today!
If your washer shakes or vibrates loudly when it reaches its max speed, make sure the 4 levelling legs are even. Adjust the legs so that the machine is level, and tighten the locking nuts on the legs ...
$18.47
In Stock
Order within the next 10 mins and your part ships today!
This spring retaining clip is just under 1 inch long. The clip is made entirely of metal and is attached to the back wall of the washer, under the console. If your washer is vibrating and louder than ...
$11.10
In Stock
Order within the next 10 mins and your part ships today!
The hose clamp is used to hold the water hose in place which will prevent the hose from leaking water. Sometimes the clamp may lose its ability to latch on, causing a leaking washer. For the installat...
$11.10
In Stock
Order within the next 10 mins and your part ships today!
Well the washer died and would not turn on in the middle of a wash cycle. Absolutely dead. I disconnected it from power and opened up the front panel on which all the control switches and knobs are mounted. This is removed by unscrewing 4 screws at the top of the washer.
Checked the fuse, and found blown. Replaced the fuse, cl
... Read moreosed the panel and plugged it in. Still not working. Checked the Check switches and found the Check Switch really limp. Checked with Digital Multimeter and found no continuity at either position. Unscrewed the check switch. Removal and re inspection with DMM of the check switch confirmed it was bad. Opened up the check switch and found contacts were blown.
Installed a new check switch making sure all the connecting wires go in the right places. The wiring diagram in the washer was very helpful in doing so since u dont want these wires reversed. Adjusted the plunger which operates the check switches when the lid is opened to make sure it is not over or under operating the switches. This is done by loosening the bolt holding down the check switch assembly and slidint the whole assembly forwards or backwards till the plunger has just enough push on the switches. This is done to avoid the plunger from exerting excessive pressure on the check switch and the safety switch in lid open or lid closed position. (both switches are operated by the same plunger according to the lid position)
Closed panel cover and plugged the washer in. There u go, it was alive again!
I suspected the lid switch right away. Where I went wrong was in thinking that I had to get to it from below. After going to all the trouble of removing the front panel and detaching the top panel, I discovered that it was located inside the control section at the top of the appliance. It only took a few minutes to remove four screws and
... Read moregain access to the old switch assembly and swap it out with the new one. One thing to note; the new switch assembly has to be set in exactly the right place along a slotted channel in order for both contacts to be activated properly. It's not difficult to find the right spot, but you have to do it consciously.
VERY EASY!!! SAFETY FIRST-Always unplug the appliance. Use 8mm socket to remove front panel screws. Loosened up two hose clamps connected to the pump and removed both lines (Hoses contain water, use a towel) which is located underneath the motor. Disconnect motor electrical connector on the left side of the motor. With socket, r
... Read moreemove 4 mounting bracket screws that secure the motor and pump assembly. Pull back the tension/idler pulley to loosen belt off the main pulley to the washer drum. Tilt and pull out motor/pump assembly. Underneath the pump, use star-bit to remove the pump from motor assembly to remove the belt. Install new belt on motor pulley (Good time to check for debris or anything restricing free movement of pump) and re-install pump. Install the motor/pump assembly and loosely secure the motor/pump assembly. Place the belt onto the motor pulley and pull back the tensioner/idler pulley to allow slack of belt to be placed on washer drum pulley. Put the belt on the lip of the drum pulley and rotate while pulling back the tensioner/idler pulley until the belt is seated on the groove of the drum pulley. Tighten the motor/pump assembley. Re-attach the 2 hoses and tighten down the clamps. Re-connect the electrical connector to the motor...Don't forget to plug in the washer and secure the front panel...Piece 'O cake, you're done! About 15 minutes to do the job. Much like changing a belt on most vehicles.


 – Part Number: WP28808")


 – Part Number: WP28808")