


Models
>
SCB1001MSS001
SCB1001MSS001 General Electric Microwave Oven Combo - Overview
Sections of the SCB1001MSS001
[Viewing 5 of 5]


Manuals & Care Guides for SCB1001MSS001
Click to downloadManual
Owner's Manuals
(2.78MB)
Specs
Product Specifications Sheet
(0.21MB)
Care
Use and Care Manual
(0.54MB)
Keep searches simple, eg. "belt" or "pump".

FUSE
PartSelect #: PS1481237
Manufacturer #: WB27X10928
This ceramic microwave fuse is just over an inch in length. It is white in the center, and metal on both ends. This is a 20-amp fuse, and is used to power your microwave. If the touch pad on the micro...
$10.58
In Stock

Halogen Bulb - 20W - 12V
PartSelect #: PS951718
Manufacturer #: WB01X10239
This light bulb is a 12 Volt/20 Watt bi-pin base halogen lightbulb, meaning it emits a bright, white light which is similar to natural daylight and is inserted into its socket, as opposed to being rot...
$37.02
In Stock


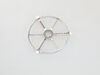
TRAY GLASS
PartSelect #: PS16873477
Manufacturer #: WB27X43590
This tray rotates in your microwave ensuring more even temperatures.
$150.68
In Stock

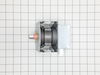
Microwave Magnetron
PartSelect #: PS12722595
Manufacturer #: WB26X32629
Genuine OEM magnetron for your microwave. Always use proper safety equipment and follow the manufacturers instructions while installing.
$199.77
In Stock


THERMOSTAT
PartSelect #: PS2321365
Manufacturer #: WB21X10148
This part will trip once the inside of the cavity overheats and exceeds the recommended temperature.
$29.17
In Stock


Questions And Answers for SCB1001MSS001
We're sorry, but our Q&A experts are temporarily unavailable.
Please check back later if you still haven't found the answer you need.
Sort by:
- < Prev
- 1
- Next >
Search filter:
Clear Filter
Your search term must have 3 or more characters.
Keep searches simple. Use keywords, e.g. "leaking", "pump", "broken" or "fit".
Sorry, we couldn't find any existing answers that matched.Try using some different or simpler keywords, or submit your new question by using the "Ask a Question" button above!
Morris
November 9, 2023
Display panel rapidly flashing clock all across window. Oven still functions using Express Button. Some times it will not stop, opening the door will pause but when door is shut it starts again. Cycling the circuit breaker will correct it for a brief moment.
For model number SCB1001MSS001
Hi Morris, thank you for contacting us. Based on our understanding of the issue, we would suggest checking the relay board, part number PS12725850, as it is most likely faulty and may need to be replaced. We hope this solves your problem!
1 person found this helpful.
Was this helpful?
Thank you for voting!
Related Parts:
RELAY BOARD


$94.27
In Stock
Chad
February 9, 2023
Sensor reheat plate of food works for about 30 sec., then shuts off.
For model number SCB1001MSS001
Hi Chad, thank you for reaching out. According to our research, if the microwave runs for a few seconds and then shuts off, the issue is most common with the door switch, part number PS12726000, which might be defective or loose. If that does not help, we would recommend checking the thermostat, part number PS2321365. We hope this solves your problem!
Was this helpful?
Thank you for voting!
Related Parts:
THERMOSTAT
$29.17
In Stock
DOOR SWITCH ACCESS COVER

$8.06
Special Order
- < Prev
- 1
- Next >
Common Symptoms of the SCB1001MSS001
[Viewing 4 of 4]No heat
Fixed by
these parts
these parts


Show All
Won’t turn on
Fixed by
these parts
these parts


Show All
Touchpad does not respond
Fixed by
these parts
these parts
Show All
Tray won’t turn
Fixed by
these parts
these parts


Show All
Keep searches simple. Use keywords, e.g. "leaking", "pump", "broken" or "fit".
Microwave completely stopped working
Turned out the issue was easily solved by replacing a single, inexpensive fuse.
First off, UNPLUG THE MICROWAVE.
The fuse is located under the plastic grill at the top of the microwave. It's held on by two screws. Once you've removed the screws and taken off the plastic grill, you go to the right side of the mic ... Read more rowave and remove another screw that holds a small metal grill in place. Removing the small metal grill is probably the toughest part of this repair. You kind of have to rock it back and forth a bit to get it to release. Once that's off, you can get to the fuse. I removed the burnt out one with a pair of needle nose pliers. I also put a small piece of cardboard under the fuse when I did this so I didn't accidentally drop it into the innards of the microwave. I did the same thing when I replaced the new fuse. I then plugged the appliance back in and made sure it worked. Once that was confirmed, I replaced both grills.
Read less
Parts Used:
-
Kim from Cliffside Park, NJ
-
Difficulty Level:Really Easy
-
Total Repair Time:15 - 30 mins
-
Tools:Screw drivers
953 of 1228 people
found this instruction helpful.
Was this instruction helpful to you?
Thank you for voting!
Halogen bulb beneath microwave lighting the stovetop burned out after 9 mo.
Unscrewed the light cover beneath the microwave with a phillips head screwdriver. The bulb is very tiny and has 2 straight parallel prongs that slide into 2 small holes. Grab bulb from both sides with each hand firmly and slide STRAIGHT out (no twisting or pushing). Don't worry about breaking even though it may take a fair amount of pr
... Read more
essure to pull out. New bulb arrived within a couple of days. Due to high shipping cost, suggest buying 2 or more bulbs at once. Bulb is often used as a kitchen night light so that is probably why I only got 9 months out of it.
Read less
Parts Used:
-
Edward from Averill Park, NY
-
Difficulty Level:Easy
-
Total Repair Time:Less than 15 mins
-
Tools:Screw drivers
40 of 51 people
found this instruction helpful.
Was this instruction helpful to you?
Thank you for voting!
No power to microwave, no heating.
Unpluged power cord!! Removed front control panel to expose electronics (need to remove top horizontal vent cover to expose mounting hardware). Unplugged leads to control panel board. Removed magnetron with Tstat (3- phillip heads, need stubby). Installed new parts and control panel, plugged it in tested. Done.
Parts Used:
-
Michael from Coulterville, CA
-
Difficulty Level:A Bit Difficult
-
Total Repair Time:30 - 60 mins
-
Tools:Screw drivers
47 of 79 people
found this instruction helpful.
Was this instruction helpful to you?
Thank you for voting!