


Models
>
S136-C
S136-C Jenn-Air Range - Overview
Sections of the S136-C
[Viewing 9 of 9]

 Diagram and Parts List for Jenn-Air Range")


Keep searches simple, eg. "belt" or "pump".

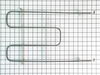
Light Bulb - 40W
PartSelect #: PS884734
Manufacturer #: 8009
This an authentic OEM 40-Watt replacement light bulb, used in a number of household appliances. It is specially designed to withstand extreme temperatures, which is why these replacement bulbs are mos...
$11.73
In Stock

Grease Filter
PartSelect #: PS11743870
Manufacturer #: WP71002111
This filter is made of metal and is intended for use with ranges and cooktops. Grease filters are an important but often neglected part of ranges. If the filter is full, your extractor fan will become...
$30.69
In Stock

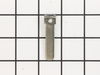
Screw, 8/18 x 3/8
PartSelect #: PS11746840
Manufacturer #: WP90767
This screw is sold individually.
$5.42
In Stock

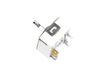
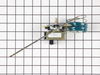
Surface Burner Switch - 240V
PartSelect #: PS12347301
Manufacturer #: W11120791
This surface burner switch, also known as an infinite switch, controls and regulates the heat output of the burners on a stovetop. The user simply adjusts the knob on the user interface panel, which i...
$90.92
In Stock

Door Hinge
PartSelect #: PS11744215
Manufacturer #: WP74008014
The hinges control the rate that the oven door opens and closes, and allows the door to stay open at an angle. This hinge can be used on either the left or right hand side of your oven, and is approxi...
$98.27
In Stock

Screw
PartSelect #: PS12349731
Manufacturer #: W11233072
This is a multi-use and multi-appliance screw. It can be used on a microwave, refrigerator, range/oven, air conditioner, dehumidifier, washer, or dryer. The measurements of this screw are 8 x 1/2 inch...
$20.79
In Stock

Screw
PartSelect #: PS11738704
Manufacturer #: WP179051
Sold individually. Lock washers are used with screws when vibration from an appliance may cause the screw to loosen. Lock washers are also used in the electrical components of an appliance to ensure ...
$8.04
Special Order

Toggle Switch - With Push Nuts
PartSelect #: PS2005745
Manufacturer #: 12200039
This toggle switch is also known as a fan switch. It has three positions: low, off, and high. This switch allows you to select the speed for the fan.
No Longer Available

2 Piece Broiler Pan
PartSelect #: PS971245
Manufacturer #: 4396923
This is cookware designed for use in your range or oven. It is a two-piece dish that is used to grill or cook food while the broil function is on, meaning it can withstand high temperatures. This set ...
$37.51
In Stock

Rock Grate Support
PartSelect #: PS1640535
Manufacturer #: 700819
Sold individually.
$74.28
In Stock

Cartridge Male Contact Spade
PartSelect #: PS1988157
Manufacturer #: Y708572
This cartridge assembly male contact spade is made of metal. These are sold individually, though each range uses four contact spades.
$13.95
In Stock

Oven Rack
PartSelect #: PS2201584
Manufacturer #: Y704660
This is an oven rack for various models of ranges and ovens and is sold individually. This oven rack allows you to lay different kitchen items on it to cook or bake within your range, and over time th...
No Longer Available
Questions And Answers for S136-C
We're sorry, but our Q&A experts are temporarily unavailable.
Please check back later if you still haven't found the answer you need.
Sort by:
- < Prev
- 1
- Next >
Search filter:
Clear Filter
Your search term must have 3 or more characters.
Keep searches simple. Use keywords, e.g. "leaking", "pump", "broken" or "fit".
Sorry, we couldn't find any existing answers that matched.Try using some different or simpler keywords, or submit your new question by using the "Ask a Question" button above!
Ralph
December 30, 2019
Can I get a replacement for the grey oven control knob located to the left of the digital clock?
For model number S136-C
Hi Ralph, sadly the requested part is discontinued, however you can contact the manufacturer to see if they have a suggested replacement. If they can provide you with a part number feel free to contact us back to see if we have the part in stock. Thank you for your question and good luck with your repair!
Was this helpful?
Thank you for voting!
Bill
January 30, 2020
Are there any parts available for the top burners
For model number S136-C
Hi Bill. Yes please look under the "Top Assembly" Diagram. Thank you for your question and good luck with your repair.
Was this helpful?
Thank you for voting!
Heather
March 2, 2022
My oven did not turn off with the oven knob i had to you the main knob to turn the oven off what would be the problem here?
For model number S136-C
Hi Heather,
Thank you for your question. If the oven was not shutting off, the issue may be with the oven control thermostat. The oven control thermostat controls the bake and broil elements. It is a temperature-controlled switch and as such will have contacts that supplies power to these elements. To verify if the oven control thermostat is working, you will need to test it for continuity with a multimeter. Set your multimeter to the Rx1 setting and touch the terminals with the probes. You should receive a reading between 1000 and 1100 ohms. If you get anything outside these readings, you will need a replacement oven control thermostat. If you have any questions, please let us know. We are open 7 days a week. We look forward to hearing from you!
Was this helpful?
Thank you for voting!
- < Prev
- 1
- Next >
Common Symptoms of the S136-C
[Viewing 8 of 8]Element will not heat
Fixed by
these parts
these parts

Show All
Door won’t close
Fixed by
these parts
these parts

Show All
Will Not Start
Fixed by
these parts
these parts


Show All
Little to no heat when broiling
Fixed by
these parts
these parts
Show All
Little to no heat when baking
Fixed by
these parts
these parts


Show All
Oven not heating evenly
Fixed by
these parts
these parts
Show All
Touchpad does not respond
Fixed by
these parts
these parts


Show All
Oven is too hot
Fixed by
these parts
these parts
Show All


Keep searches simple. Use keywords, e.g. "leaking", "pump", "broken" or "fit".
Replace Grease Filter
Just a couple of minutes to left off the cover grid, left out the old filter and drop in the new one.
Parts Used:

-
Gene from Washington C.H., OH
-
Difficulty Level:Really Easy
-
Total Repair Time:Less than 15 mins
524 of 537 people
found this instruction helpful.
Was this instruction helpful to you?
Thank you for voting!
Blower motor died and I needed to replace it
Most of the repair was obvious as I took the blower apart before ordering the parts. Unfortunately the new motor was significantly larger than the original motor so I had to um. Adjust the position of some of the other parts to fit it in. There was a sheet metal flange that was installed on the other side of the blower from the motor whi
... Read more
ch was designed to focus the air flow into the blower. I used a hammer to ajust the angle of flange so it no longer extended as far into the blower housing.
It works just fine although its a bit louder than the old motor was.
It works just fine although its a bit louder than the old motor was.
Read less
Parts Used:


-
John from Berkley, MI
-
Difficulty Level:A Bit Difficult
-
Total Repair Time:1- 2 hours
-
Tools:Nutdriver, Pliers, Screw drivers
377 of 384 people
found this instruction helpful.
Was this instruction helpful to you?
Thank you for voting!
Burner had one temperature--hot, regardless of setting
1. Killed power and removed the regulator's knob, noted the position of the old control.
2. Took off the cover for the center vent and loosened the two screw holding the housing in place--the screws didn't have to come out completely as it is a U-shaped friction hold.
3. Unscrewed the two screws holding the old control switch in ... Read more place--lifted the housing enough to get at the old switch and carefully pulled it loose--it was a front burner so the control switch was about as far back as it could be but still wasn't that hard to get at.
4. Turned the new switch to orient the wire connectors, then, using a needle-nose pliers, removed each friction connector, one at a time, and fitted them on the new switch (note: one of the wires fitted best if it went under as opposed to around the base of the new switch).
5. Replaced the control back through the housing and screwed it in place, making sure the orientation of the control matched the way it looked originally.
6. Slide the housing back over the two screws and tightened, replace vent.
7. Replaced the knob and turned on the power.
(The above took me about twice as long to write as it did to make the repair and I write professionally but am not a professional electrician.)
Also, I bought a second control switch because, given the age of the unit, I'm sure another one will go. The second one will assure that it won't happen :-).
Read less
Parts Used:

-
James H from Oxford, NY
-
Difficulty Level:Really Easy
-
Total Repair Time:Less than 15 mins
-
Tools:Pliers, Screw drivers
105 of 119 people
found this instruction helpful.
Was this instruction helpful to you?
Thank you for voting!